Tethered photography has become one of the greatest boons to photography. Images are sent to your computer, so you don’t need to worry about running out of memory cards. You can change exposure settings from your computer. Most tethering software will let you apply your presets as the photo is imported and some tethering software will even let you “Live View” on your computer, critical for manual focus. Why use a small viewfinder or 3” screen when you can preview your image capture and review your images on a large monitor?
All you need is one of those bright orange Tether Tools cables or an Air Direct between your camera and computer and then some software to transfer images over that cable.
The two most-often-used software options are Adobe Lightroom Classic and Capture One.
Lightroom Tethering 101
Lightroom Classic is simple – perhaps too simple. You can initiate tethered capture for most Canon and Nikon cameras. There are basic camera controls – shutter speed, aperture, ISO, white balance and shutter release. The latest version enables Live View on select cameras with some focus control, which is a nice addition. The real benefit of tethering in Lightroom is that you can apply your develop settings to captured images, allowing you to see your images with your preferred “look”.
Lightroom Classic is available in Adobe’s Photography Bundle, which is available for a recurring monthly cost.
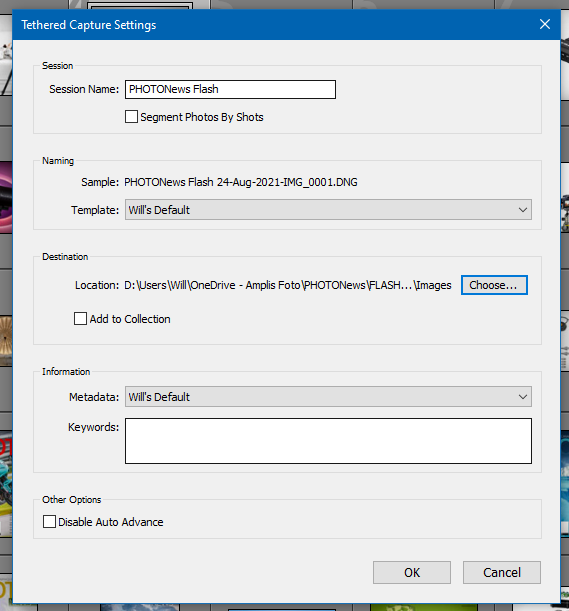
Click File -> Tethered Capture -> Start Tethered Capture. Set the Tethered Capture Settings to your preferences:
A new toolbar will pop up, showing your camera and the options available to you. The big silver button is a shutter release.

Certain cameras also support Live View – a new window that pops up when you press “Live” on the toolbar.
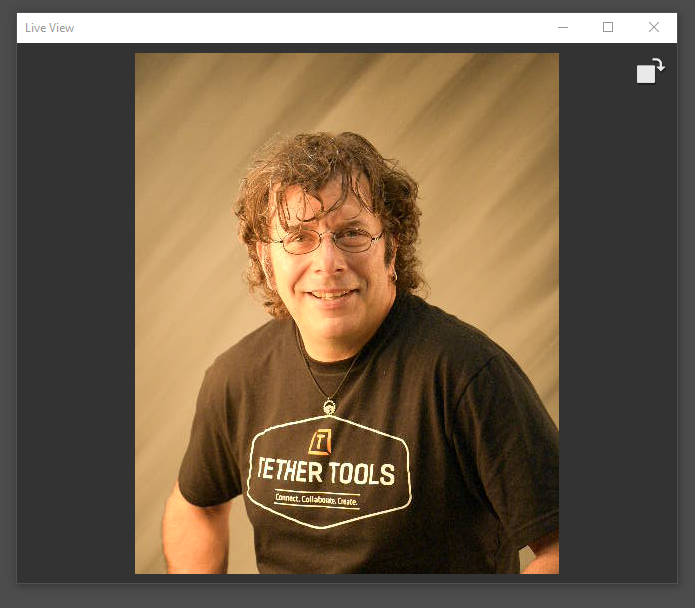
Lightroom’s Live View is, like tethering in Lightroom, pretty simple and doesn’t offer a lot of control. You can rotate the Live View Preview 90° and back – that’s it. However, there is a small change to the floating capture toolbar – Focus controls, including an AF button for instant auto focus:

A quick note on the images here – the Live View captures show my warm model lamps whilst the captured images are white balanced to my broncolor strobes. You can’t preview your settings in Live View.
Adobe has focused more on allowing you to share finished images by applying your presets than to control over how you capture images.
Capture One Tethering 101
Capture One is far more advanced. It quickly became the choice of most professionals. Click the Camera button to bring up the Camera Capture panel.
Capture One supports almost every digital camera. You have control over practically every menu option and control on your camera, including Live View with the ability to Zoom in to fine tune focus. Click the video camera icon to initiate Live View. Windows users can use the scroll wheel on their mouse to zoom in and out!
Capture One can apply your styles and presets during capture, as well. There are far more options to tethered capture in Capture One than we can talk about here – that will be a future article.
For all the capabilities, Capture One comes with a premium price tag, either monthly or purchased outright.
Note about Live View tethering in Capture One – you can change your white balance and it will change in the preview. This doesn’t help if your strobe and model lamps are different temperatures. Always set your white balance to your final light source, which should be your strobes, not your model lights.
Smart Shooter 4 and Smart Shooter 4 PRO
What are you to do if you prefer Lightroom to Capture One and you’re a Sony shooter? What if you don’t like monthly subscriptions or can’t justify a large up-front price tag for your software? The company that brought us those awesome orange cables now offers a solution that will help – Smart Shooter 4!
Smart Shooter 4 can work as a standalone software package or as a powerful add-on to Lightroom. For Sony users, Smart Shooter 4 Plug-In for Lightroom Classic now gives Sony photographers the ability to tether directly in Lightroom! Smart Shooter 4 supports most Sony, Canon and Nikon cameras and supercharges tethered capture into Lightroom – adding valuable and time saving features. More on Lightroom below.
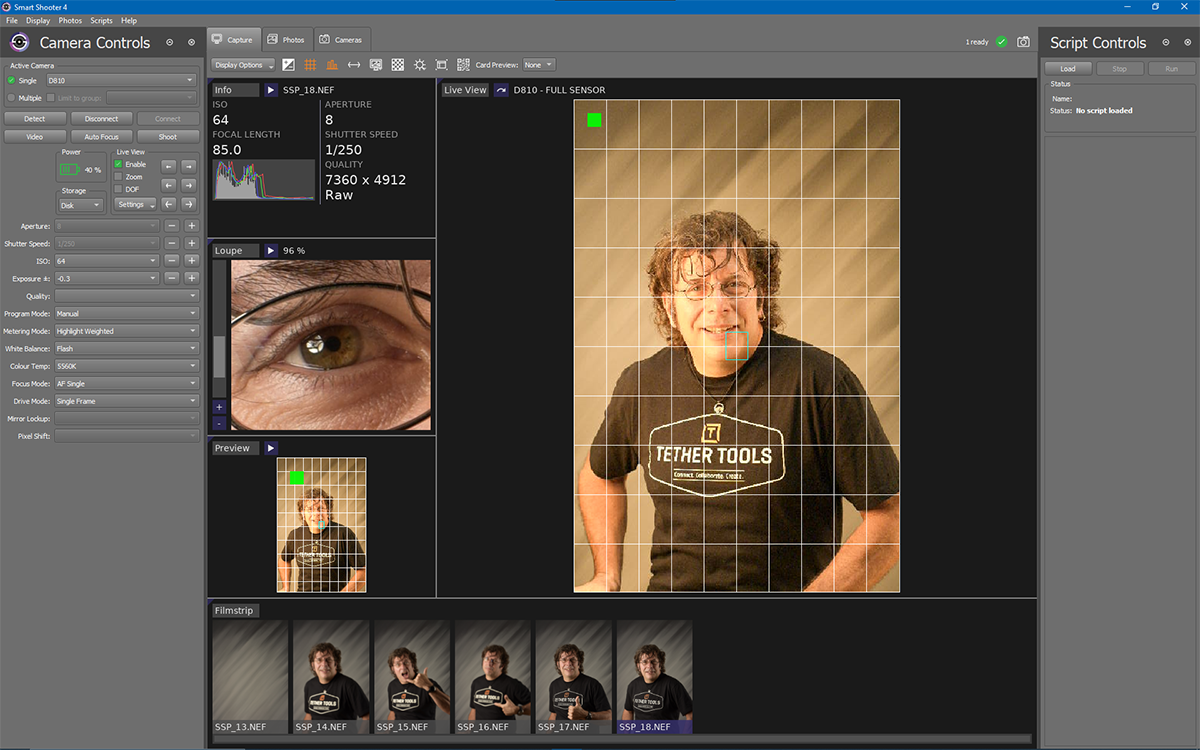
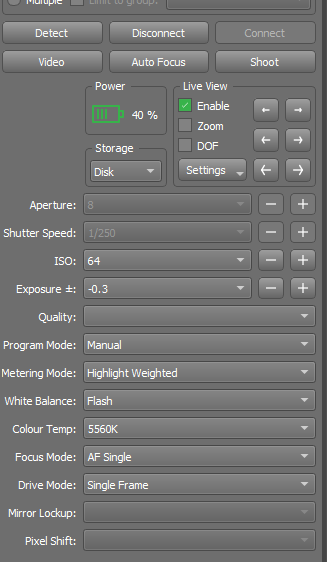
In addition to standard exposure controls, Smart Shooter 4 adds more camera controls than Lightroom without being as overwhelming as Capture One. You can record images to your computer, your memory card or both. Colour temperature, focus mode, drive mode, metering mode and image quality can all be changed from Smart Shooter, instead of having to set that on your camera beforehand.
Focus controls are another standout feature. In Live View, there’s a small square that you can drag around the screen. Drop it where you want to focus and Smart Shooter 4 focuses your camera on that point. That’s it.

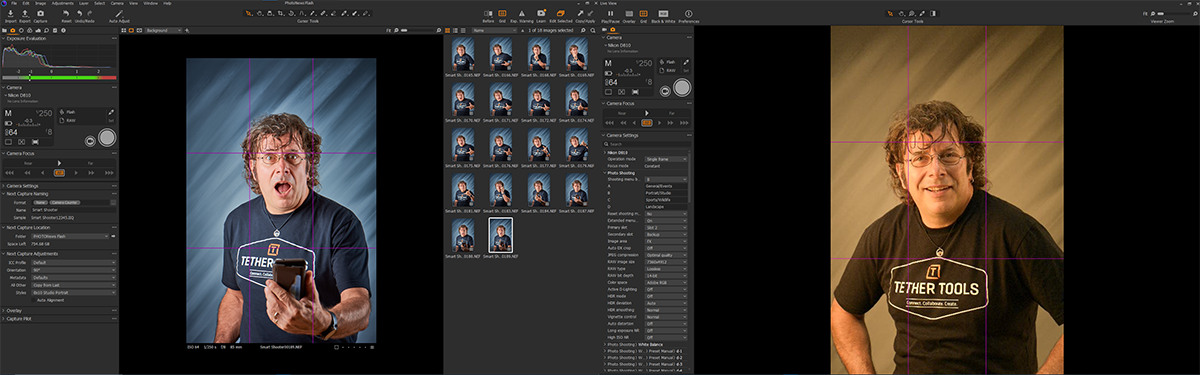
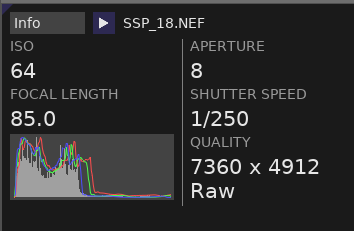
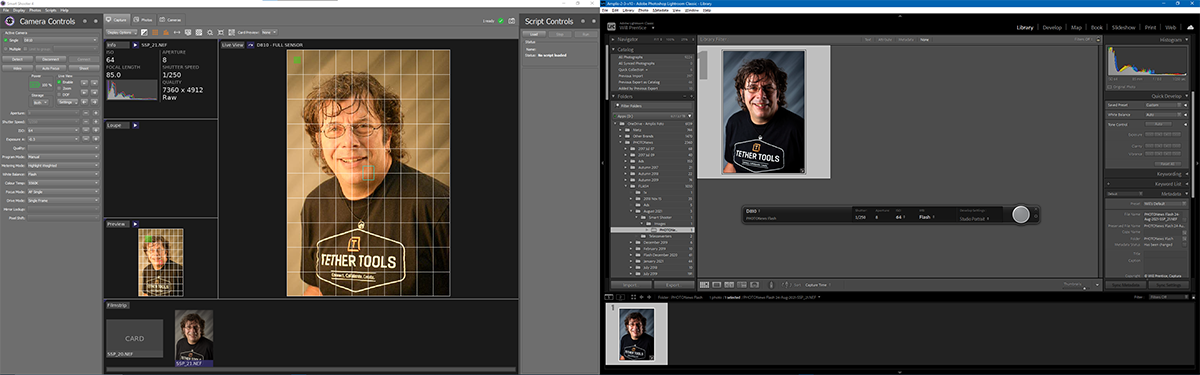
The Smart Shooter 4 interface is clean and informative – you can see Live View, camera info (with histogram), image review, a filmstrip of captured images and a loupe/magnifier view of your image.
You can even resize the “windows” in Smart Shooter display just by clicking and dragging. You can also swap “windows” by clicking the curved arrow in the large window and then clicking any arrow in the other windows. You can swap any of the windows to any position you’d like. You can also resize the windows with a click and drag. It’s easy to personalize the software to your shooting style and needs.

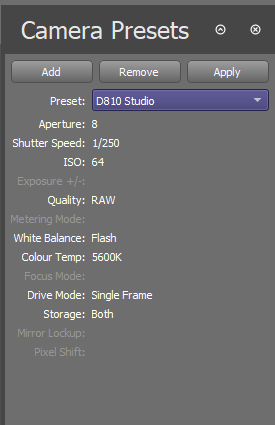
A couple of my favourite features are Camera Presets and Script Controls.
Camera presets are handy for studio and timelapse photographers. Create a preset with your preferred exposure settings, file quality, white balance and more and save it for the future. It’s similar to your “U1, U2” user settings on camera but easier to access. You can save multiple presets and name them for faster recall, such as “Studio Portrait”, “Product Macro”, “Night Timelapse”, etc.
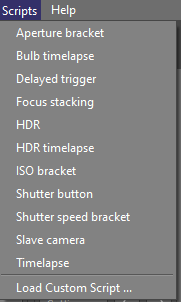
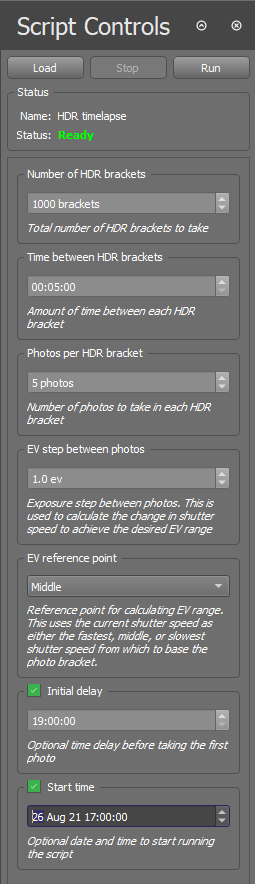
There are also integrated scripts to make your workflow easier, including ones for bracketing, timelapse, HDR, focus stacking and more. These scripts give you finer control over your settings than your camera can. For instance, HDR Timelapse lets you pick how many HDR bracketed shots to take, the time between bracketed sequences, how many photos per bracket, the number of EV steps between photos, which image is the EV reference image (except if using M mode) and you can set a delay for the first image and/or a literal start time. How’s that for power under your fingertips?
The PRO version lets you write your own scripts. All you need is knowledge of Python and you can write almost any script you want. Do you need a focus stacking HDR timelapse of a flower that only blooms at 2:31.05 AM? Smart Shooter 4 PRO will help you get your images and your beauty sleep.
Smart Shooter 4 PRO also adds Barcode Scanning, Multi-Camera Connectivity (up to 8 cameras) and the ability for programmers to integrate SS4PRO into their own applications via External API. This makes Smart Shooter 4 PRO the perfect companion for school and other high-volume photographers. SS4PRO also adds a powerful Lightroom Classic plug-in (more on this below).

Tethering to Lightroom
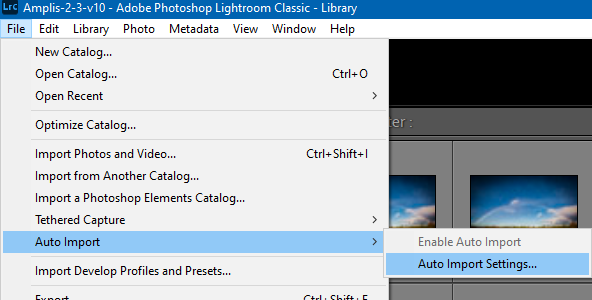
Lightroom Classic has an “Auto Import” function which will “watch” a folder and import your images into your preferred catalogue and more. This works with Smart Shooter 4 perfectly.
If you’re one of the growing number of Sony photographers who likes Lightroom, Smart Shooter 4 will help immensely. All your camera settings and controls can be set in Smart Shooter 4. Set your storage location to “Disk” or “Both”. Open Lightroom, go to File -> Auto Import -> Auto Import Setting and every image taken by Smart Shooter 4 will now appear in Lightroom. This process works for Sony, Nikon and Canon photographers.
In Lightroom, you can move the photos to any folder of your choice, rename the files using your Lightroom naming convention, apply develop settings, metadata and keywords and pick your Initial Preview setting. Smart Shooter 4 can run on one monitor and Lightroom on the other.
Updated Tethering in Lightroom (Sony & Nikon Only … Canon coming soon)
Smart Shooter 4 PRO recently added a Lightroom plugin for tethering Sony and Nikon cameras (with Canon support coming).
You can install the plug-in from SS4 PRO, via File à Options and then clicking on the “Lightroom” tab:
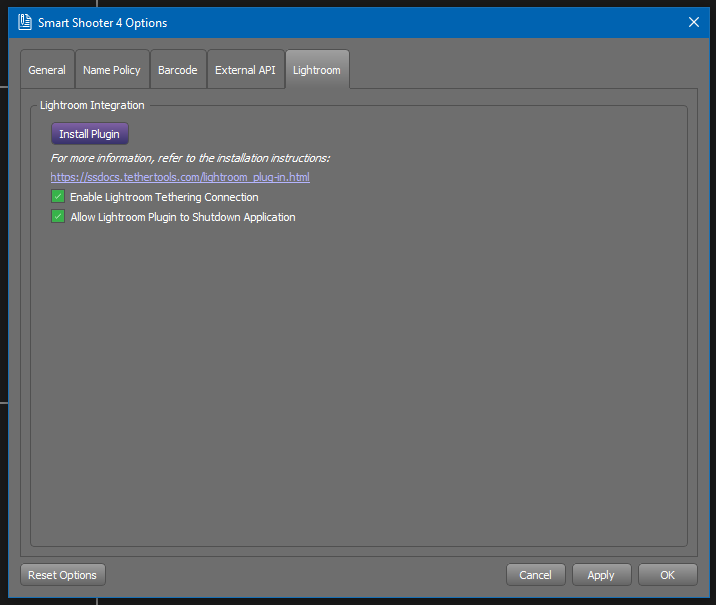
Install the Smart Shooter 4 plugin for Lightroom Classic via SS4 PRO options, then start Lightroom Classic.
In Lightroom Plug-in Manager, if you have Nikon Tether Plugin running, disable it and make sure Smart Shooter 4 plug-in is enabled.

Start Tethered capture in Lightroom and Smart Shooter 4 PRO will also launch.
You have the standard LR capture bar showing, but the “Live” button is missing:

Enable “Video” in SS4PRO if you want Live View.
Click the Shutter button in the LR Floating bar and away you go!
Images will be captured by Smart Shooter 4 PRO first – you can scan barcodes and use the advanced tethering features of Smart Shooter 4 PRO – and then automatically added to your Lightroom catalogue, where your presets are applied. Depending on your workflow, either SS4PRO or Lightroom can name your files – you decide!
This approach allows a similar workflow to Capture One, but at a reduced cost. It’s also the only way to use barcodes to track subjects plus you have the power of scripts and presets to ensure your camera is capturing exactly what you want.
I haven’t been able to test the barcode feature since everything is still shut down. It sure would save a lot of time when photographing sports leagues and schools.
Which is the best solution for you?
Many photographers already have the Adobe Photographers bundle, but that doesn’t mean that Lightroom is the best solution. It works well enough for Canon and Nikon shooters, but doesn’t help the growing number of Sony shooters. Capture One is the choice of working pros and for good reason. It’s incredibly powerful and handles colour better than any other program. In the right hands, Capture One is the ideal tool. If you’re a Sony shooter who wants to tether, a pro using bar coding, someone who can’t justify the cost of Capture One or want the monthly fees of Lightroom or C1, use an editor other than Adobe products or want to take advantage of the advanced scripting capabilities, Smart Shooter 4 and PRO should be at the top of your list. You can download a trial version at www.tethertools.ca/product/smart-shooter-4/
About the Author – Will Prentice (www.capturaphoto.ca) is a professional photographer based out of Whitby, Ontario and Brand Specialist – Lighting for Amplis.