

Flash Meter or Camera Back: How to setup your lights!
This is a companion article to the Summer 2019 issue of PHOTONews Canada magazine. The print issue focused on key points – this article offers a few more “behind the scenes” tips and information.
A common question from photographers venturing into studio photography, especially with multiple light setups, is “How do I set my lights correctly?”
There are three ways to adjust your lights – utilize your camera’s automatic mode with TTL (Through The Lens); review your histogram and “blinkies” on your camera’s rear display; or use a flash meter. This article will review all these methods, plus provide tips on when and why you should pick one mode over another.
Regular readers know that I’m a fan of using every function available to you with modern cameras and equipment. The gear available today offers far more capability and functionality than anything we had “back in the day”. The gear doesn’t make the photographer take better photos; the photographer uses the gear to make better photos.
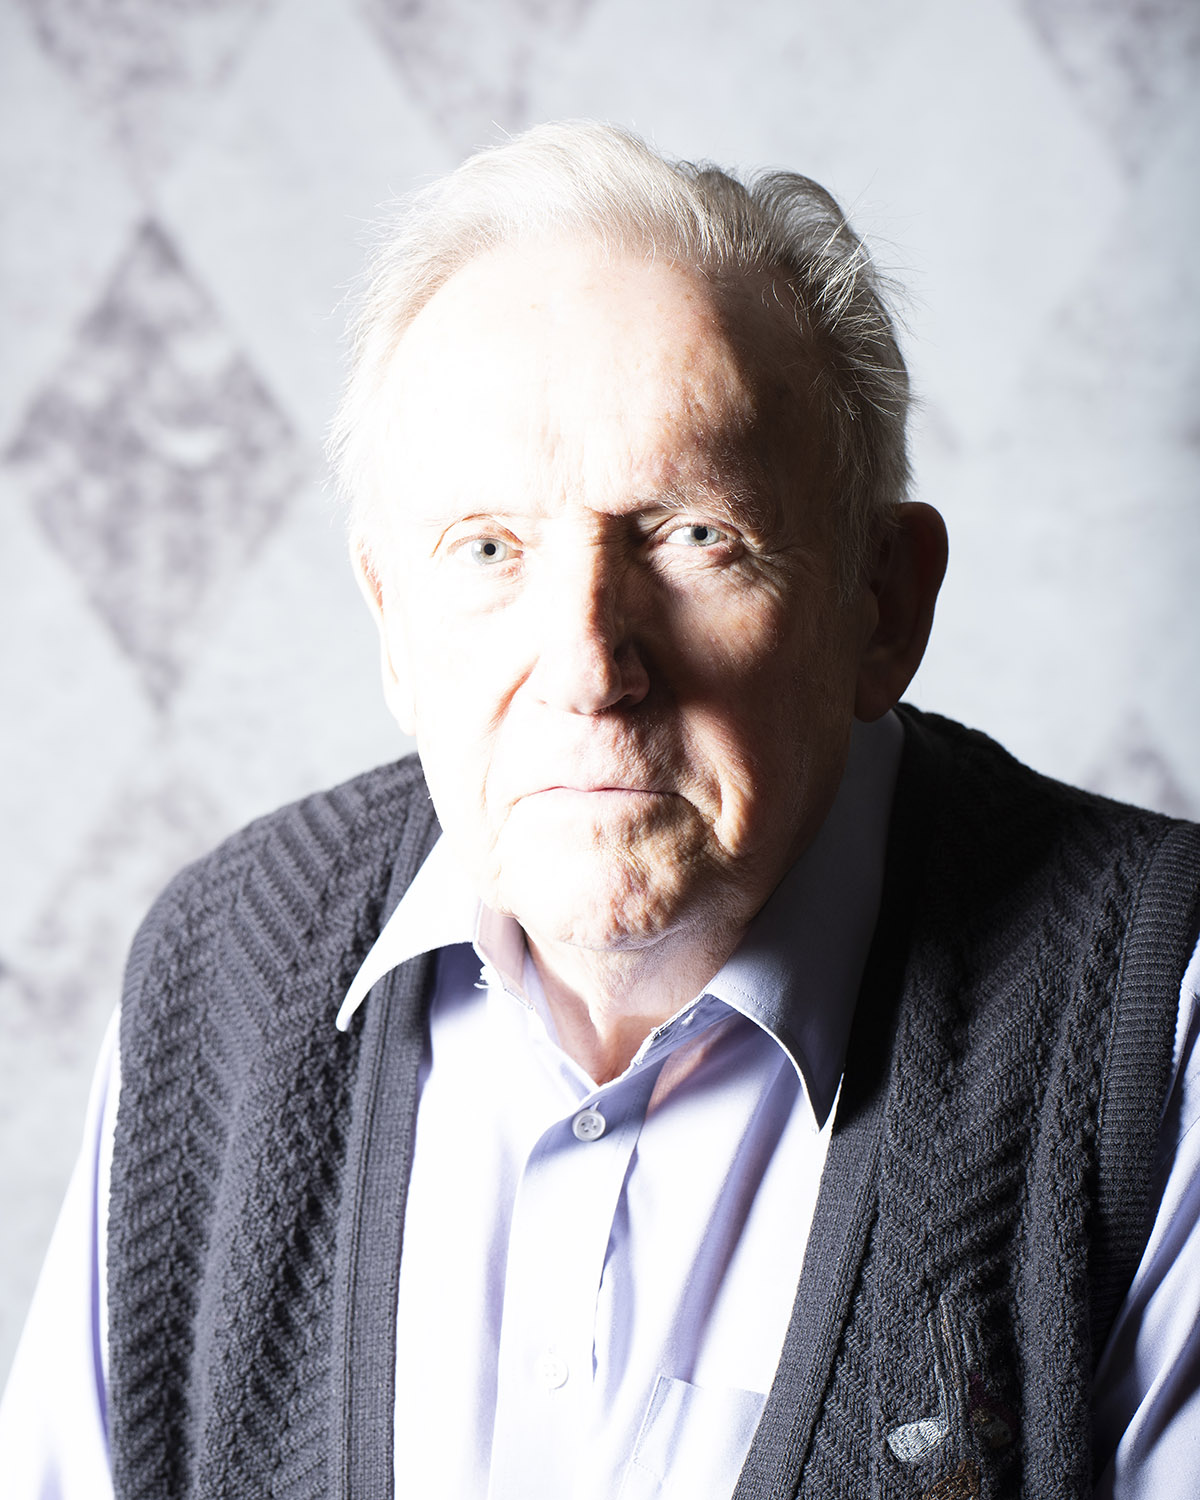
My model for this session is an accomplished portrait artist, Mike Slade, of Uxbridge, Ontario. mikesladephoto.ca
My equipment list today includes my Nikon D810 and Tamron SP 85mm f/1.8 Di VC USD mounted on a Vanguard Alta Pro 2+ 264CT tripod and Alta PH panhead.
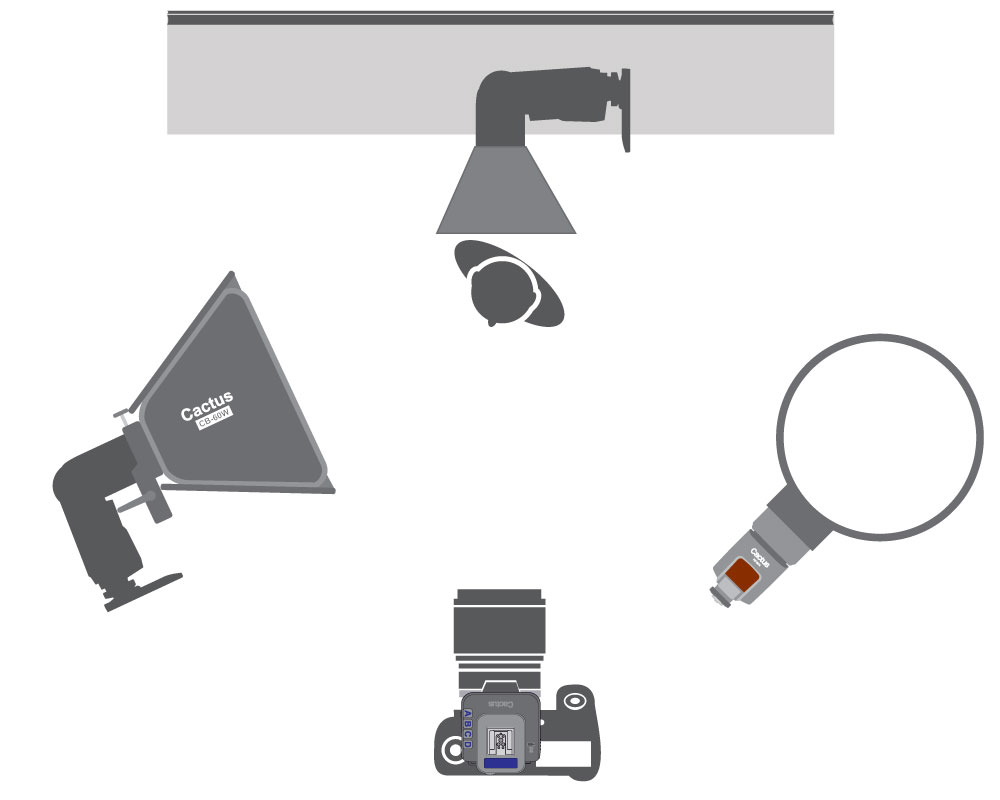
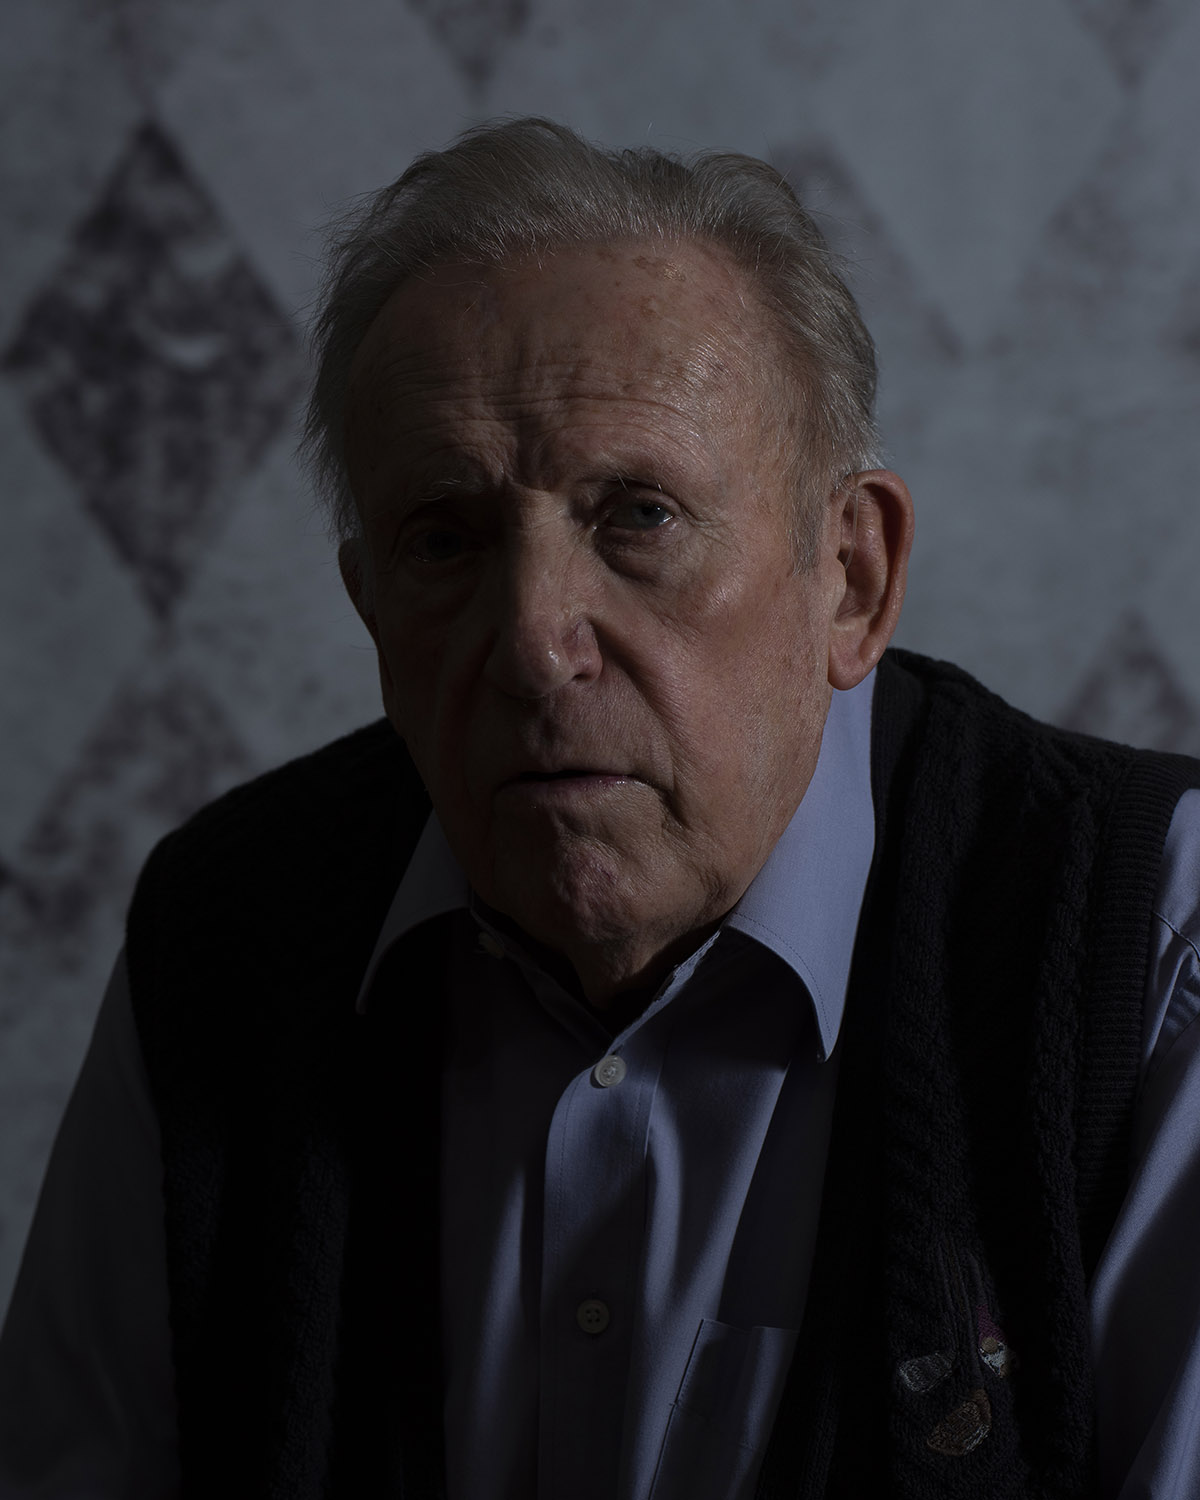
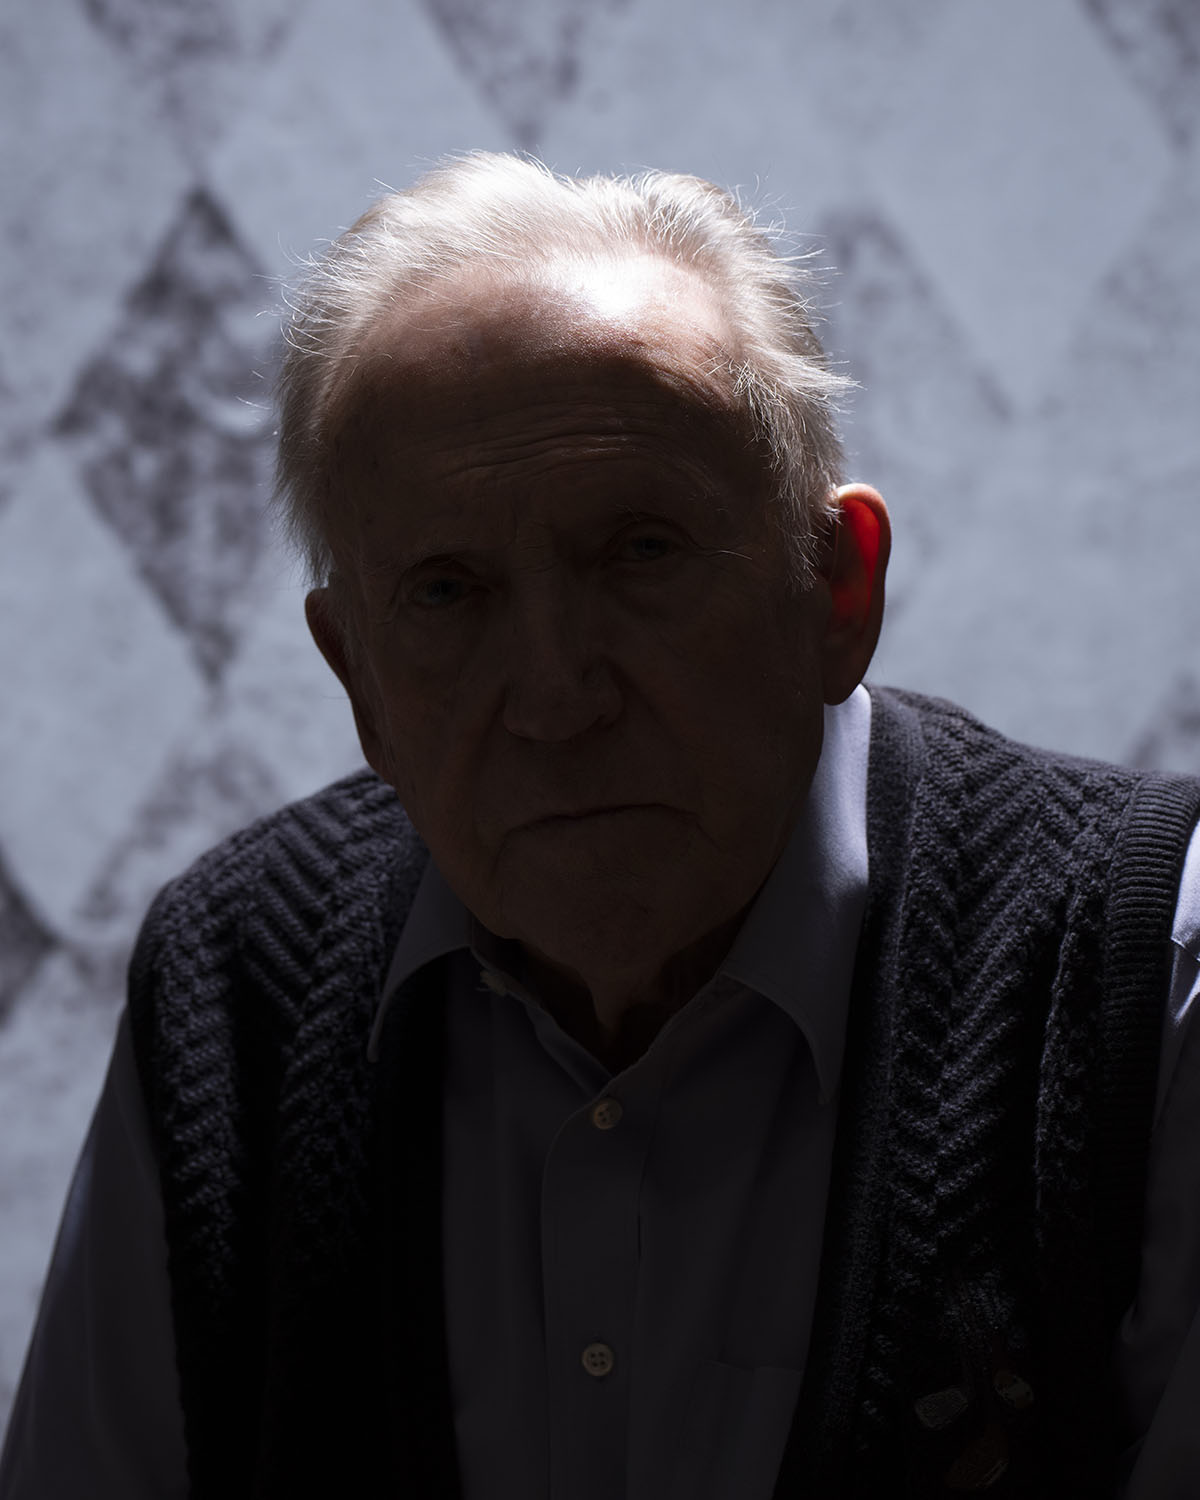
My lighting system is from Cactus – a V6II with Nikon TTL firmware on camera and three RF60X speedlights. For light modifiers, my key light is the Cactus CB-60W with grid; fill light is an Aurora Speedbounce 30 and my hair light is a LumiQuest Softbox III on a boom. My lighting pattern is Classic Rembrandt – a great challenge for metering.
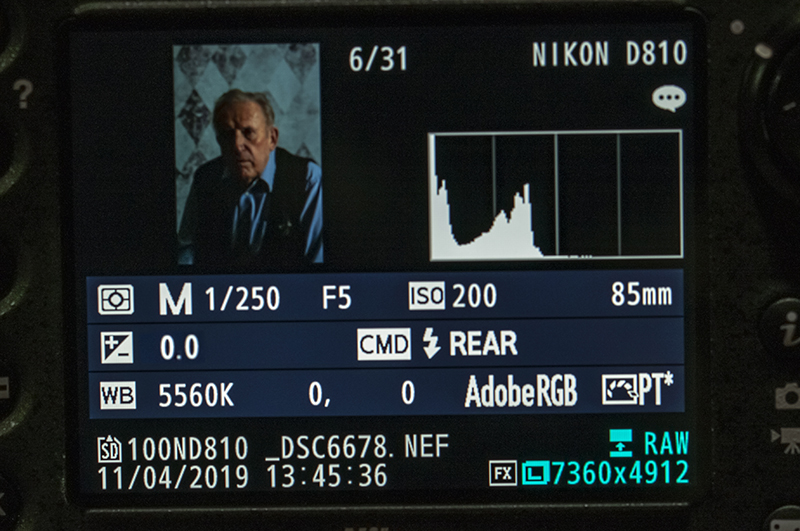
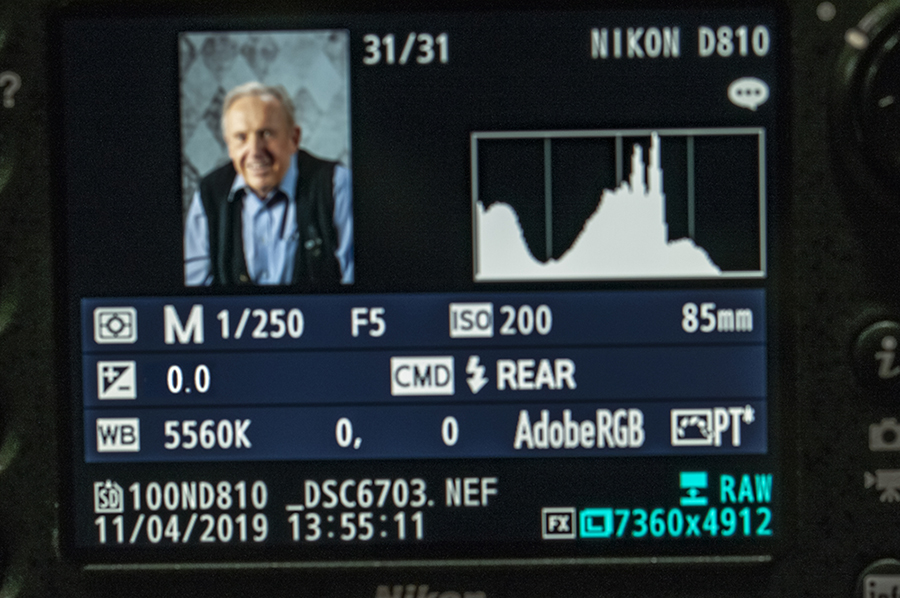
Camera settings, with the camera in Manual for consistency, were 1/250s at f/5 ISO200 – typical settings for many photographers in studio.
One thing I love about Cactus is the cross-brand TTL from V6II and the integrated radio in RF60X – it all works together seamlessly. For the first image, I set all of my lights to TTL to see how the automatic lighting worked. It’s okay, but nothing great. The main and fill are a little under and the hair light is too bright.

For the second image, I made changes to Flash Exposure Compensation on my V6II from camera: +1.0 for the main light, 0.0 for the fill and -1.0 for the hair light. The results are much better – I’ve got some light shaping and sculpting.

TTL will work in a pinch and it’s easy, but it clearly needed a couple of tweaks before it was usable. The other challenge with TTL is that it doesn’t know if I’m using a softbox or Speedbounce or there’s nothing in front of it. TTL is the camera’s best guess as to how powerful the light should be.
What if you don’t have TTL triggers? Or you want to use manual? TTL isn’t the most reliable for repeatability – the camera will determine different settings based on what it sees. If Mike had removed his sweater, TTL will meter differently. I also like consistency in my images – each exposure should look like the previous exposure.
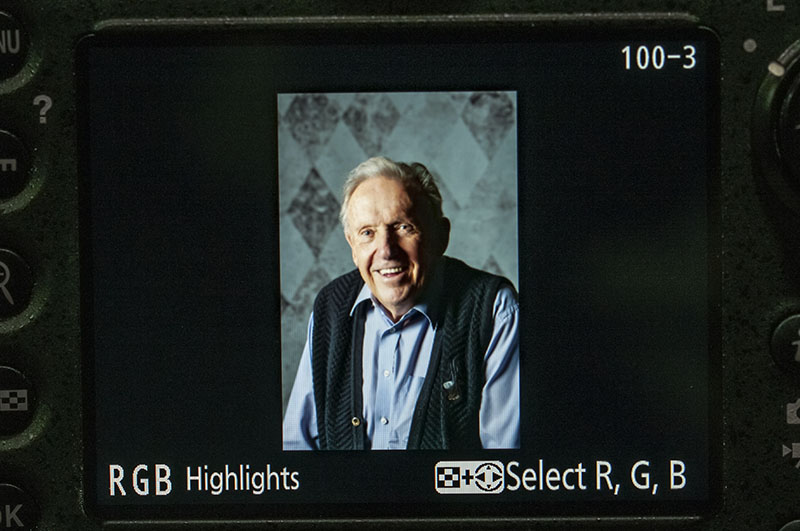
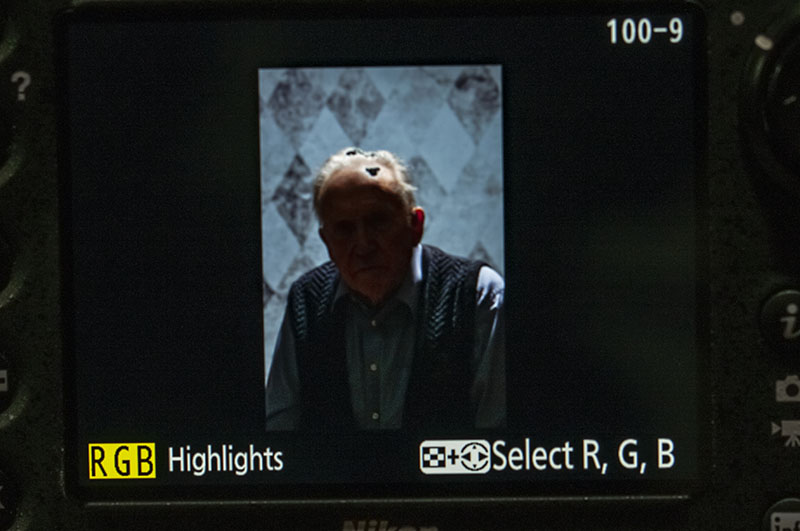
A common method used by many photographers is to read the histogram on their camera back. This is often called “chimping”. The histogram will show you spread of light throughout your image, including over- and under-exposure If your camera has “blinkies” or “over exposure warning”, this option will show you areas that are so over-exposed that there will be no colour captured at all. You can’t restore these overexposed areas in post-processing.
One of the challenges with trying to set your lights is that it’s not always easy to tell which light needs to be adjusted. I like to set each light separately and then take a combined image.

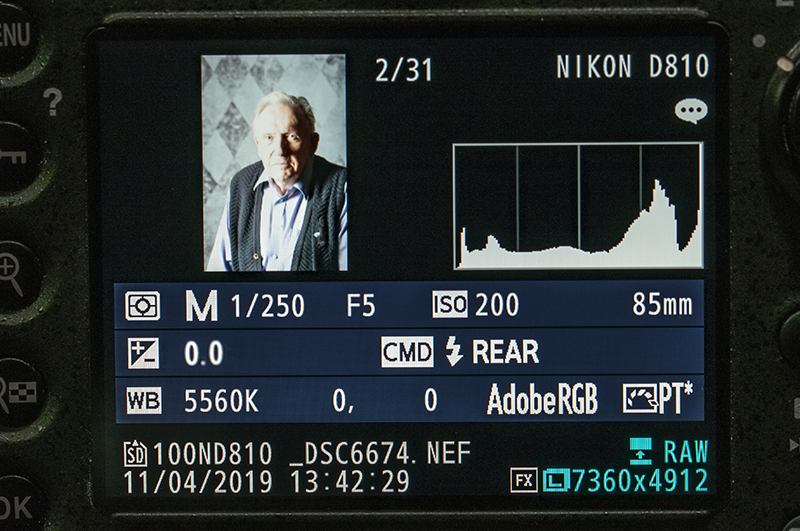
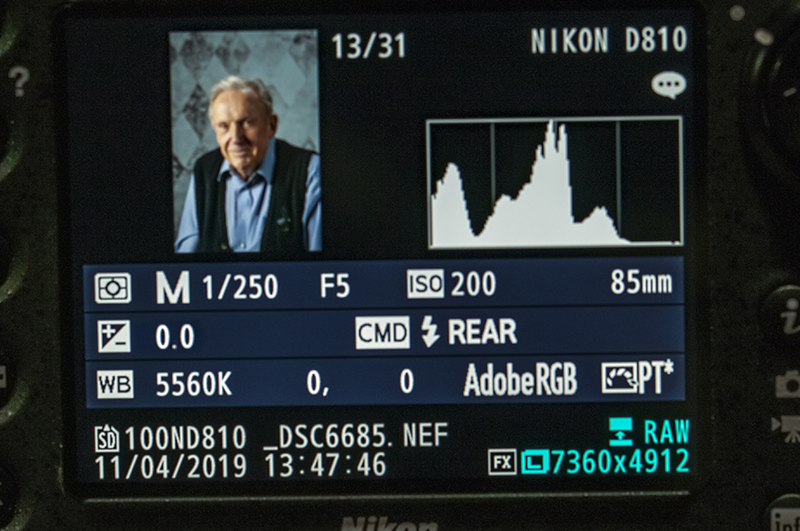
I always start by adjusting my main light. At ¼ power, Mike is over-exposed – “blinkies” are flashing and the histogram is running off the right side of the graph with a big spike.

After dropping the main light power to 1/8, the blinkies stopped, and the histogram looked pretty good. There was some clipping – or a spike – in the deep shadows.
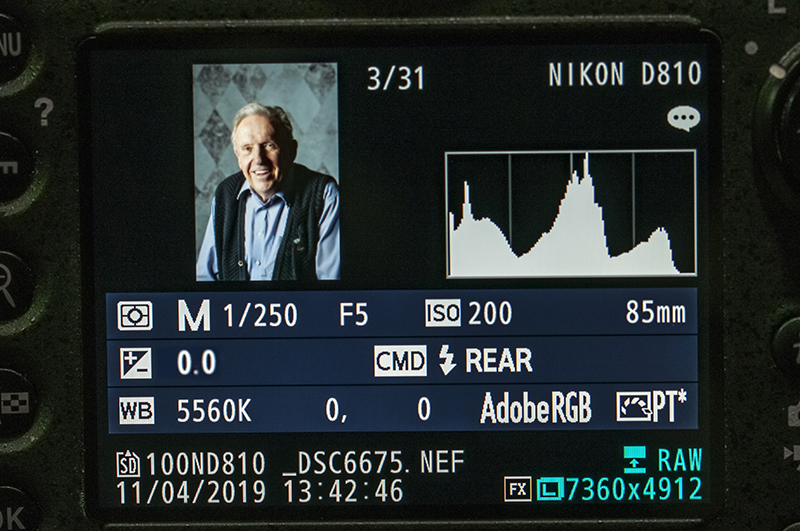
I knew that my fill light should be less powerful than my key light, so I started the fill light power at 1/8 (the fill was further away from Mike than the key light), which produced an image that looked a little bright on the histogram (too far to the right).
I dropped the power down to 1/16. The resulting histogram was mainly to the left – that’s okay as a fill light is simply intended to add a touch of light.
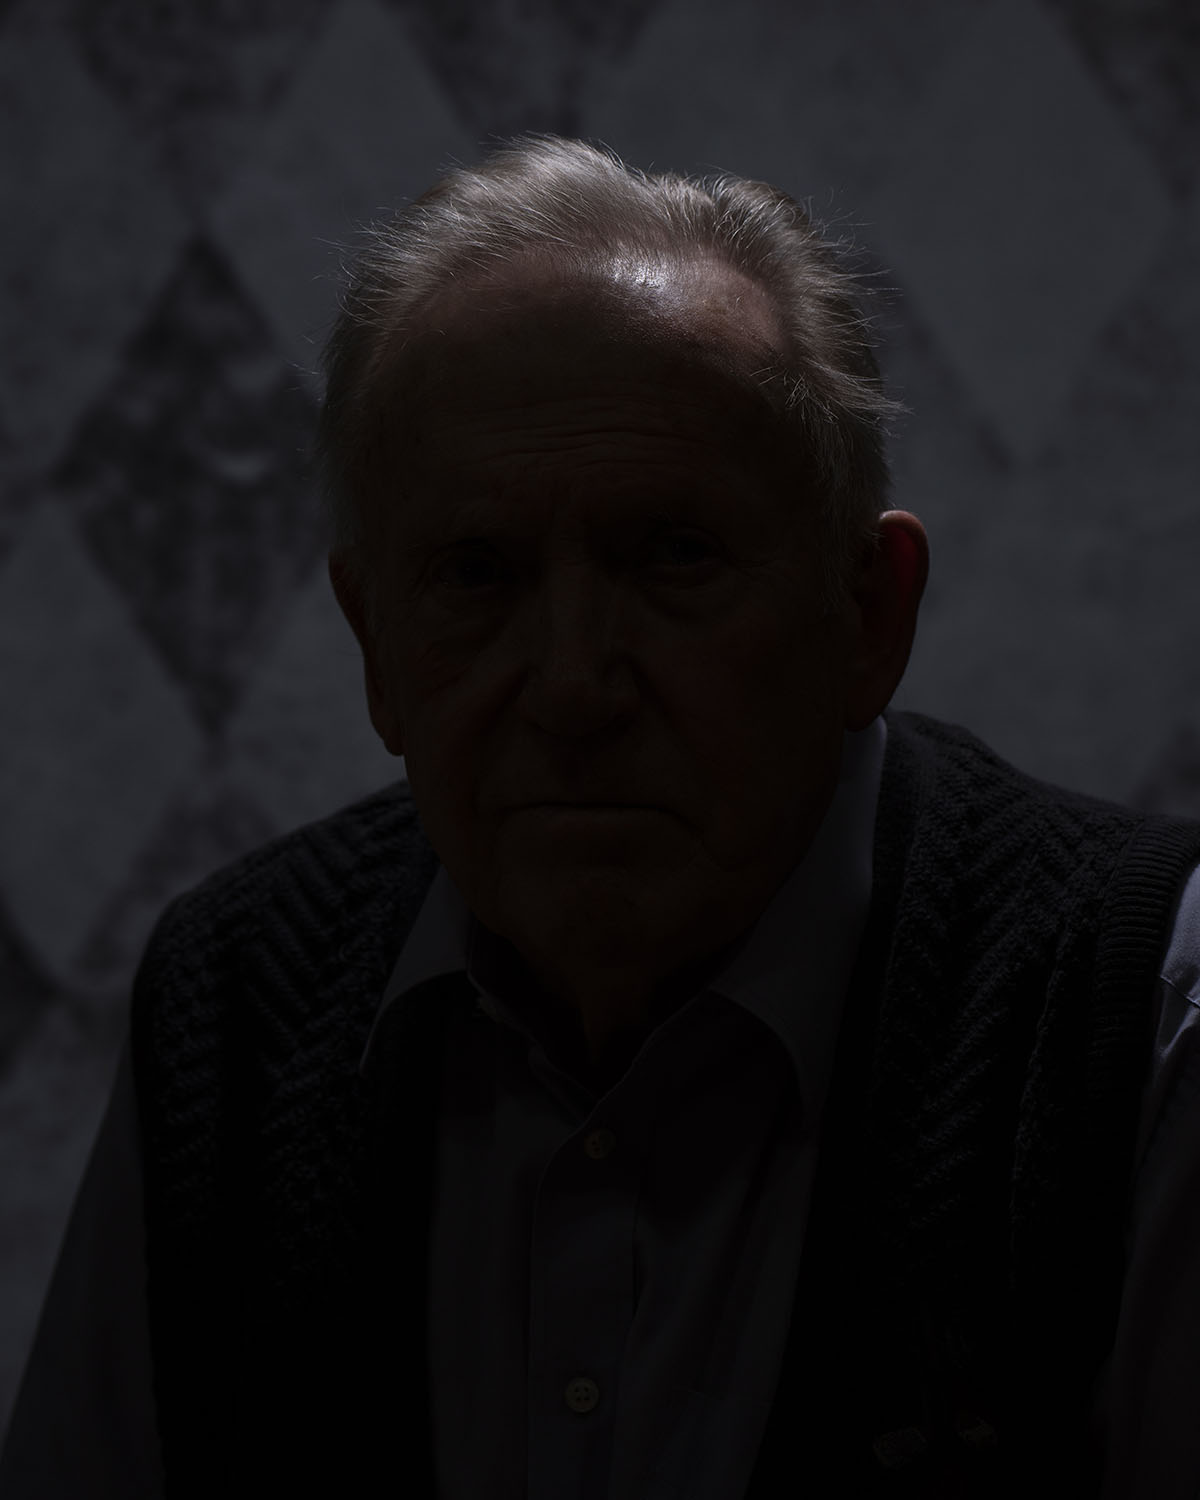
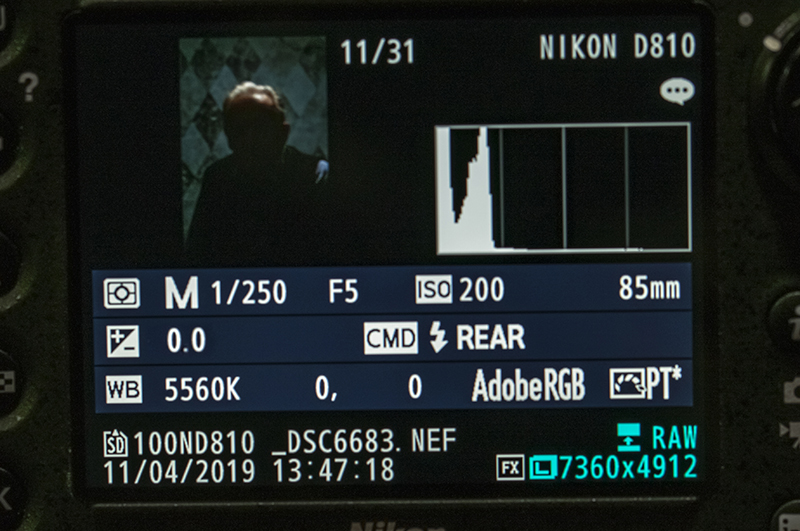
Finally, I checked the hair light. It is very important that a hair light be treated carefully. Too much light and you see the blinkies – that means you are losing detail from the hair.
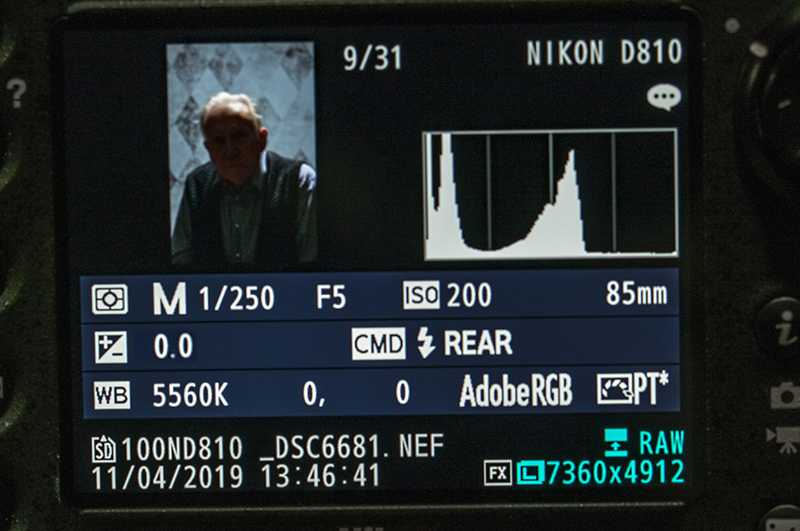
I wanted just a touch of separation between Mike and the background, so I adjusted the power output from the hair light so the histogram shifted to the far-left quarter and I made sure there were no blinkies.

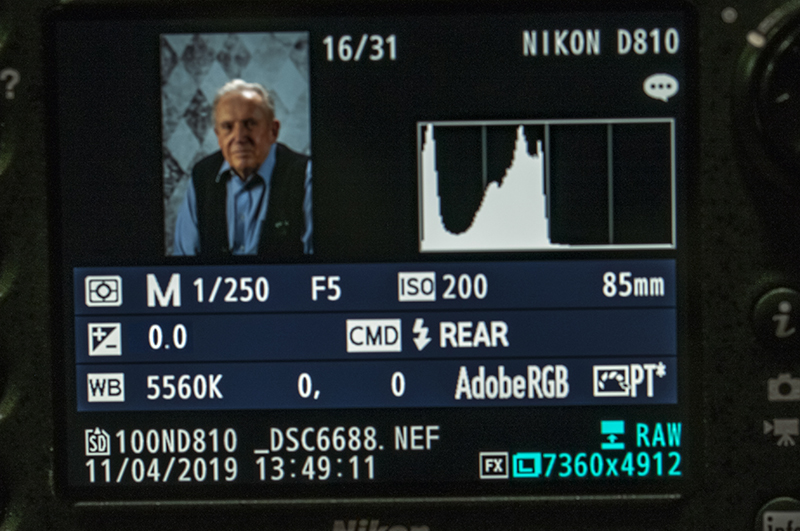
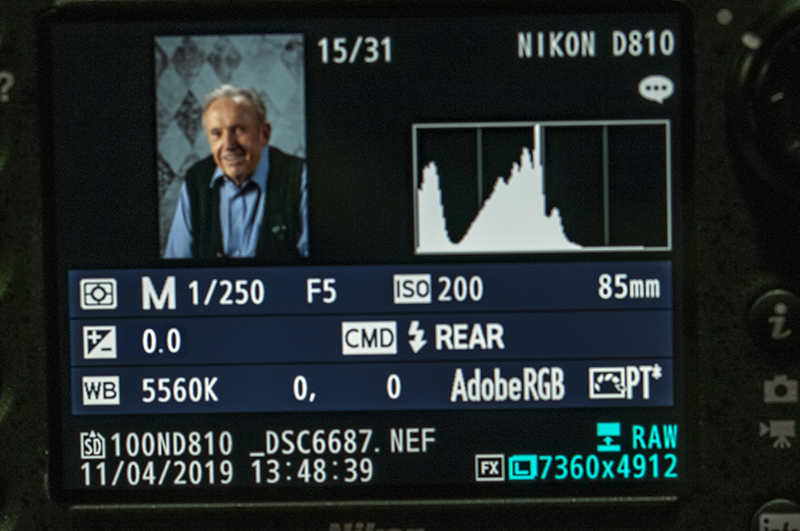
The resulting image, with all the lights enabled and after chimping each light, was a little brighter than I had with the TTL image, with a touch more contrast and slightly less effect from the hair light.

It took about 5 minutes to chimp each light – it’s not as fast as TTL but I created a nicer image. Chimping your lights also takes a fair amount of guesswork as to how much you need to adjust the power. Moreover, you need to chimp your lights with your subject in front of you.

If you have a flash meter, you can speed up the process tremendously. A flash meter gives a precise measure of how much light is falling on your subject, so you know exactly how much to adjust your lights. I’m using a Gossen Sixtomat F2 – a feature-packed and affordable flash meter.

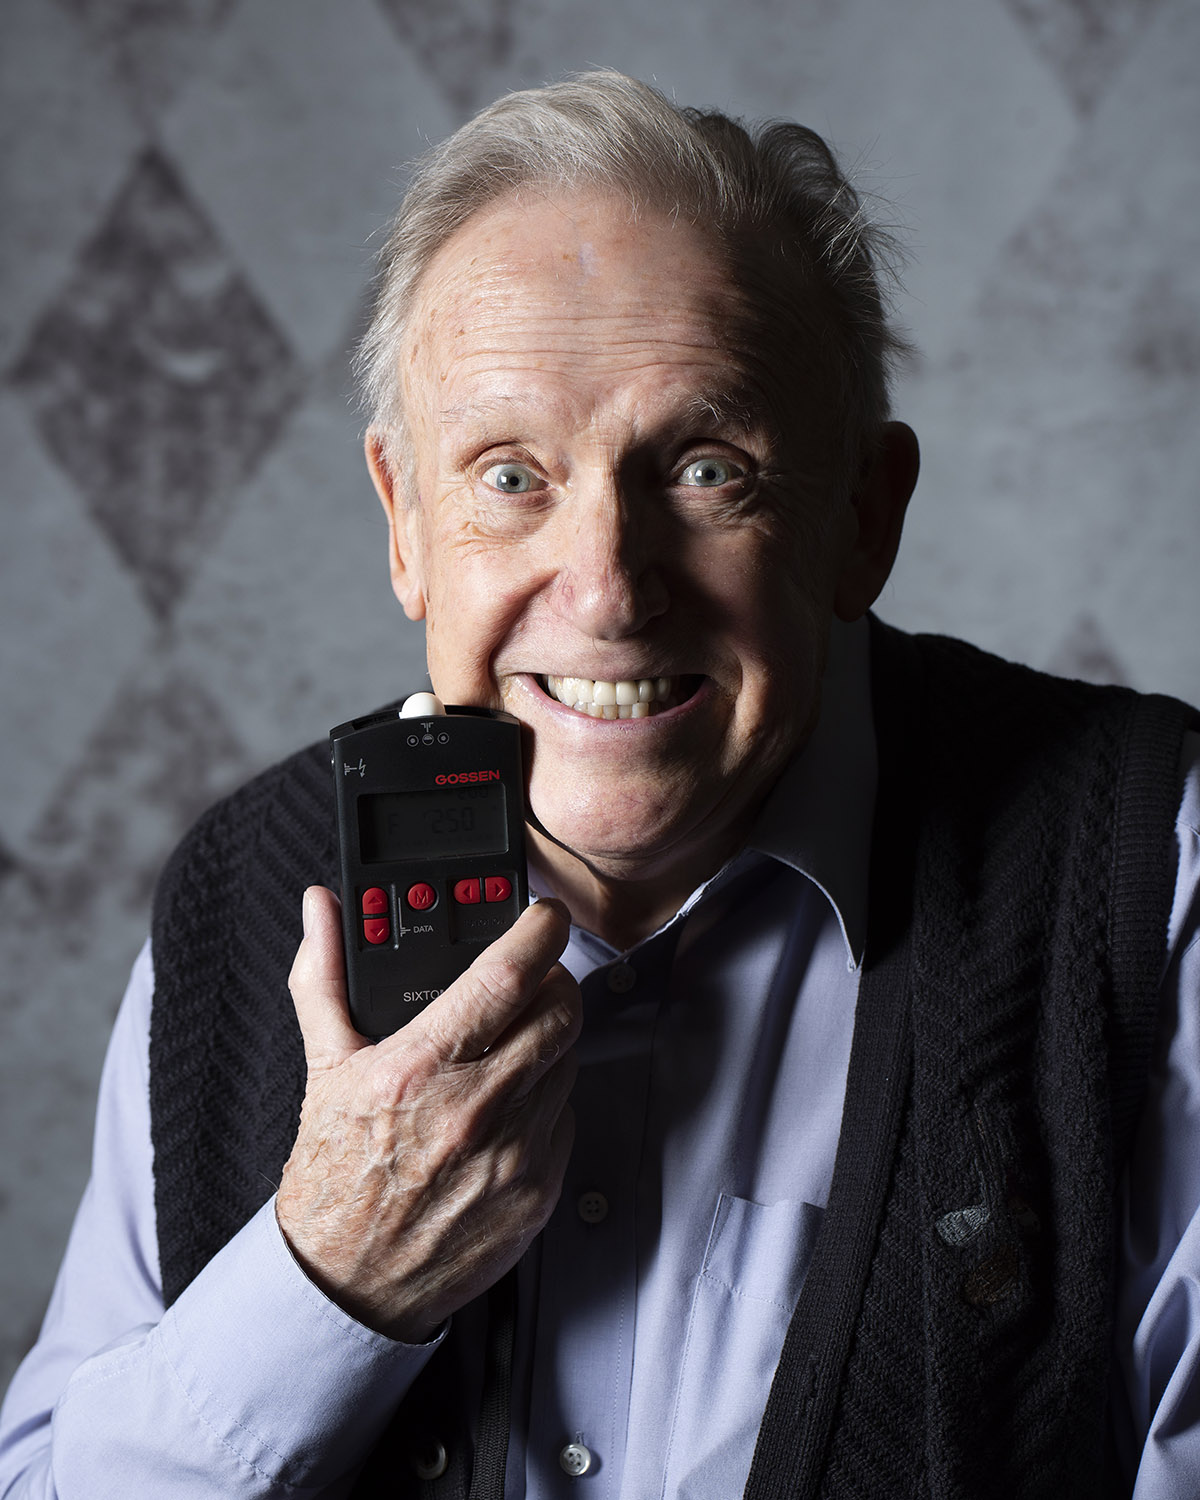
I start with my key light – I wanted it at f/5 to match my camera setting. Mike held the flash meter with the sensor pointed toward the camera and I triggered a test flash. My first reading showed I was a third stop over. I adjusted the power of the key light down 1/3 stop and took another reading. I needed a one-tenth of a stop drop and the key light was set. To set my fill light at one stop less than the key light (for a 2:1 ratio), I needed to meter for f/3.5. Then I metered the hair light at f/4, which was two-thirds of a stop less than the key light. It only took a minute to adjust the three lights and I was ready to take Mike’s portrait.

I feel the resulting image is the most pleasing. There’s a touch more fill, and a touch less key light than I had achieved by chimping, and more light than the TTL metering system thought I needed. The histogram shows a slightly wider range of tones with the flash metered exposure than it did when I used the other methods.
Of the three methods, TTL is the easiest and fastest to get started, but may require a fair amount of tweaking to get the results exactly right. Chimping is the most cost-effective, as manual strobes and speedlights are less expensive, and you don’t use a flash meter. It also takes the most time and means your subject (or an assistant) must be present to set your lights. A flash meter is the most accurate way to set your lights, it is almost as fast as TTL, your setup will be consistent throughout the photo shoot, and in most cases, the lighting effects will be more accurate.
For a situation like this, using a flash meter is faster and more accurate than chimping when setting your lights. From the meter reading, I knew within 1/10 of a stop how much to adjust my flash power.
The other advantage to using a flash meter is that you don’t need your subject present for setup – you aren’t wasting their time while you adjust your equipment. This is very important, especially if your subject has a tight schedule. You can meter your own lights and be ready to photograph right away. The only adjustments you may require are to decrease or increase the hair light, depending on how light or dark the subject’s hair (or if they are lacking hair).
Stay tuned for the next issue, where I’ll share my tips and tricks for Perfect Lighting for Imperfect People.
About the Author – Will Prentice (www.capturaphoto.ca) is a professional photographer based out of Whitby, Ontario and Brand Specialist – Lighting for Amplis.


