


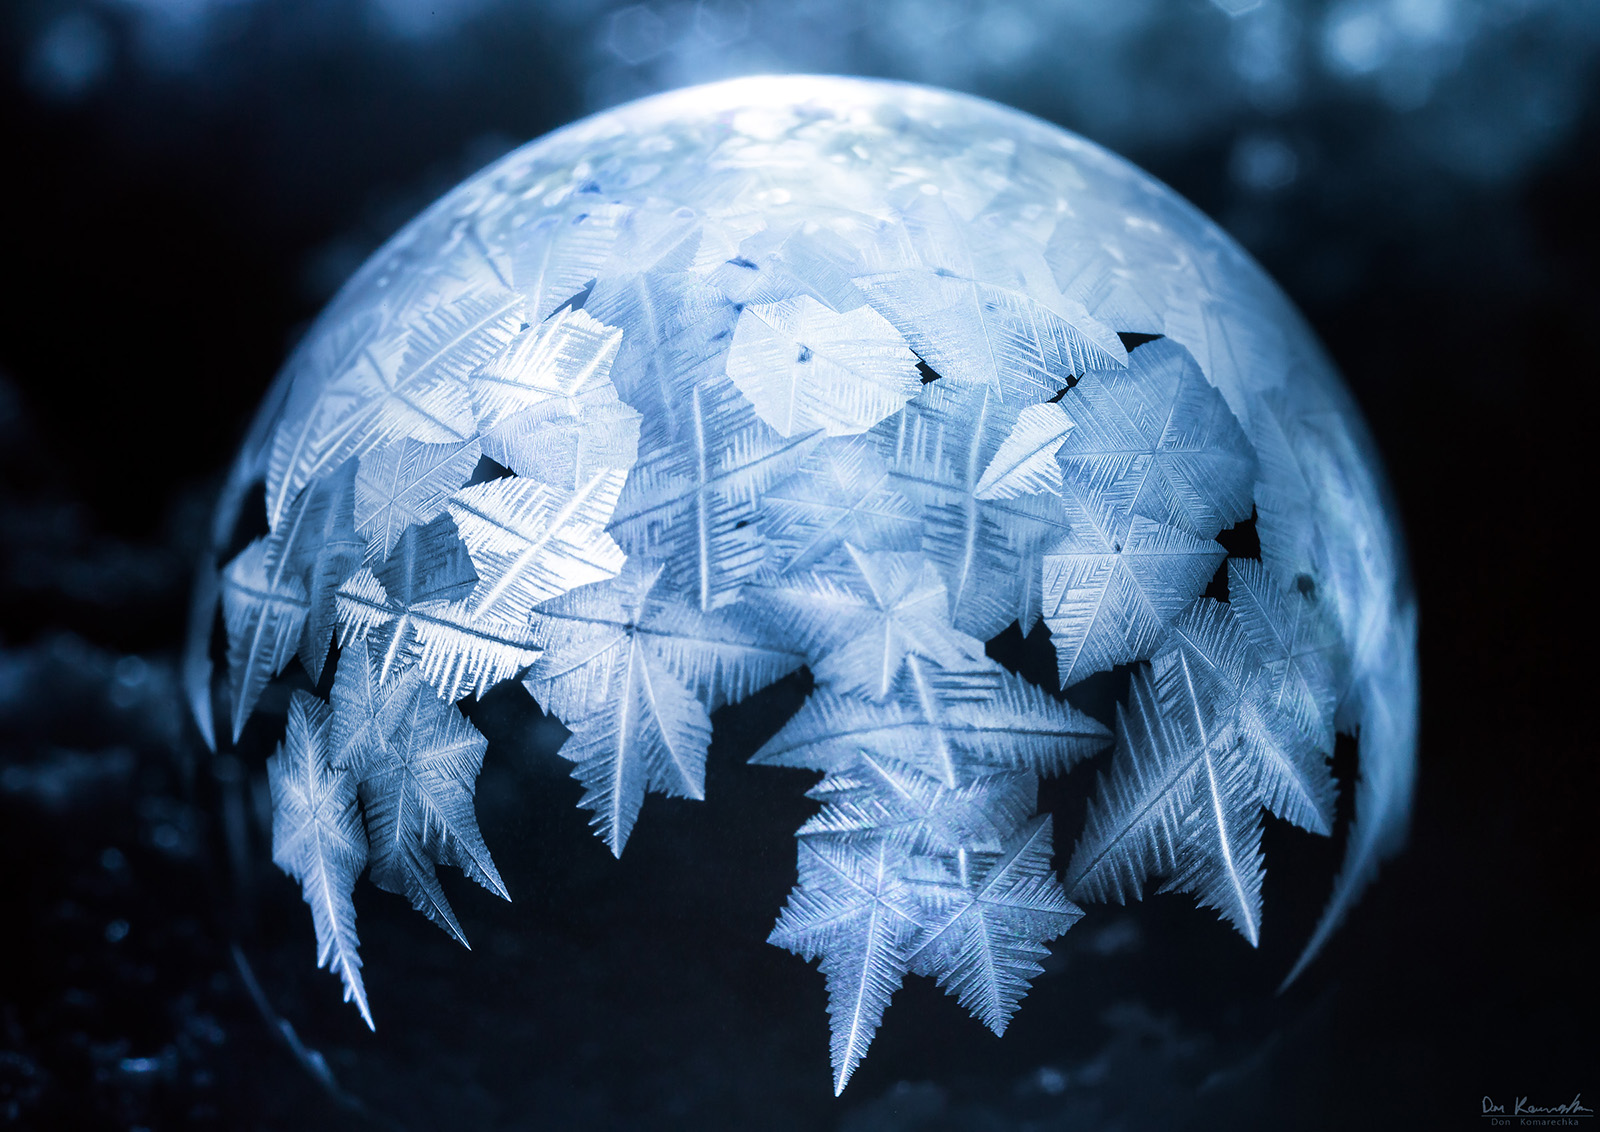
Some subjects are perfectly suited to this focusing concept, including freezing soap bubbles. With the temperature dropping, it’s a fantastic subject to explore on the coldest days of the winter season. The concept is simple: blow a soap bubble in the freezing winter air, and photograph the resulting crystals that form in a sphere. You’ll need to consider a few elements:
- Temperature range: -6 to -20C.
- Extremely calm air.
- Preferably backlit with a bright LED flashlight.
- A “special recipe” bubble solution.
- A drinking straw for blowing the bubbles.
The bubble solution isn’t that complicated:
- 6 parts water
- 2 parts dish soap
- 1 part white corn syrup / glucose syrup.
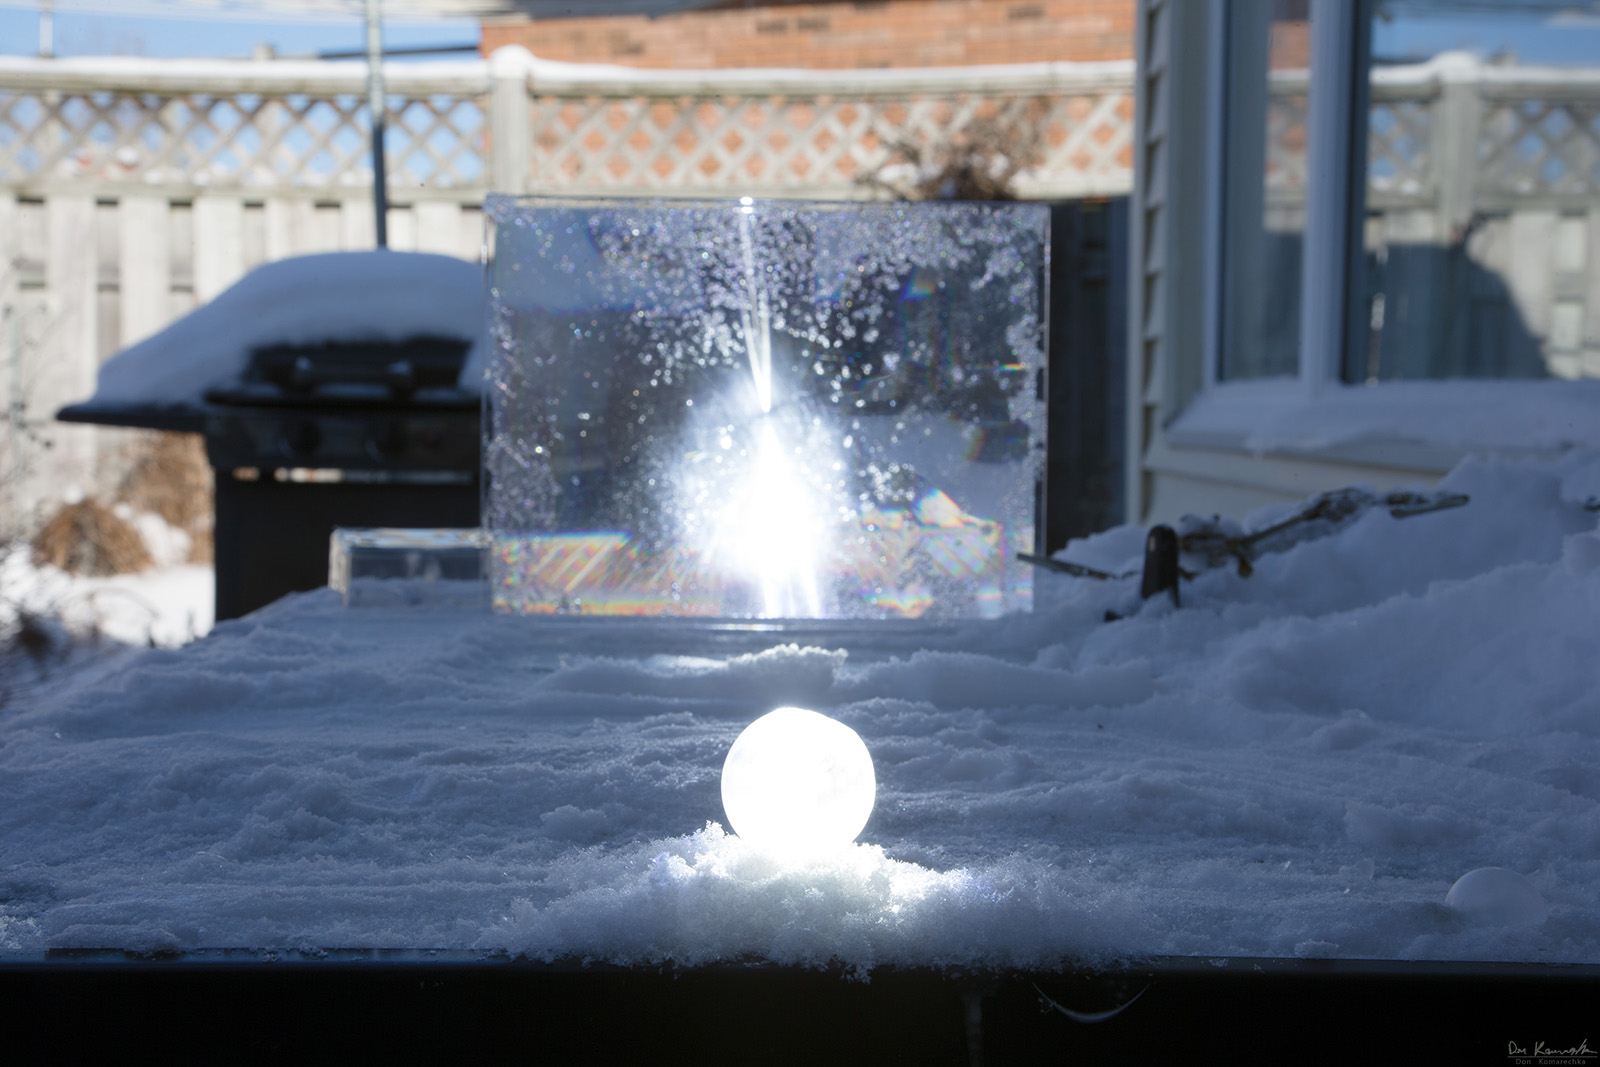
The white corn syrup is the secret here, which will pool at the bottom of a blown bubble and act as a cushion on impact with any surface, including the snow. This stops the bubbles from bursting on impact most of the time.
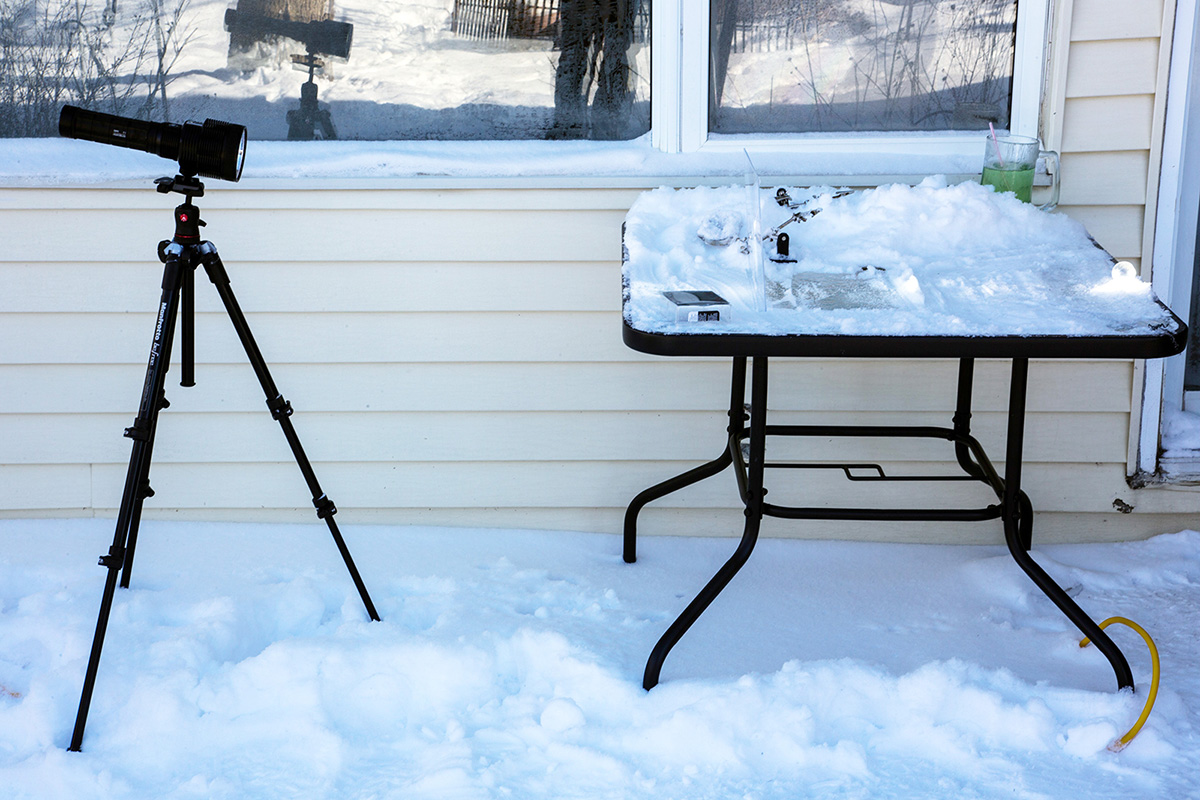
A flashlight is placed behind the bubble, in this case it’s best to use a light with a single LED rather than a cluster. The narrower the beam, the better. No matter how narrow the beam is, you’ll still need refocus it with a Fresnel lens, also called a sheet magnifier. These are readily available from department or hardware stores – the bigger the better. This will help your light stay as a “spotlight” on the area where you will be placing your bubble to freeze. The bubbles are blown through a drinking straw and carefully placed where they need to be.
The camera should be positioned such that the Fresnel lens and the flash are above the subject, creating a sense of isolation from the light source. When you adjust the exposure for the bubble itself, much of the background will be pleasantly dark:

Of course, this isn’t the framing we’re after – we want to get in tight and see all of the beautiful crystals forming! Any macro lens that can focus to infinity is suitable for this, as the bubbles are usually blown to be 2-3” in diameter. The preferred focal length is ideally between 80-100mm in full-frame equivalency, with a strong preference for manual focus.
The Laowa 100mm f/2.8 2:1 Ultra Macro APO is an excellent choice for traditional DSLR users, and mirrorless shooters should look at the Laowa 90mm f/2.8 2x Ultra Macro APO lens, which is my current “daily driver” macro lens. If you shoot with a smaller sensor, the Micro Four Thirds Laowa 50mm f/2.8 2X Ultra Macro APO MFT is an ideal solution. With the right equipment, you’re set. Now, how do you shoot?
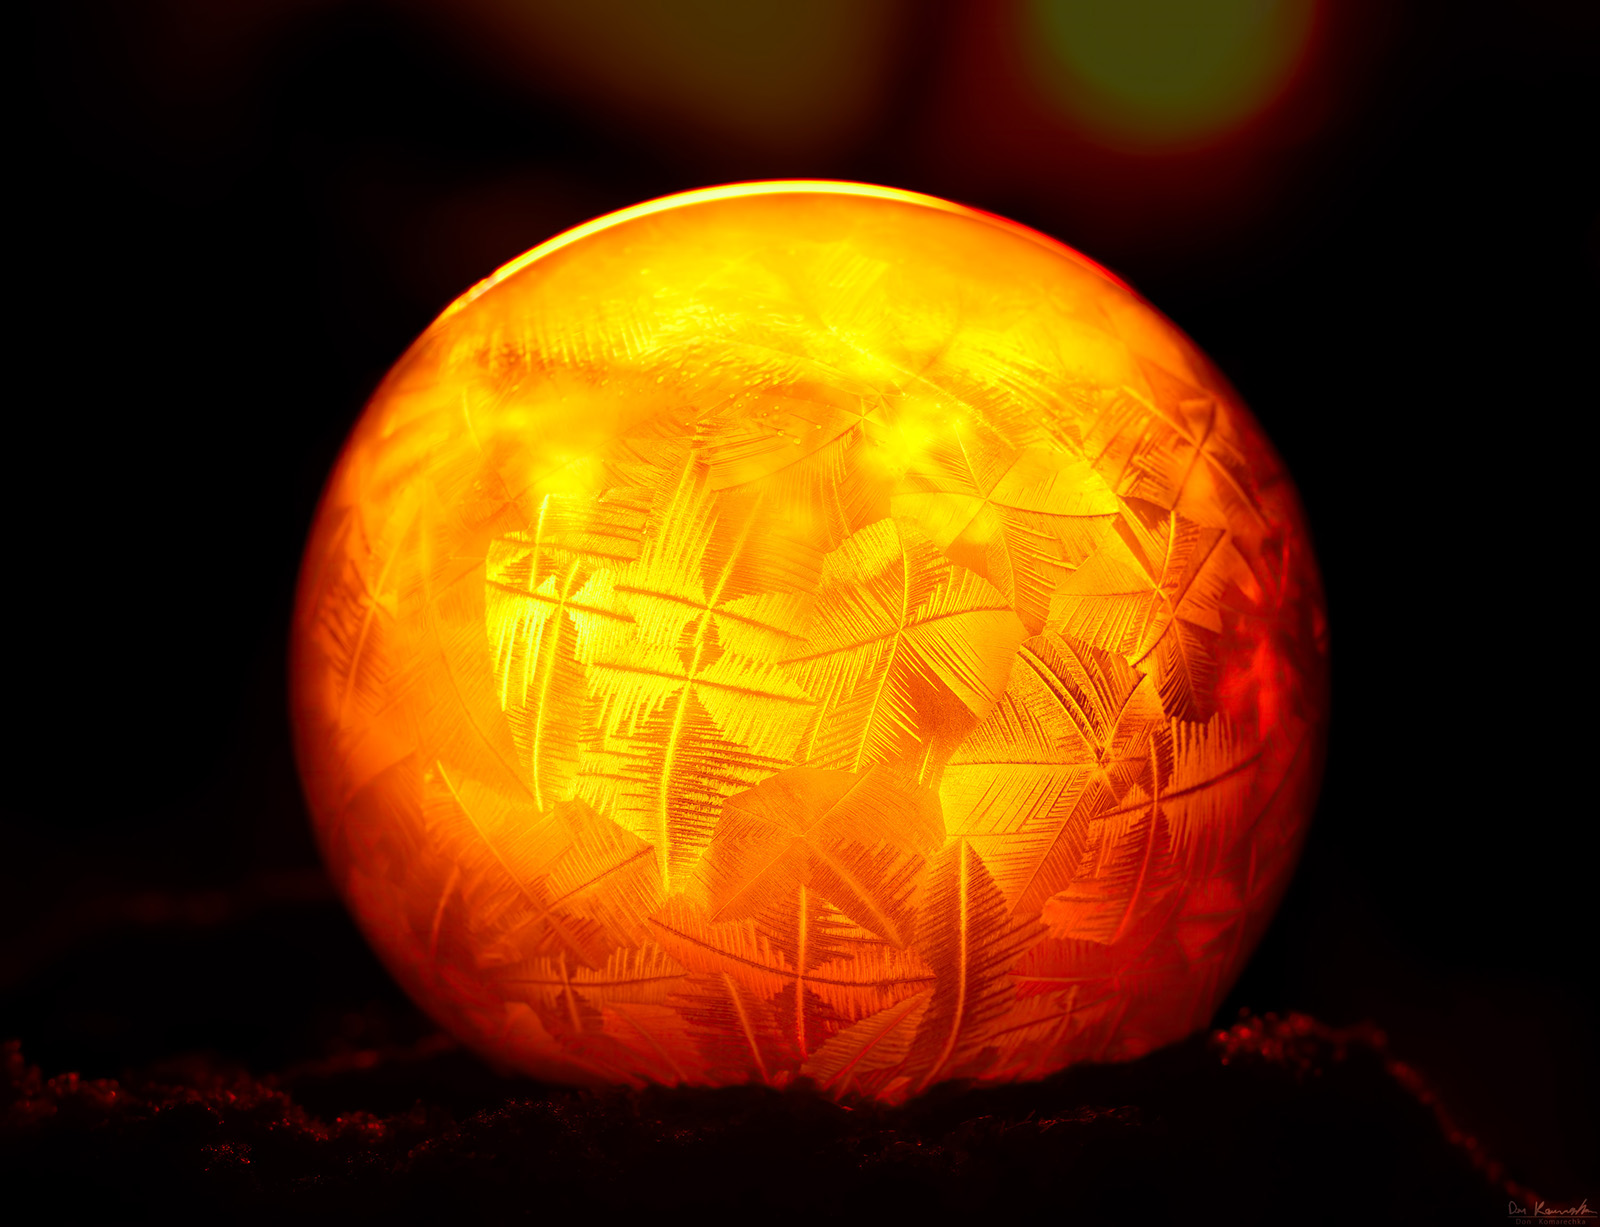
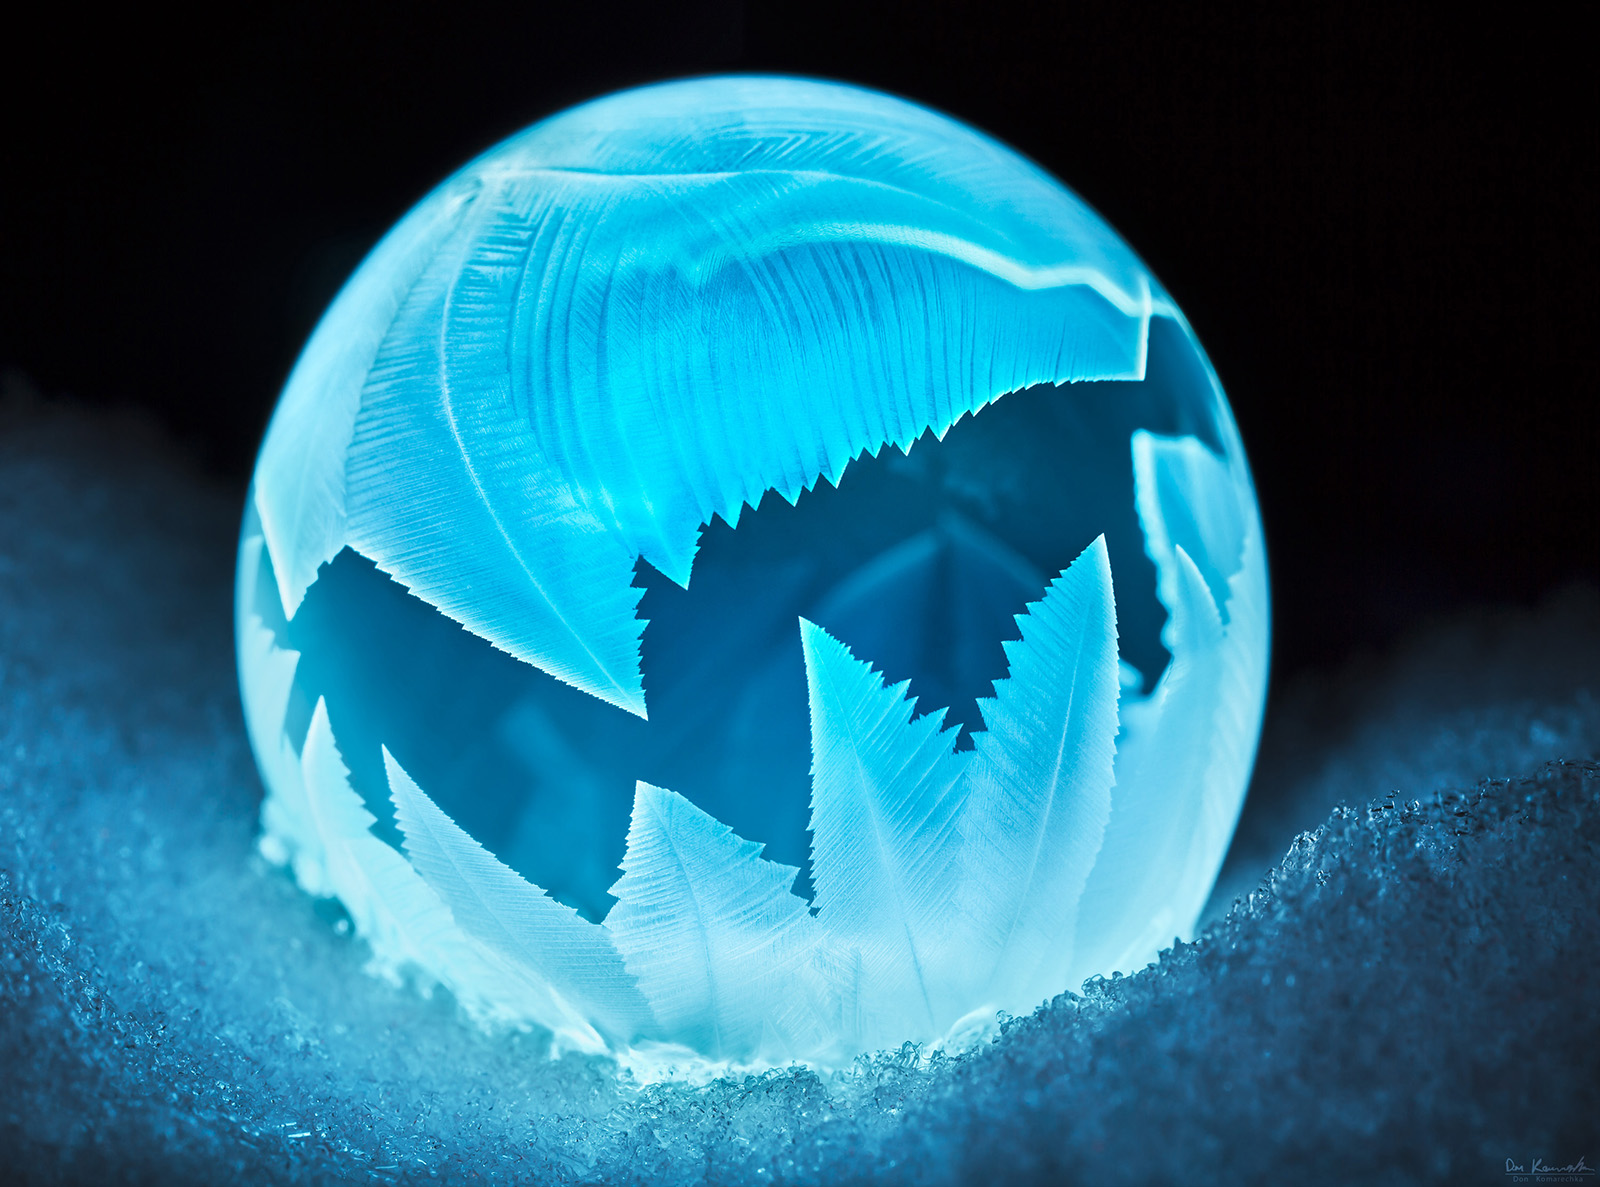
An orange filter was placed over the light to change its colour. You can get very creative with colours!
It’s usually best to allow one bubble to freeze completely solid so that you can test your exposure, focus and other settings. This can take a bit of tinkering. You’ll want to maximize depth of field but not fall victim to diffraction that can soften your image. Nearly all the images I’ve photographed of freezing bubbles have been shot between F/10 and F/22, with F/16 being the sweet spot.
Ideally, you’ll want to have a shutter speed of at least 1/100sec; this will be dependent on how bright your flashlight is. Bring your ISO up to the point where you can get a decent exposure about this shutter speed threshold – you’re far better off to have a slightly noisy image than a blurry one.
With these settings dialed in on a manual exposure, we can worry about focus. In short, autofocus will likely fail. My experience, across numerous camera bodies and brands, is that autofocus is inconsistent at best. At worst, it tends to focus primarily on the background. The recommended Laowa lenses don’t have autofocus, but even if you have a lens capable of it, it’s best to keep it all in your control.
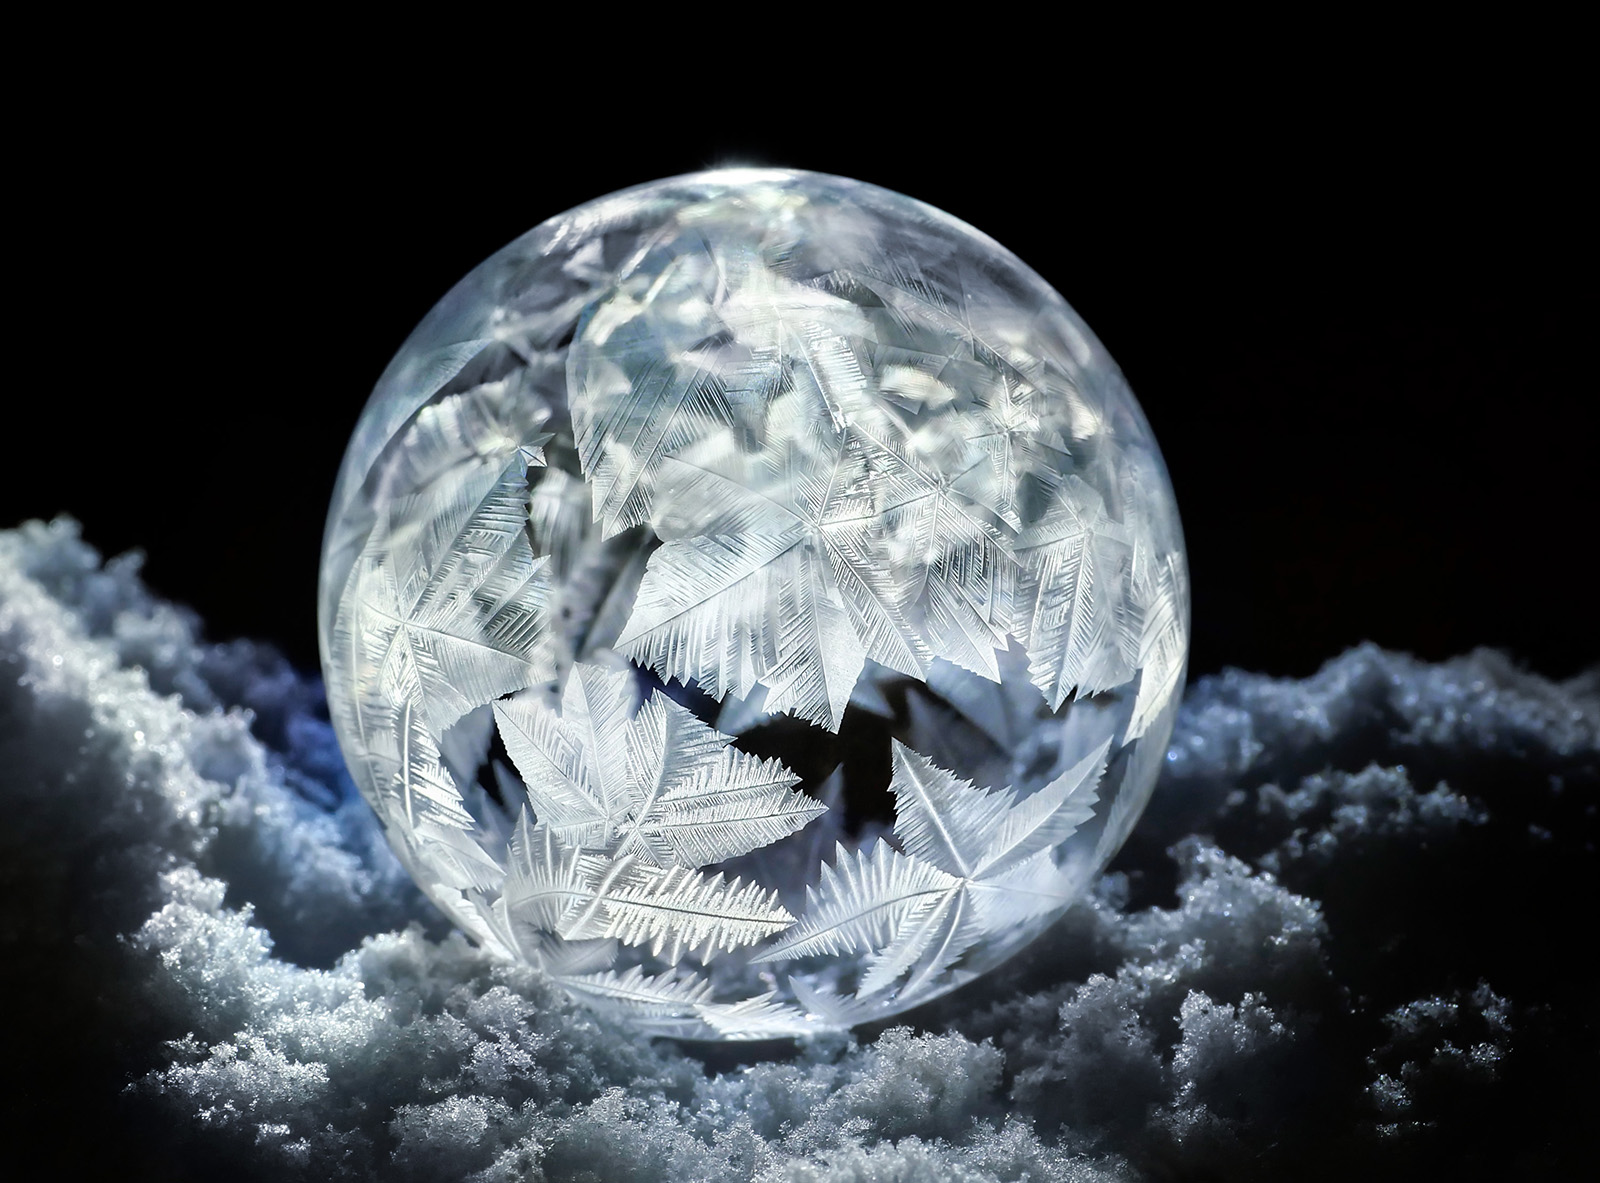
Expect to get the front of the “crystal ball” in focus, with details falling off before the edge of the bubble. This means we have to employ some understanding of the hyperfocal distance to maximize our depth of field, placing one third of the detail before the focus out and two thirds beyond it… but wait. We don’t need to overcomplicate this. We can achieve the same results without calculations, since this bubble will be frozen solid within about 10 seconds. Just sway, forward and back, through the ideal focus region.
Moving the camera (and your body) forward and back through the area of most interesting focus while continuously shooting a high-speed burst is the best way to do this. I have shot this subject on a tripod when video is required, but the freedom of shooting handheld is extremely valuable. Since the exact position of the bubble will change between various attempts, and crystals bend light differently every time, a slight movement left or right can also help you catch the best lighting.
Once you’ve attempted this a handful of times, the technical aspects will become muscle memory. The camera becomes the tool, and your creativity gets to shine. So, how can we start the “creative process”? It all begins with what you place the bubbles on:
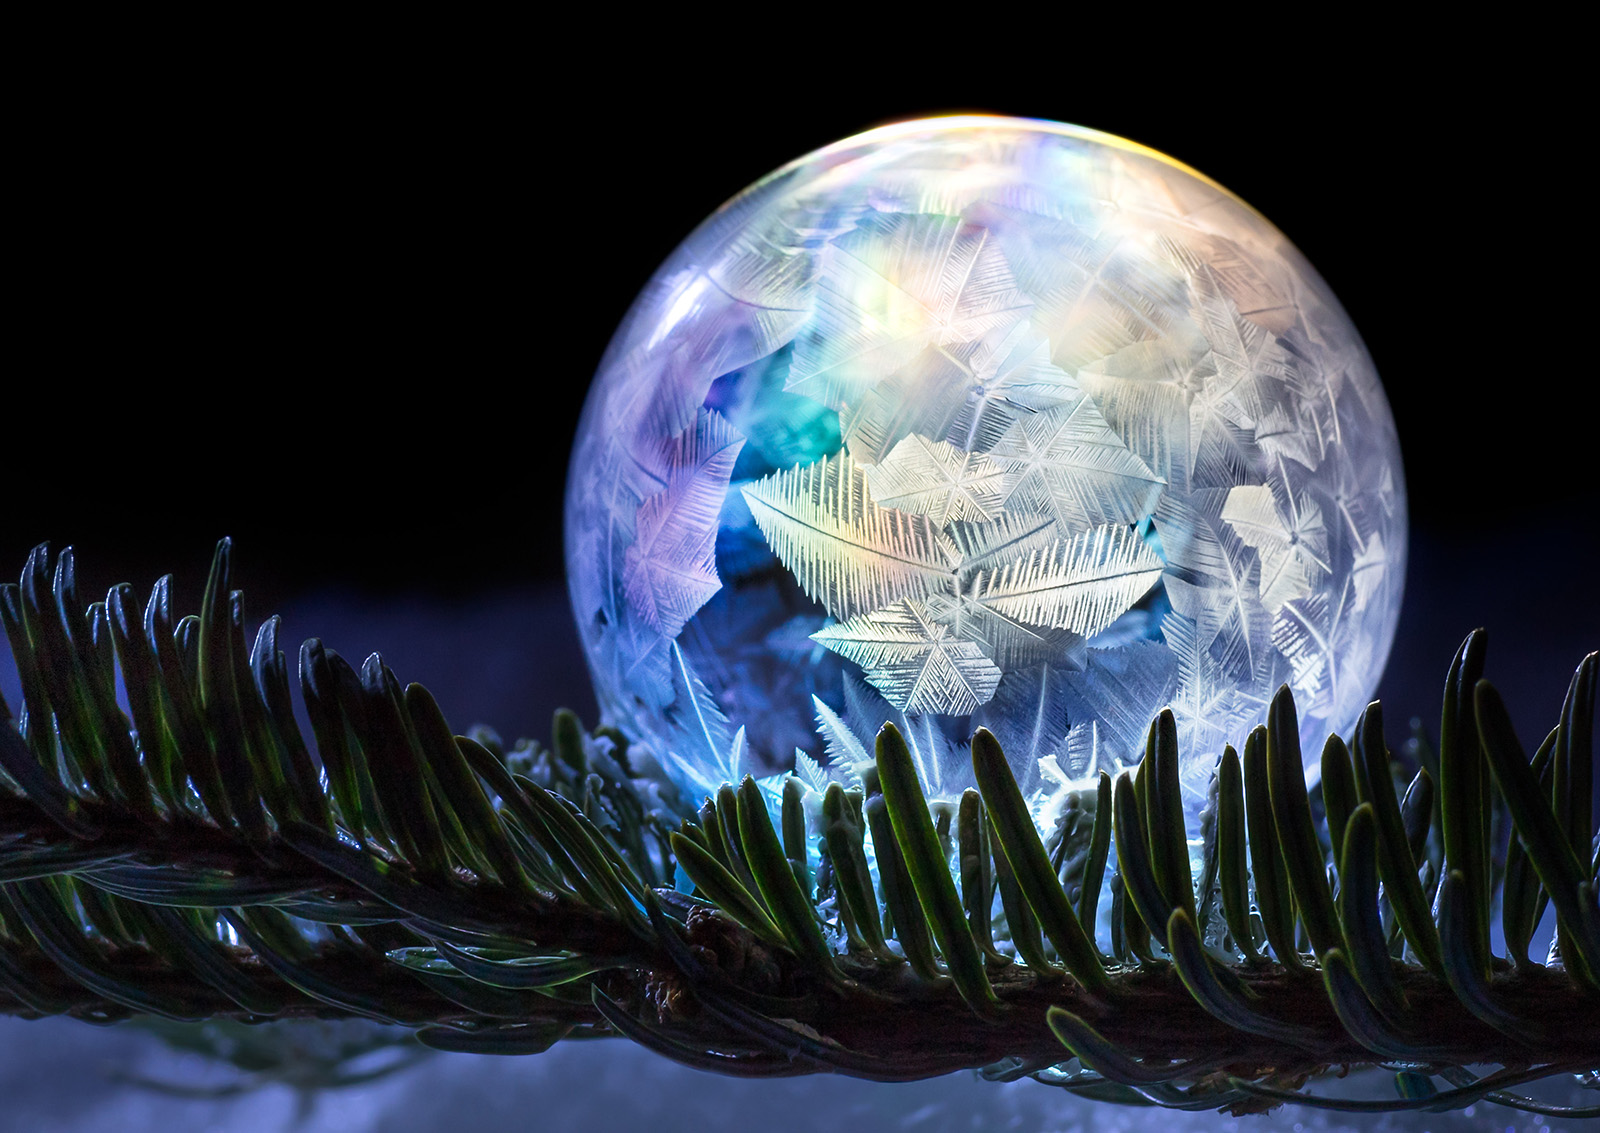
How about a branch from your Christmas tree, or any evergreen outside you’ve got handy? Photographing freezing bubbles on snow is fine, but does get boring after a while. You can go explore your backyard for some possibilities, or even the florist:
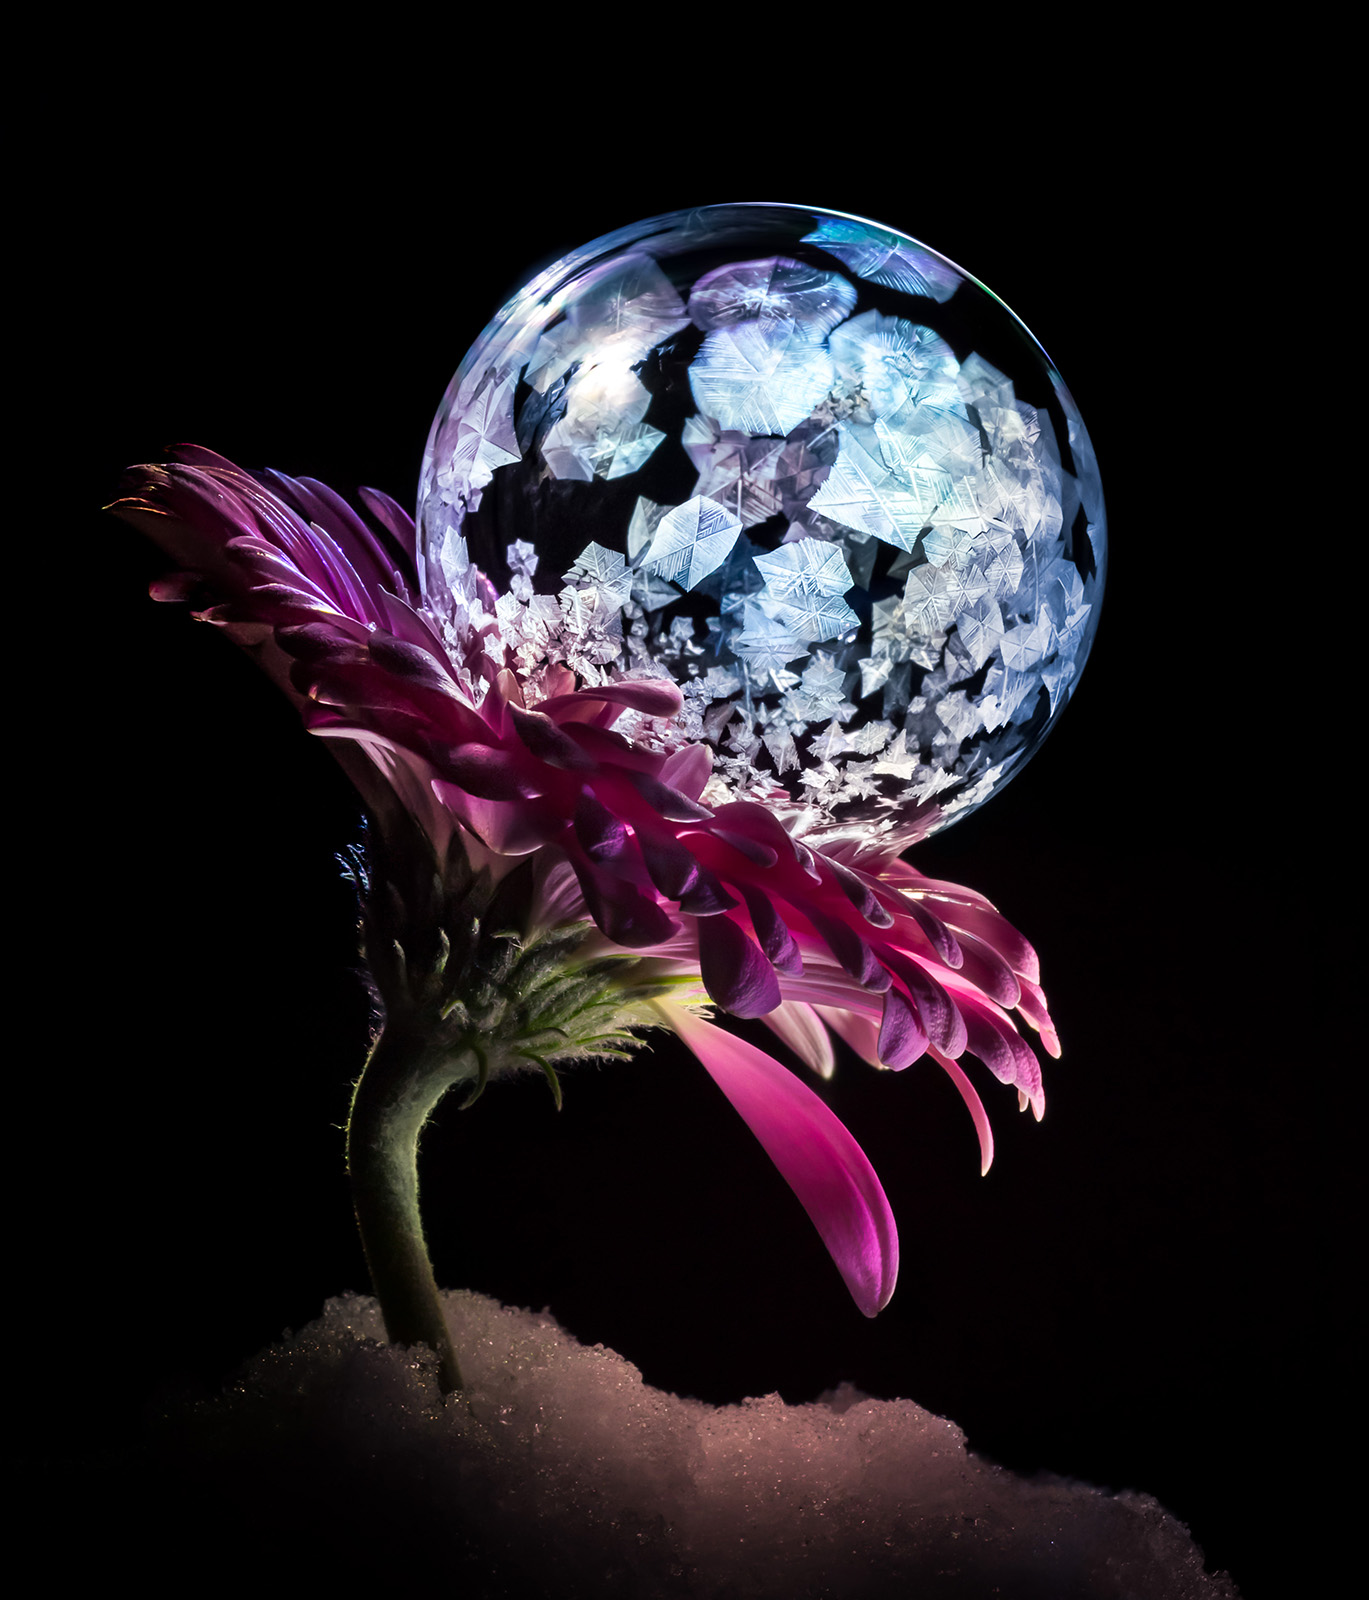
In this image (above), I left a gerbera daisy outside for roughly an hour. After sprinkling a bit of snow inside the center of the flower to aid with the nucleation of crystals, I placed a bubble in the center with a drinking straw. This setup used two lights, one illuminating the bubble crystals and one adding light to the underside of the flower.
At this point, you’re creating a very fleeting sculpture worthy of being photographed. The technical skill required to photograph a bubble takes a while to develop, but once you’ve got it – you can focus on the art. Photography is a fabric woven from the interactions of both science and art; the more complicated the weave, the more magical the results.
There are many “what if?” moments when photographing subjects such as this. What if I mix in highly fluorescent ink that allows for the bubble to glow, becoming its own light source under ultraviolet illumination? Ask these crazy questions, and explore the answers:
About the Author – Don Komarechka


Awesome—we’ll done!👍👍
Very cool article (no pun intended) and great subject matter. I’ve been an admirer of Don since I first heard him on one of the many photography podcasts I listened to at work before I retired. Thanks again for sharing your expertise and wisdom with the masses. Much appreciated!