


As photographers, we are creators. The degree of “creation” depends solely on us – sometimes an approach of minimal involvement best suits the subject. In other scenarios, the subject will not exist without our exhaustive participation in the creative process.
During the months that end winter and prepare for summer, much of Canada is unforgivingly dull. Piles of dirty snow line the streets and the flowers have yet to bloom. Vibrant subjects can still be found, however, with ingredients you might already have at home – and with a bit of science. We are about to explore the realm of cross-polarized crystals that you construct yourself. It might be a foreign concept, but you’ll discover how easy it is to succeed.
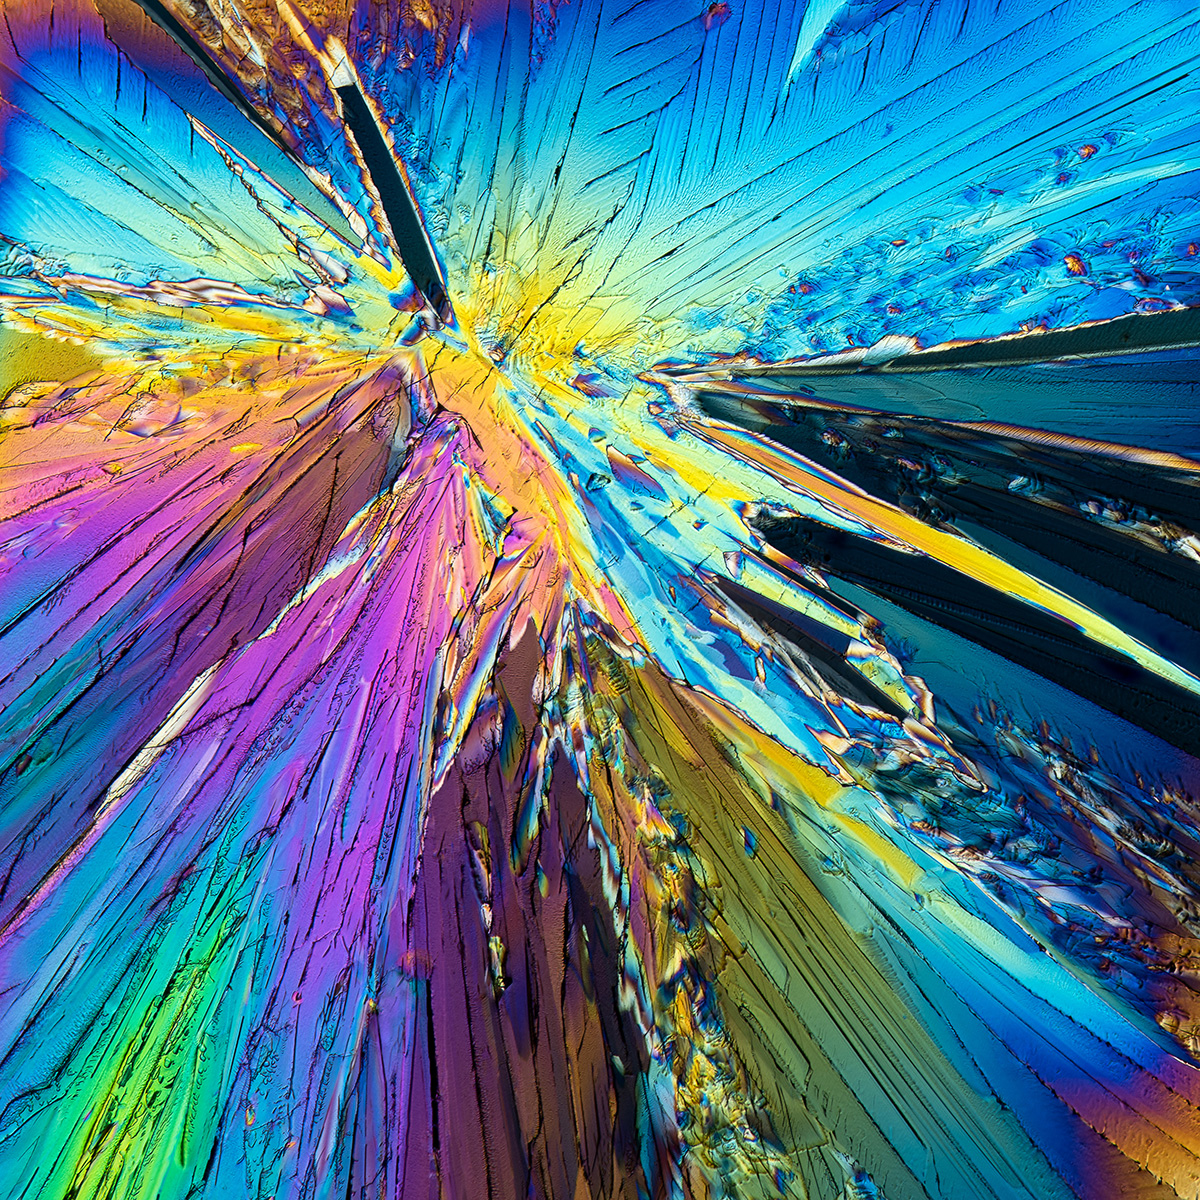
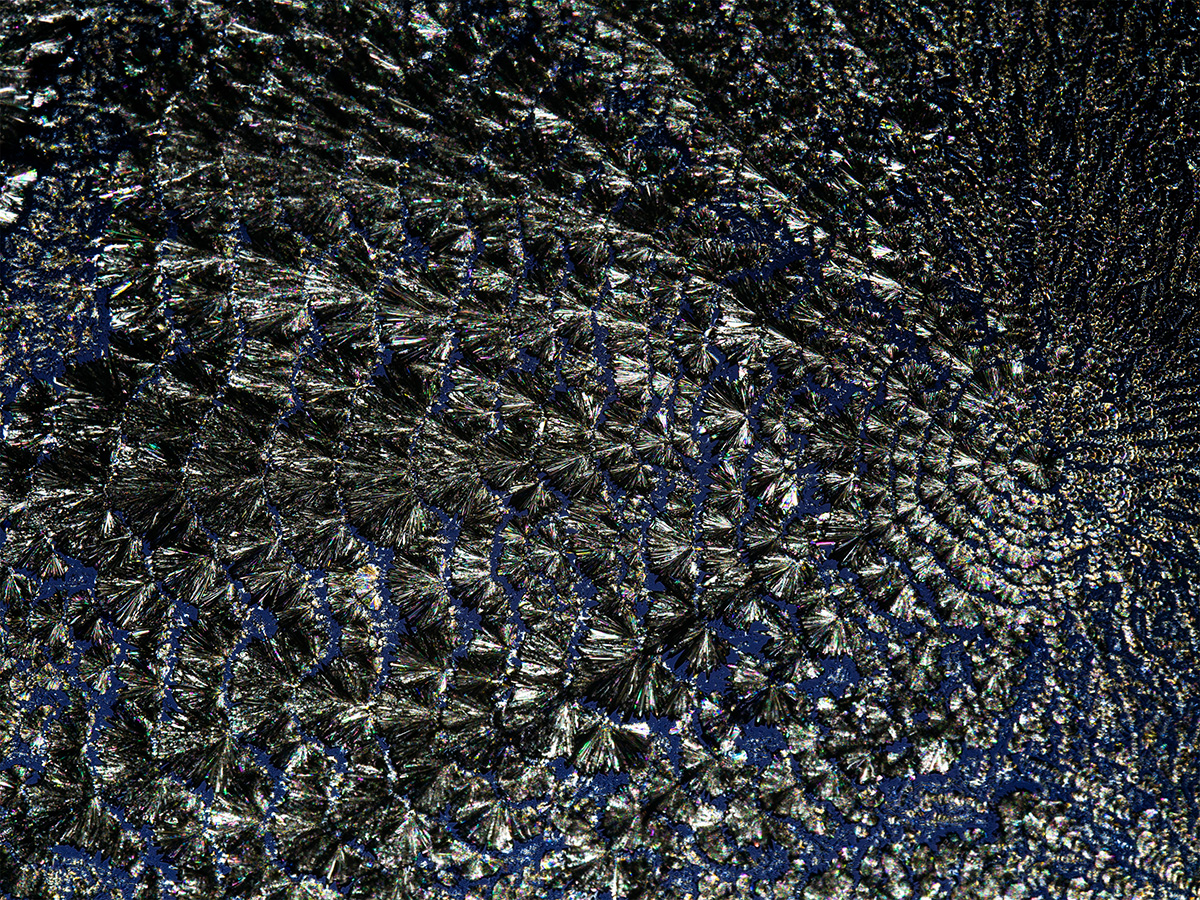
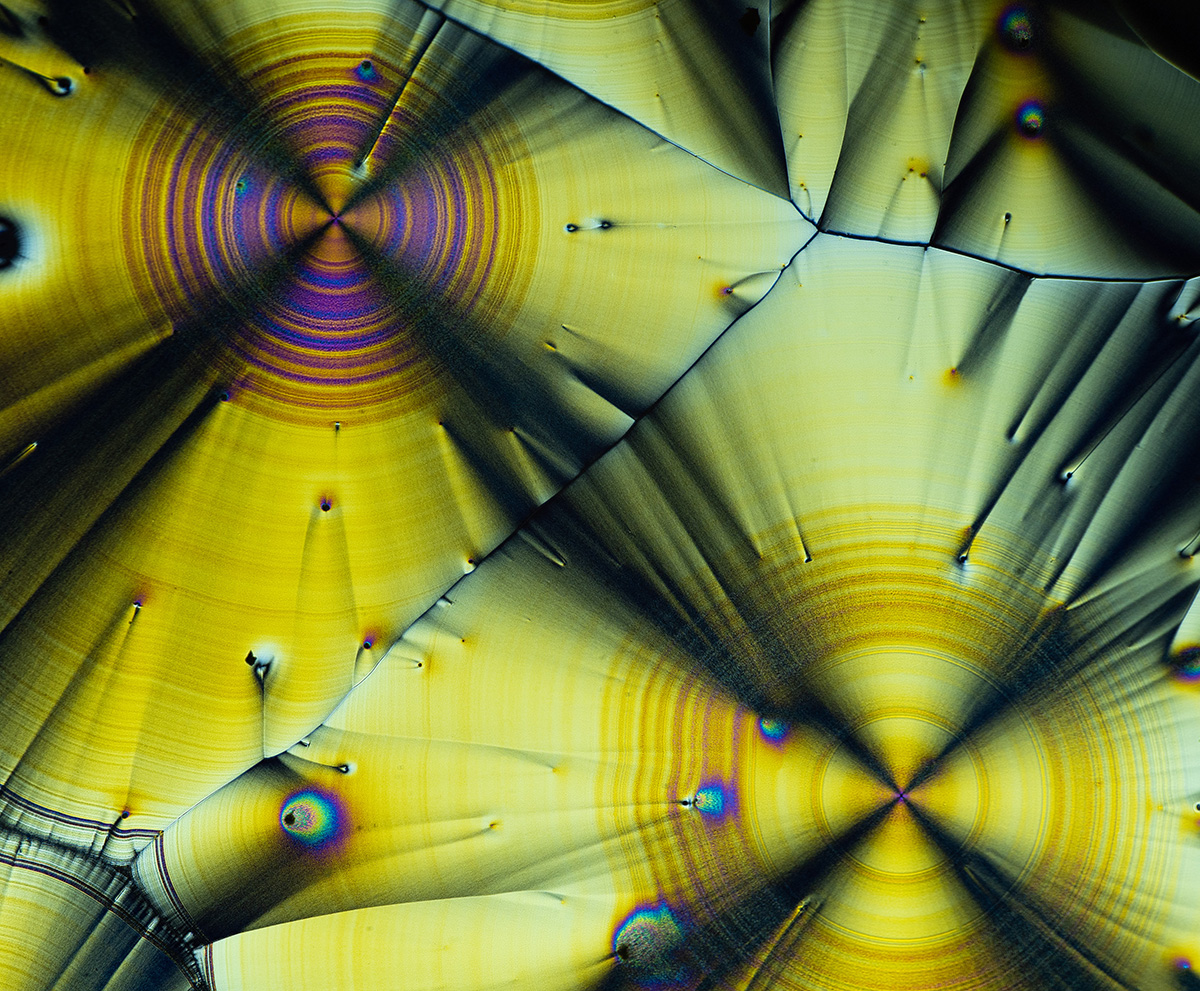
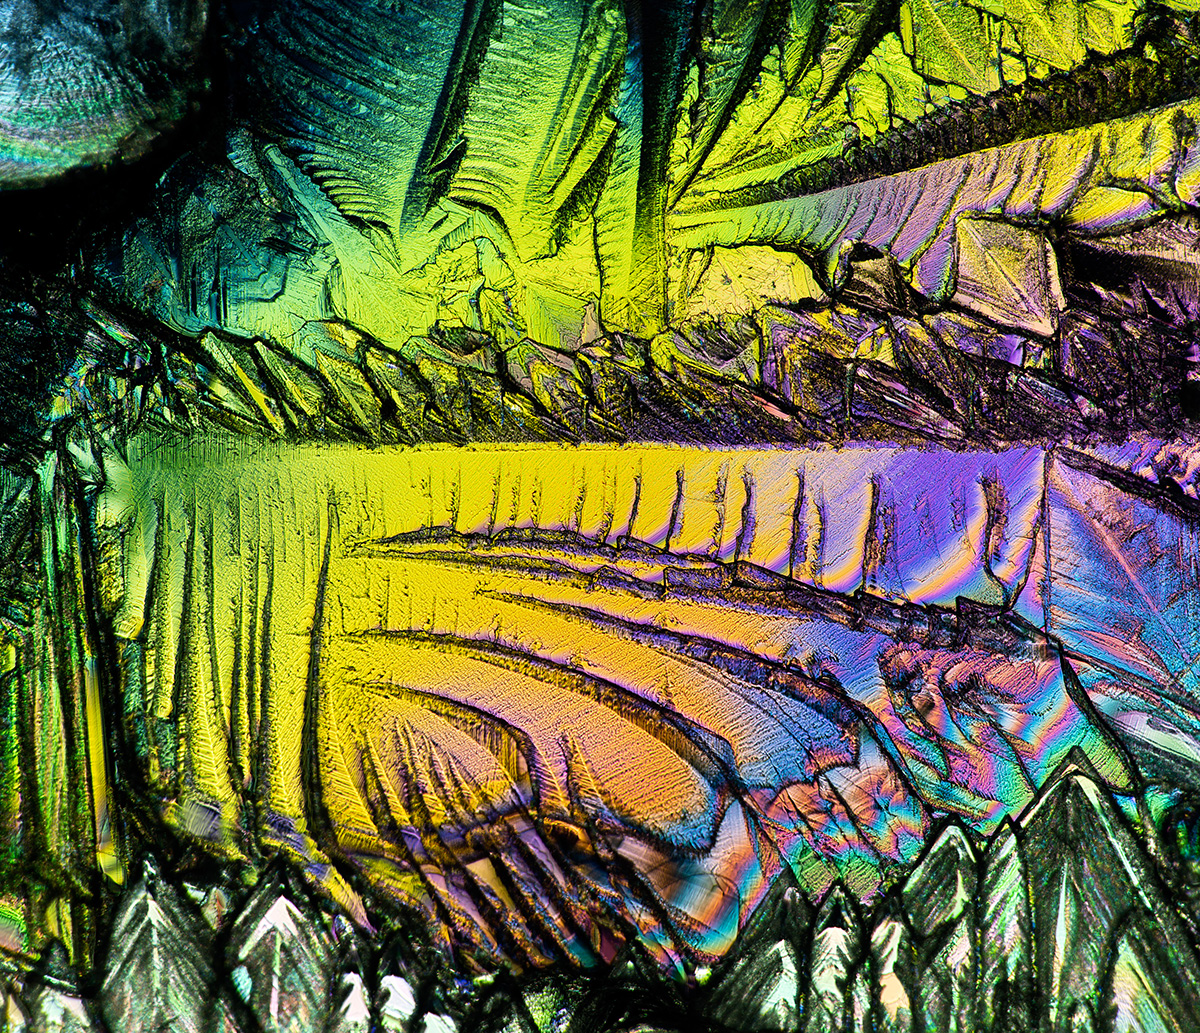
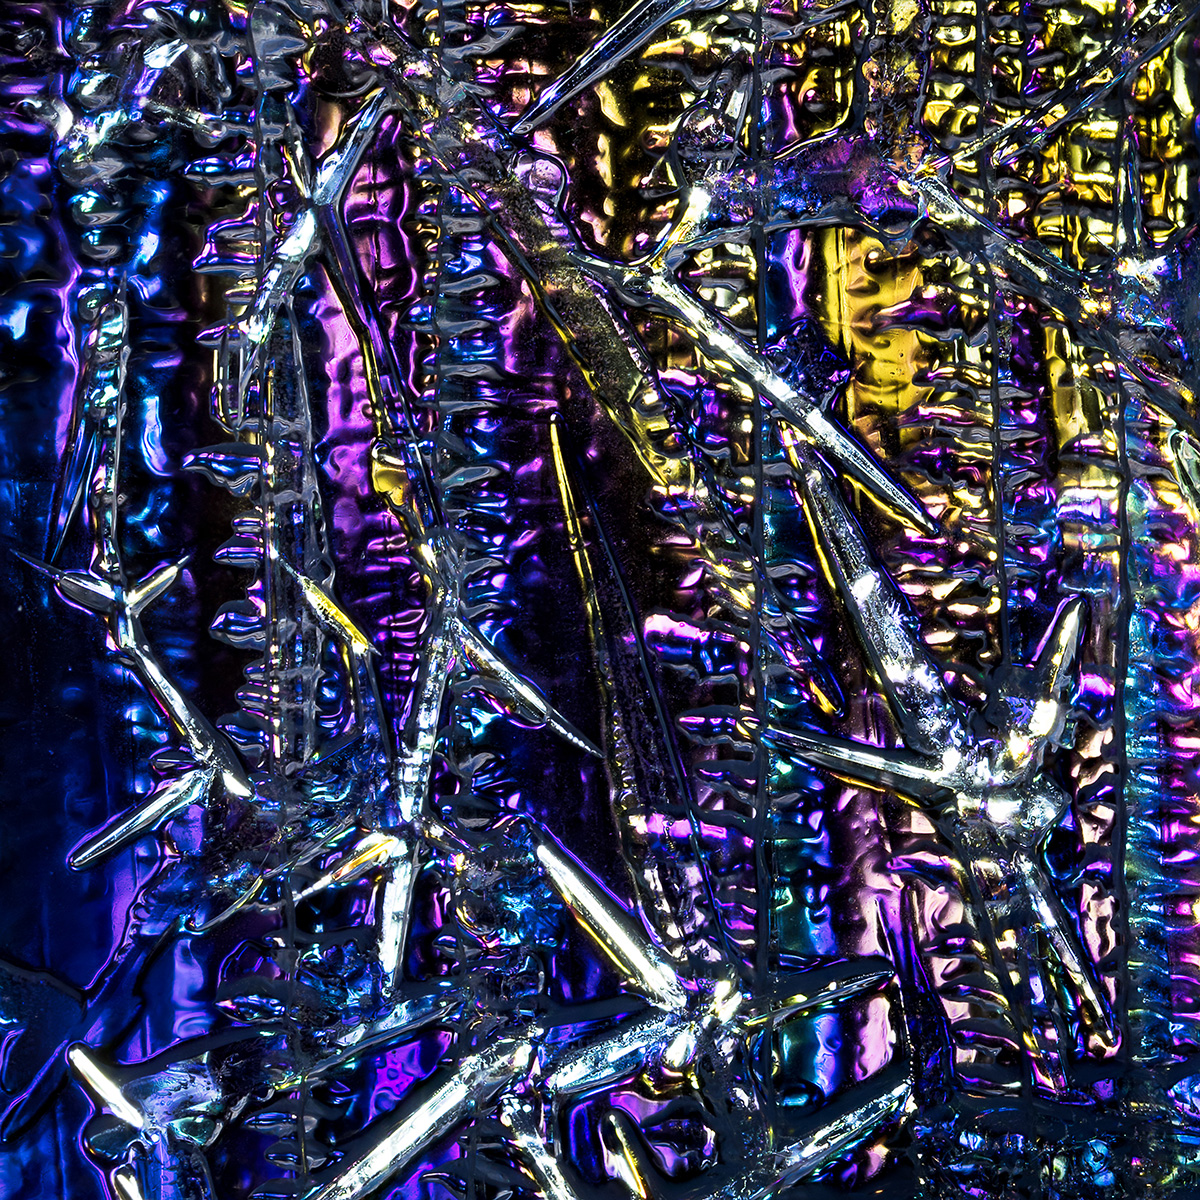
First, we need a subject. The first two images in this article (above) are citric acid on glass. The don’t normally look so vibrant to the naked eye, these colours only emerge when you cross-polarize the light. We’ll talk more about the photo setup in a moment, but first we need to create our subject; the process is incredibly simple.
Citric acid is readily available from health food stores or online – it’s a food preservative. Mix the powder with water in roughly equal parts; I used small jam jars for this purpose. Shake periodically for 10 minutes. If all of the acid has completely dissolved, add more. The goal is to get the water to the “saturation point” where no more powder can be dissolved in the liquid. Magic is about to happen.
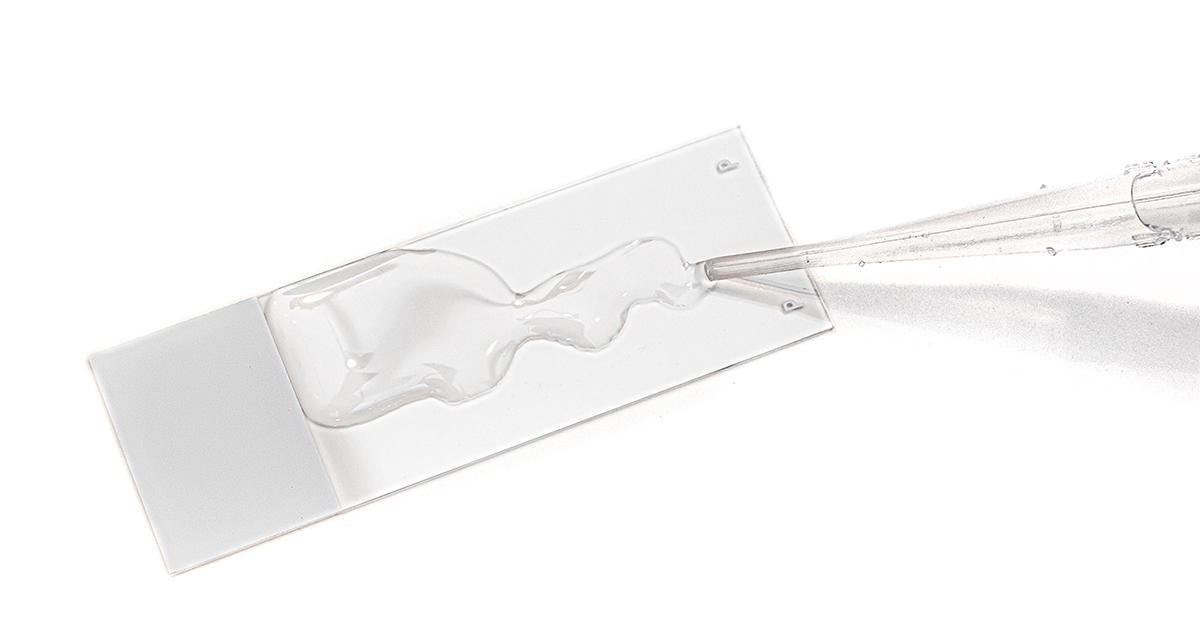
Using a pipette, an eyedropper, or really anything, place a layer of the liquid on glass. Microscope slides are easily purchased online, but the glass from an old picture frame works just fine for this – the smaller the better. Once the liquid is spread out, wait. In the late-winter dry air, it shouldn’t take long for the water to start evaporating. When it does, the dissolved citric acid will no longer be able to stay dissolved, and crystals will start forming. This can take anywhere between a few minutes to 8 hours depending on how fast the water evaporates. Have some isopropyl alcohol handy? Use that instead of water and it’ll evaporate faster.
Once dry, you’ll have your subject. Make more than one, as there are a near-infinite number of variables that affect the crystal growth and every one will be different, just like snowflakes. Now, the photo setup:
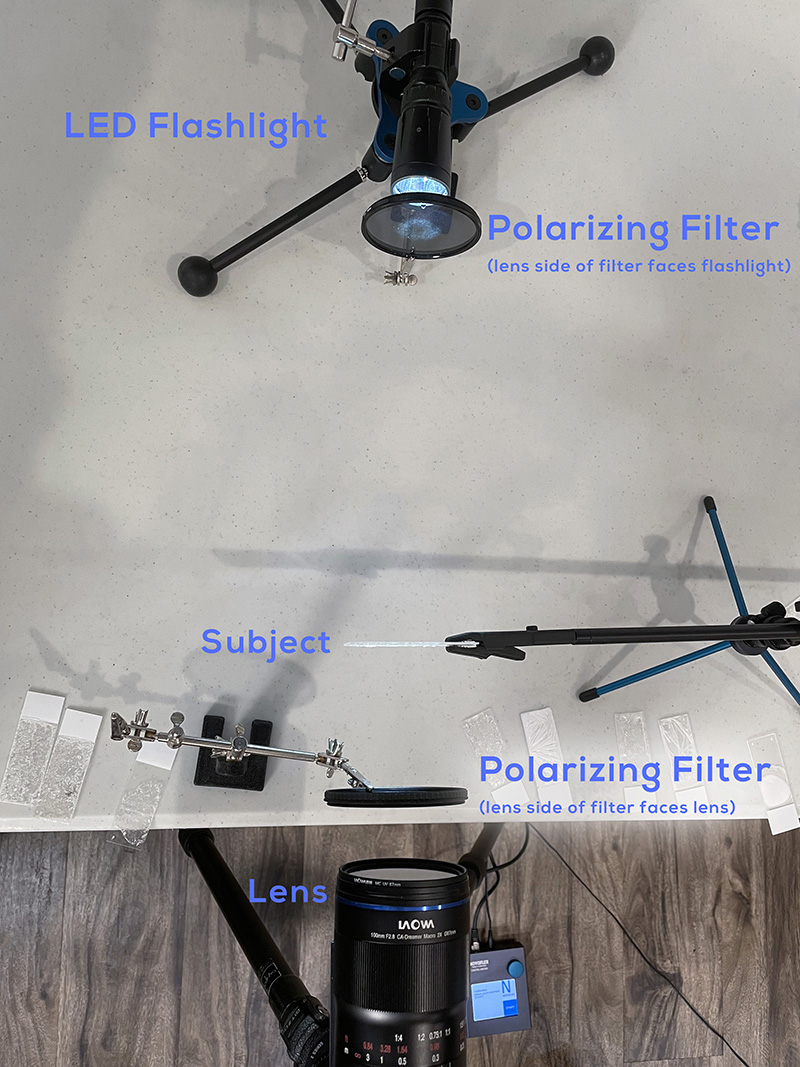
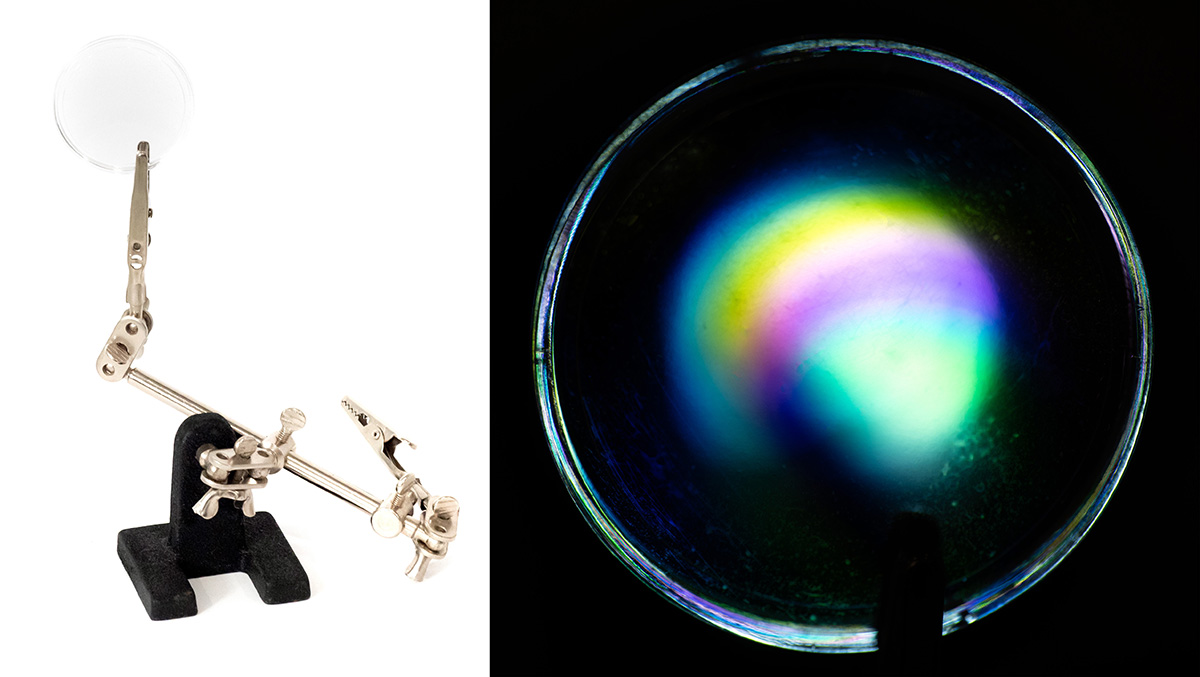
It’s an easy-to-follow recipe. You need a polarized light source and a polarized lens, with the subject in between. Imagine how a variable neutral density filter works: two polarizers that, when placed in opposition to one another, create a very dark image as almost no light gets through. This is what we have created – but… what if something mucks about with the polarity of the light? I’ll save you from the physics lesson about how light can perform a strange corkscrew dance through certain materials, but this simple statement will sum it up: some materials muck with the polarity of light, and instead of darkness, we see light and colour.
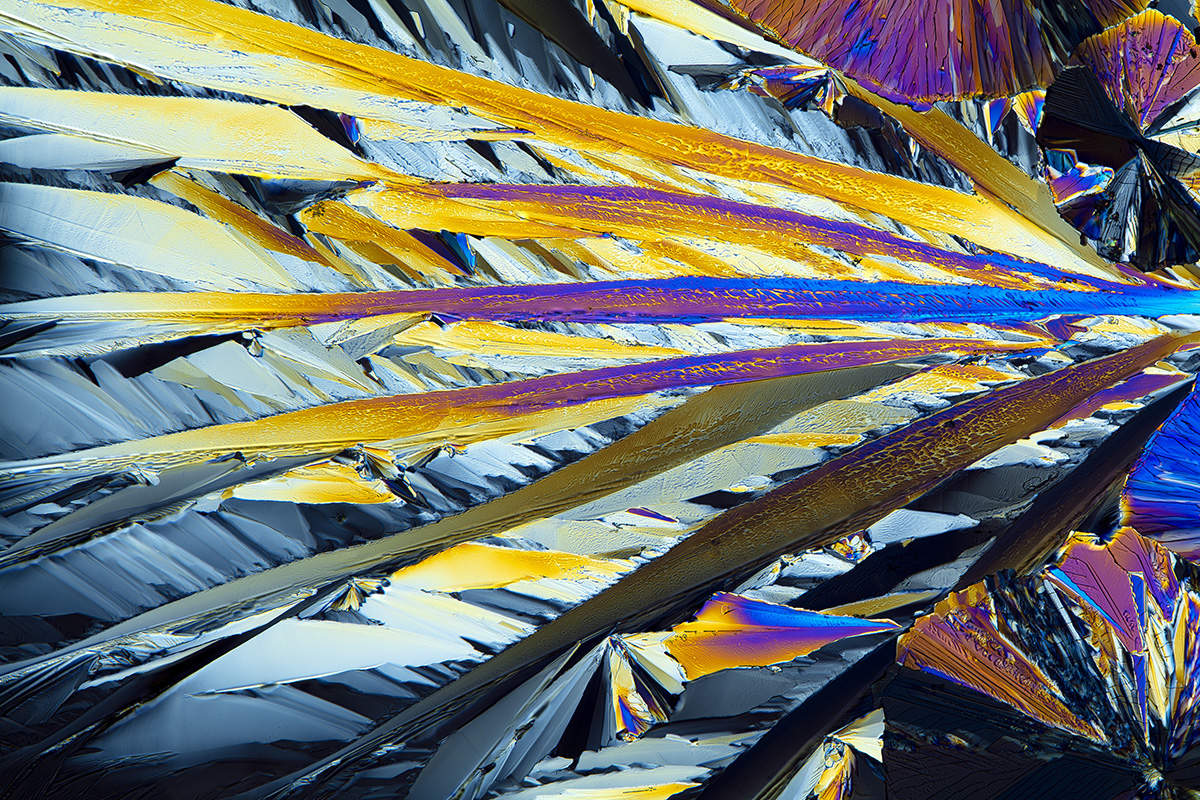
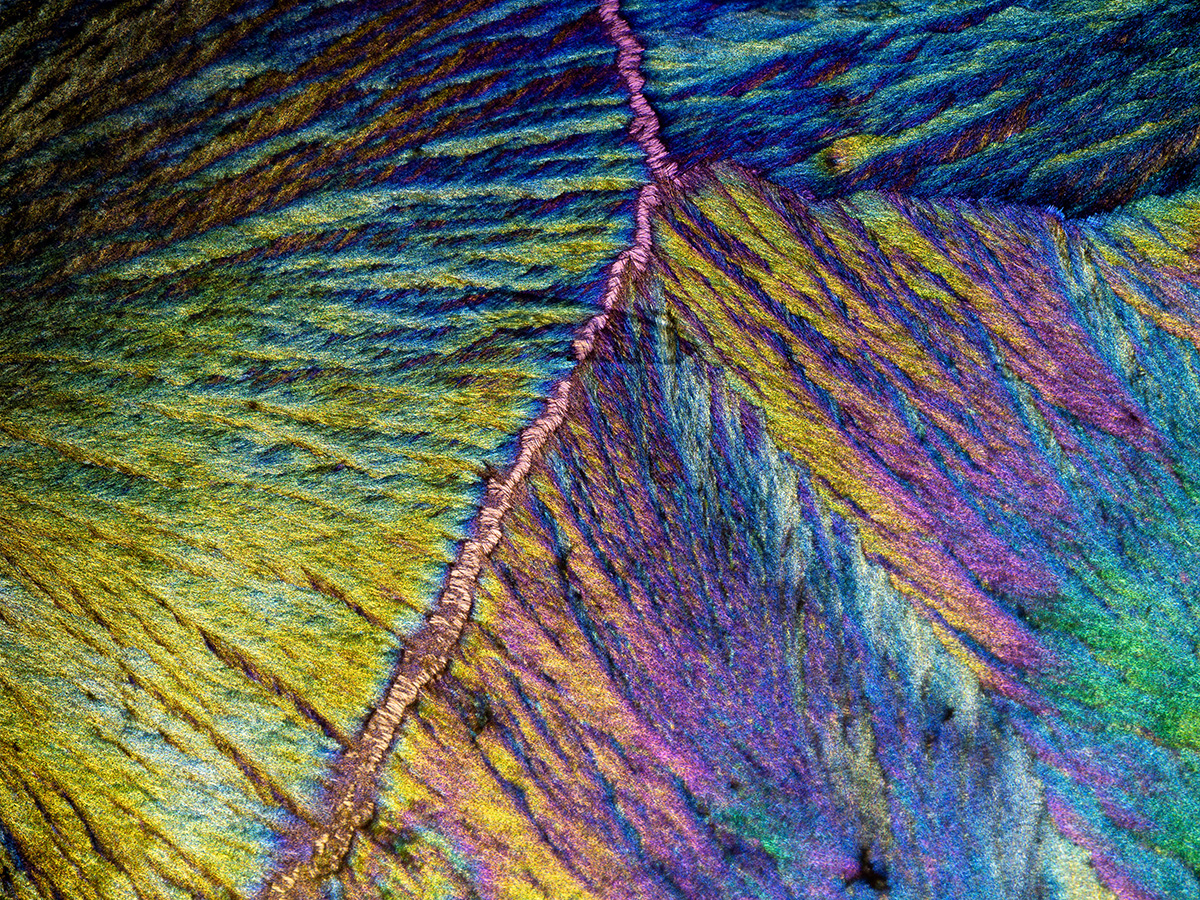
You can use many different health supplements and household cleaners to create different abstract patterns. It doesn’t always work, and some iterative experiments are often required. For example, this was my first attempt at using ascorbic acid, otherwise known as Vitamin C:
Not great. However, a repeat attempt with the same input variables (same solution), buy possibly a different evaporation time based on relative humidity, yielded this gem that could have been a 1970’s album cover:
Many of these subjects are small. A 1:1 magnification macro lens might cut it, but you want to explore with the lines, shapes, and colours here. Where the edges of the frame connect with the lines of the crystals is very important. In the setup photo, I was using the Laowa 100mm F/2.8 macro lens. The Vitamin C images were taken with the Laowa 50mm F/2.8 macro lens on a Micro Four Thirds camera (Lumix GX9). In both scenarios, I often utilize these lenses beyond the 1:1 magnification limit imposed by the vast majority of macro lenses on the market.
Even with enough magnification, however, sometimes your subject just doesn’t generate the colour you were hoping for:

Not ideal, but there’s a secret weapon here. Remember, we’re creating something from nothing – so why not add an extra element? We can add our own colour, using cheap plastic.
In this example, I’m using the casing from a collector coin. The clear plastic from a CD jewel case would work just as well, if not better. These objects have a cross-polarization effect themselves, and this can create a preliminary palette of colours for the crystals before they impart their own. Add this into the mix, and you get:

This allows for incredible variability in composition – move the plastic piece and all of your colours will be readjusted. You’re pulling the strings to control abstract designs and creating art.
The above image is a different kind of crystal – menthol. It can be melted at a temperature below the boiling point of water, but do that outside and don’t breathe over it, unless you want to feel like you’ve taken a dose of cough medicine. There are many acids and salts that can create interesting patterns. This one (below) is the amino acid Beta Alanine:
They key is experimentation. What if you mix two different solutions together? Different concentrations, solvents, volume, every experiment will yield different results. Naturally-occurring crystals can offer up interesting results as well – simple ice can do the same tricks:
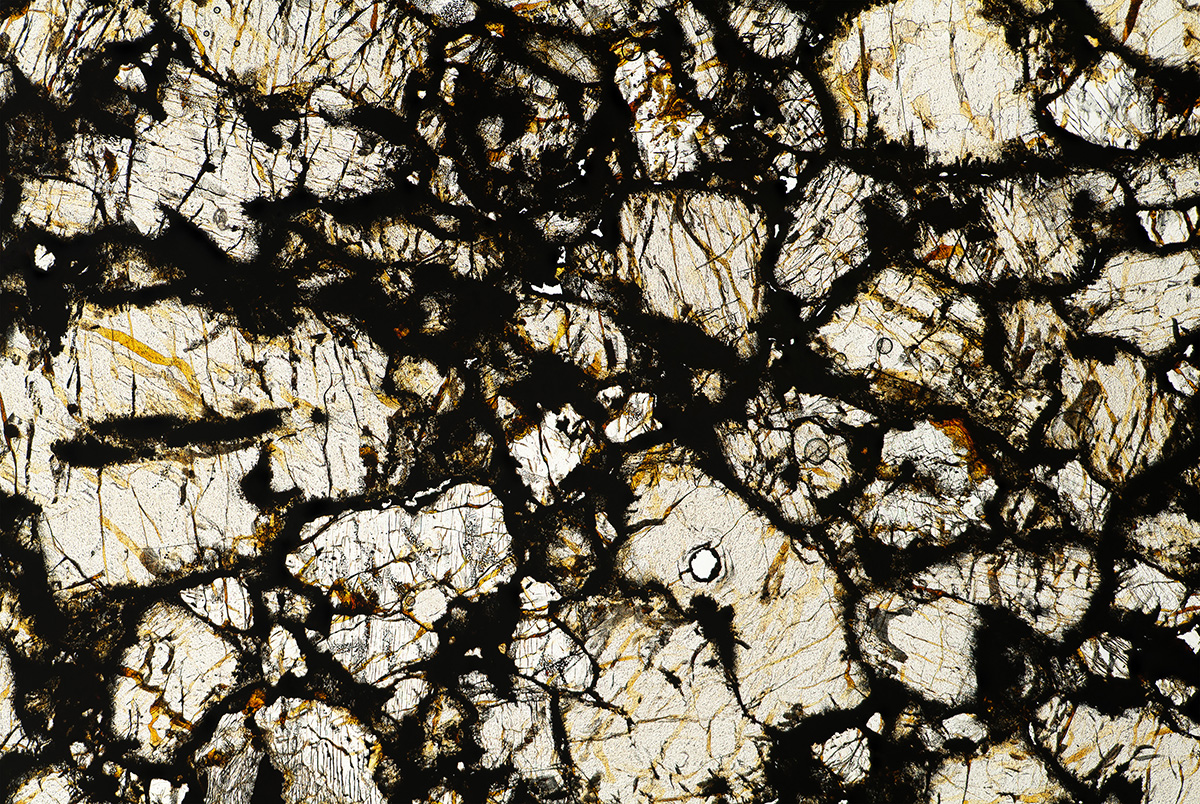
And, if you want to push to the extremes? Crystals can be found in meteorites. Below is a sample from one such meteorite that was discovered in Northwest Africa, without cross-polarization:
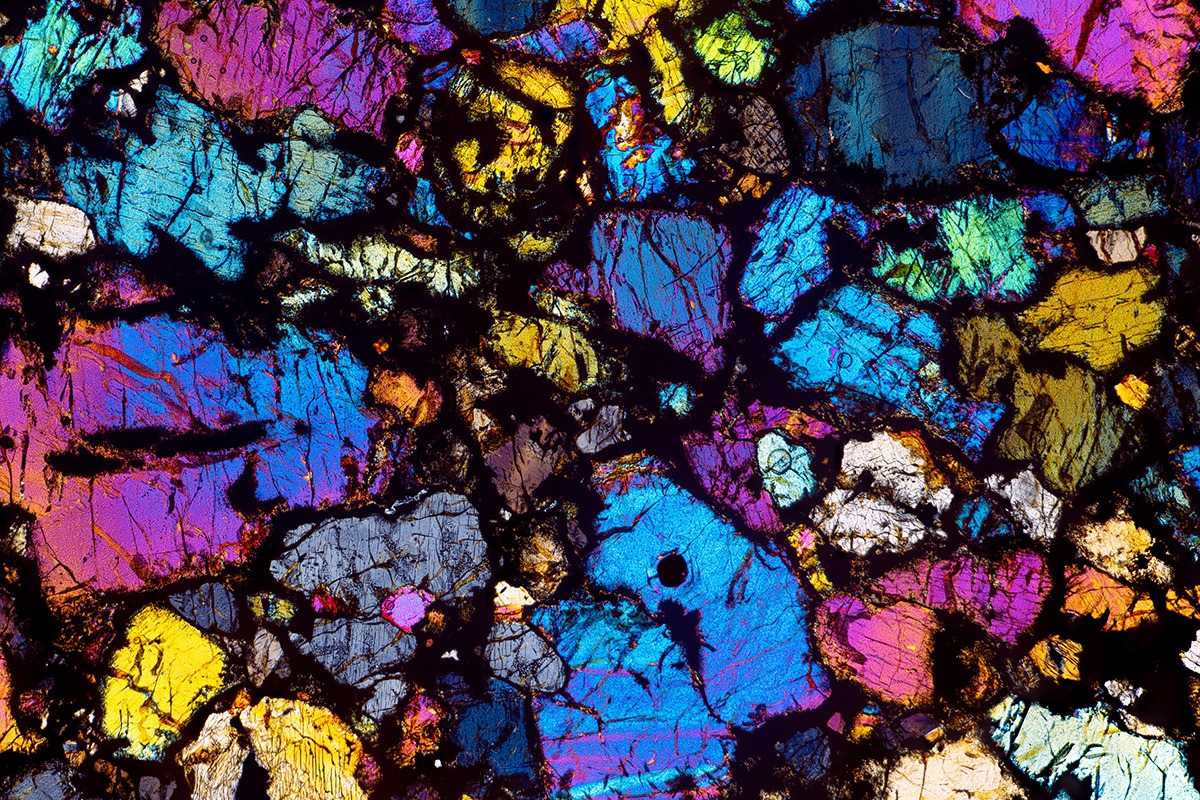
But when this cross-polarization technique is applied, it becomes a celestial mosaic:
How far you take this concept is entirely up to you. With ingredients from your kitchen used for cooking or cleaning, a geometry-covered canvas can be created – the perfect subject to explore while waiting for spring to arrive.
Sale valid until April 30, 2023
About the Author – Don Komarechka


I have done this 30 yrs ago using my old enlarger. Buy an attachment to mount camera to top of photo enlarger. Using the enlarger lens which is perfect flat field drop one polarizer lens inside the enlarger bellows. 2nd make a small light box with another polarizer lens mounted to this light box with a small rod taped to filter so you can adjust the polarizer filter. Place glass slide over this polorized light source. Start shooting.
That’s a novel approach, Larry! Not many people have enlargers these days but that doesn’t discard the successes you had with yours. I wouldn’t have thought of that – and there are many other approaches to consider as well. A proper polarizing microscope would also be an uncommon occurrence in the average household, but smart phones are ubiquitous.
Your phone (and nearly all LCD screens) uses polarized light. You inherently have a polarized light source in your pocket – hold up a polarizing filter to you phone, turn it, and see the effect. It’s not perfect, but it’ll do in a pinch. 🙂
very interesting thank you
You’re welcome, glad you enjoyed the read!