

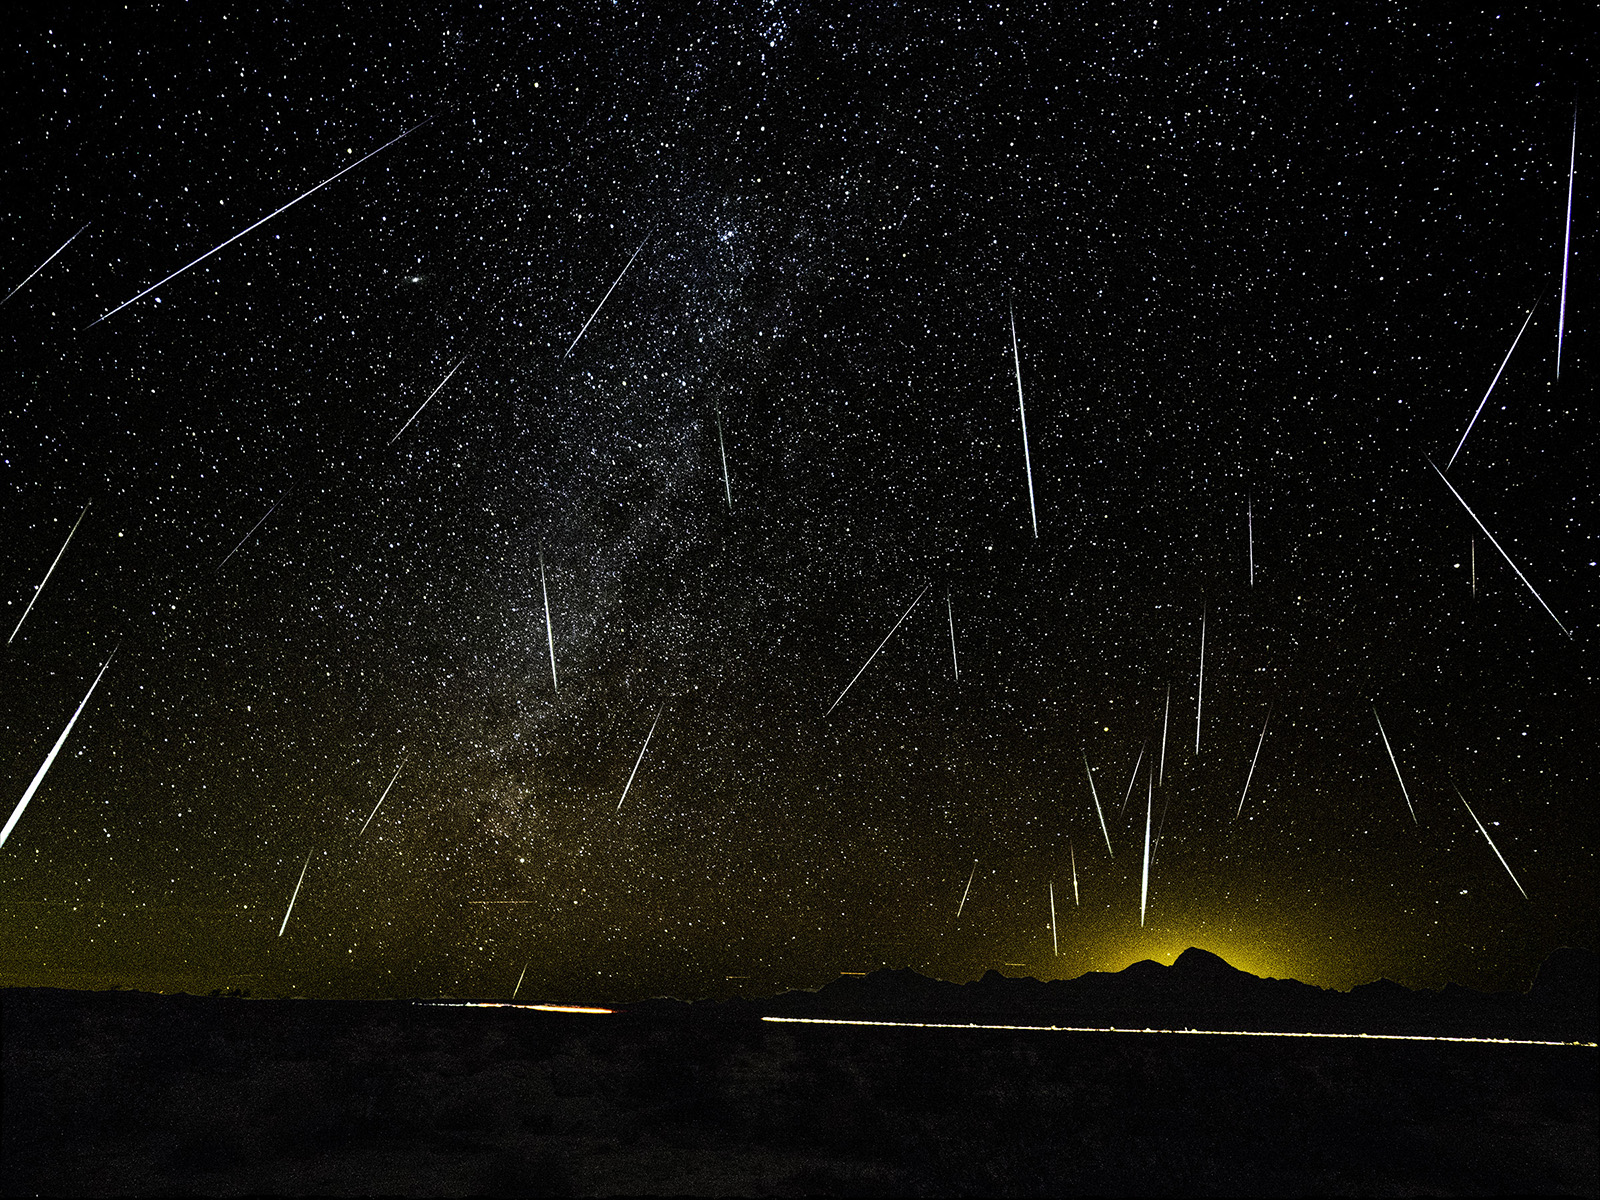
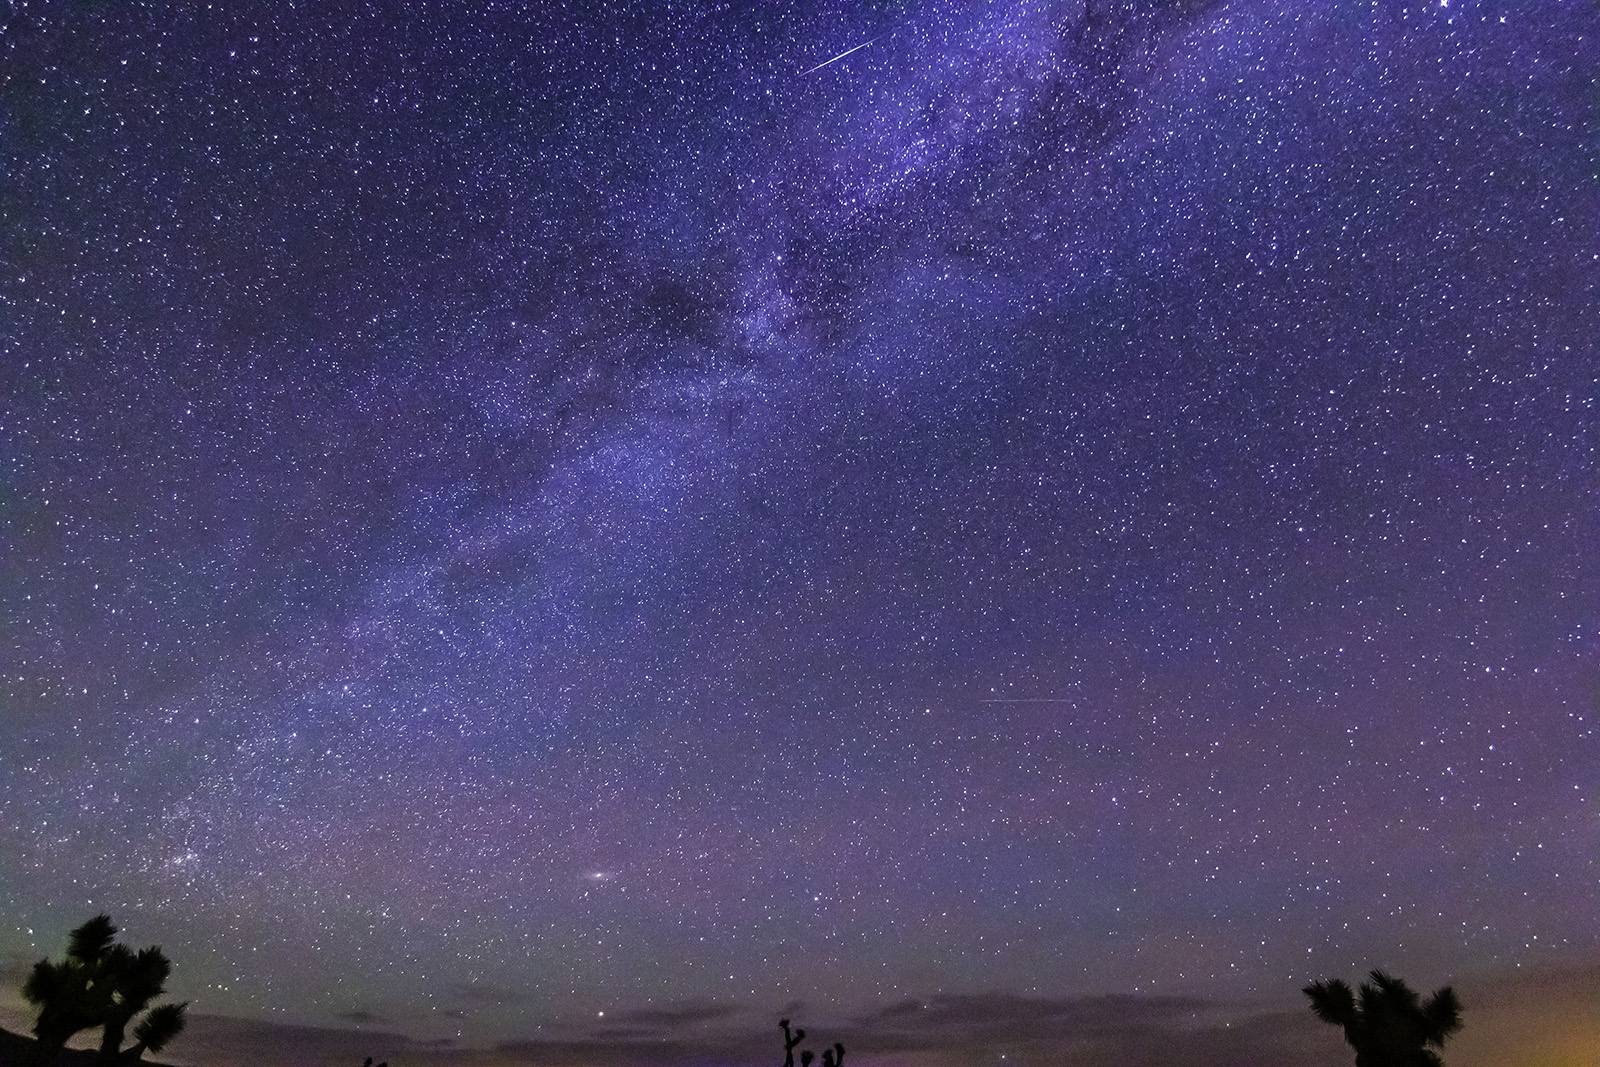
(composite photo of 33 meteors in one night)
In horse racing a Superfecta is when you correctly pick the first 4 horses across the finish line. In 30 days between December 5th and January 4th there will be superfecta of 4 meteor showers visible in the Northern Hemisphere but you only need to hit one to get some awesome meteor photographs. This article contains what you need to know to photograph these or any meteor shower.
Which Meteor Showers and when?
Andromedids Meteor Shower
(This was one of the most intense meteor showers of the year in the late 1800s but went dormant for over a century. Surprisingly in 2011 it started to perk up again and this year is predicted to be a good one.)
Peak: Night of December 5th in the morning of the 6th
Geminids Meteor Shower
(the most intense of the 4, if you can only shoot one, go for this one.)
Peak: Night of December 13th into the morning of the 14th
Ursids Meteor Shower
(This year a full moon will obscure all but the brightest meteors)
Peak: Night of December 21st into the morning of the 22nd
Quadrantids Meteor Shower
Peak: Night of January 3rd into the early morning of the 4th
As mentioned, if you think you are only going to try one meteor shower then go for the Geminids, it’s always the most intense with upwards of 100-120 meteors per hour at it’s peak. Last year’s Geminids were amazing all night.
These times mentioned are for the Pacific Coast of the USA. Check locally for the best viewing times in your area. Some meteor showers peak for as long as 24 hours while others peak for just 4-5 hours.
What you will need to photograph a Meteor shower:
Dark Sky
Camera that can be set manually
Lens, preferably a super-wide to get the most area of the sky in photo, that can be focused manually
Sturdy, reliable tripod
Remote release or the ability to set the camera’s self timer and/or time-lapse mode
A Red Enhancer filter to filter out light pollution for better color (optional but recommended)
Dark Sky
The darker the sky the better because light pollution caused collectively by millions of city lights hides all but the brightest object in he night sky. The brightest meteors can be seen from anywhere but its best to get as far away from lights of the city as you can. You can search for dark sky nearest you using:
http://www.darkskyfinder.com
Or
http://www.darksky.org
Next, check and double check the weather in the dark sky location you have chosen. There is nothing worse than driving for 4 hours or more just to be clouded out.
Tip: Once you choose your dark sky areas plan to get there 1-2 hours before sunset so you have time to find the exact location and composition you want. When you have your composition set up your tripod and lock the camera down in it so it won’t move.
Camera, you will need a camera that you can focus and control all of the settings manually; these days, that’s almost any DSLR or mirrorless camera.
Now lets run through the camera settings quickly.
Set your camera’s control dial to “M” for controlling the shutter speed and aperture manually.
Determining the Shutter Speed
The 500 Rule introduction: 500 / focal length of the lens = maximum shutter speed
You might have heard of this before, it’s a rule of thumb where you take 500 and divide it by the focal length of the lens you plan to use. The resulting number is the longest shutter speed (in seconds) you can use and still get pinpoint stars. Longer shutters speeds would record the starts movement as a blur or “star trail”.
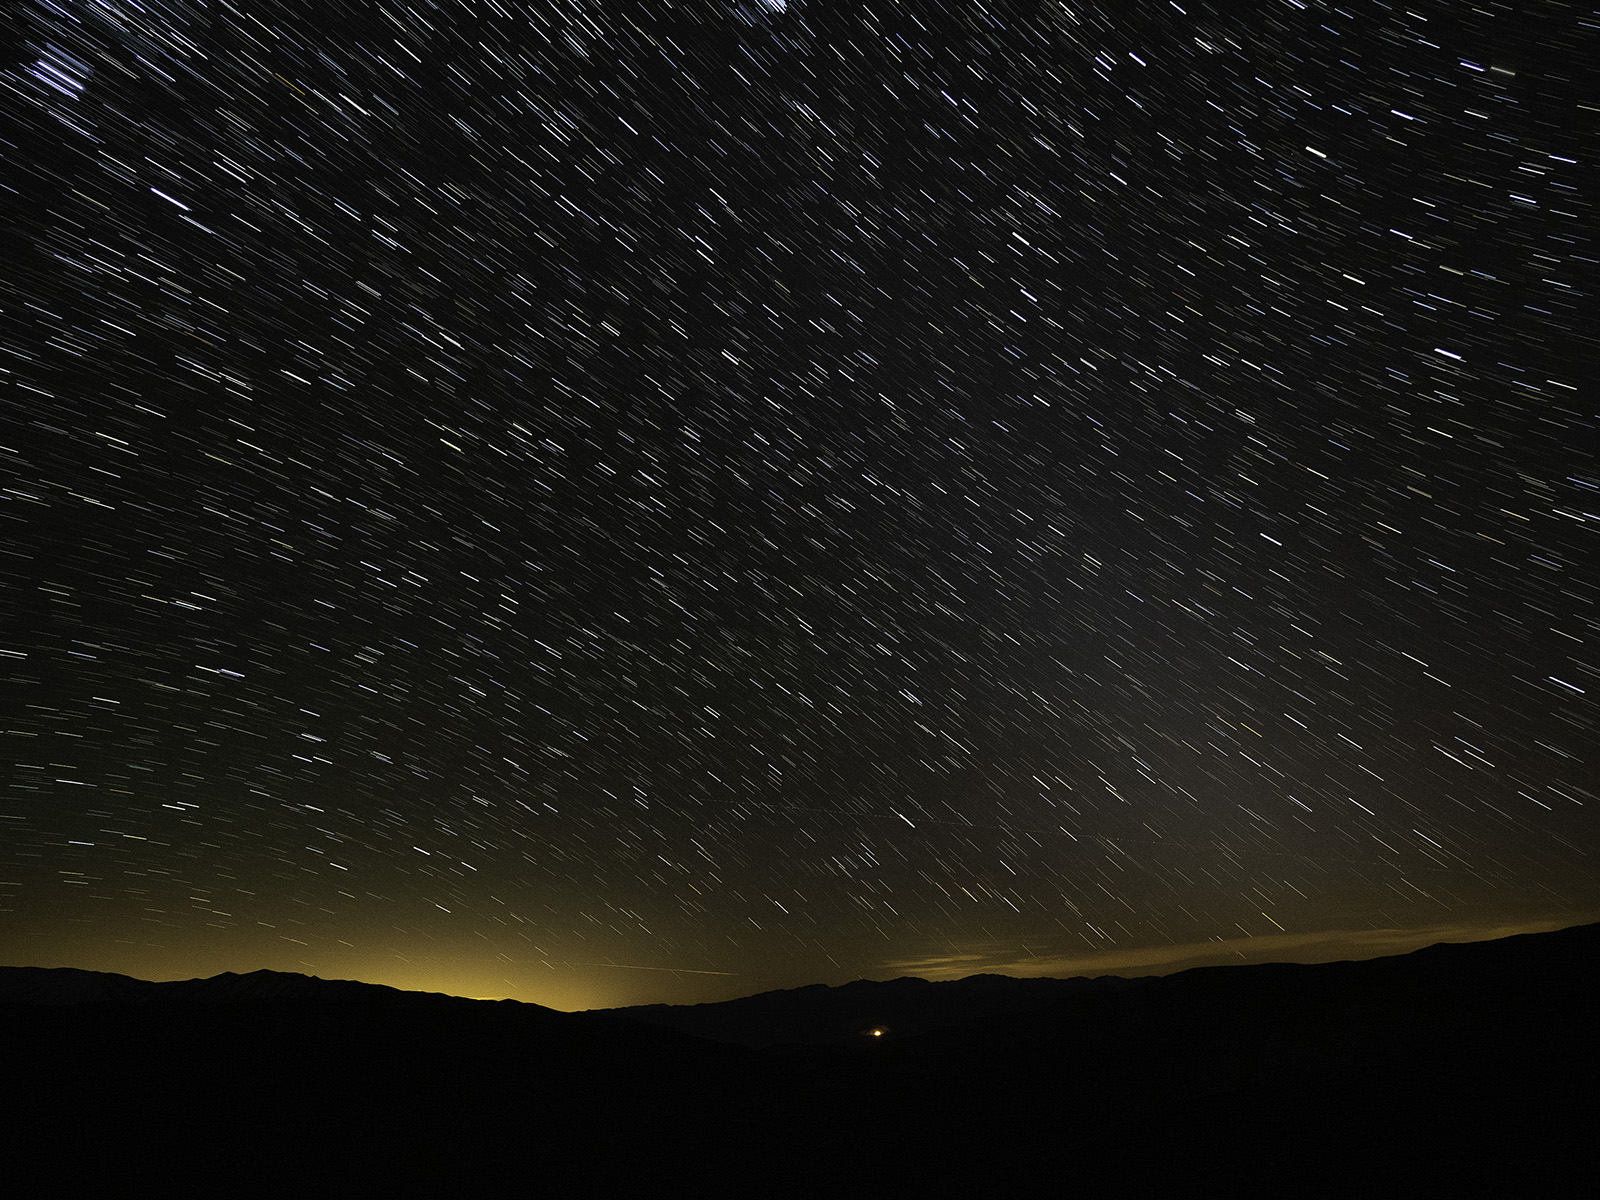
(This is an extreme example of Star Trails but this is what they look like and what you want to avoid when shooting meteors)
Example
Say I have a Nikon D750 full frame camera and a 16-28mm f/2.8 lens that I plan to shoot at 16mm. I would take 500 and divide it by 16mm to get 31.25. Then round that number down to 30. 30 seconds would be the long shutter speed I could set with this lens and still get pin-point stars.
For cameras with APS-C (DX) sized sensors: You would first have to convert the focal length to a full frame equivalent then divide that number into 500.
Example: Say I have a Canon 80D with a 14-20mm f/2.0 lens that I intend to shoot at 14mm. I would multiply the 14mm by the sensor crop factor of 1.6 to get 22.4, rounded to 22 or 22mm in full frame terms. Now take 500 and divide by 22 to get 22.73 or 22 seconds. Rounding down is always better in photographing stars and most cameras can’t set a 22 second shutter speed so round down to 20 seconds. That is your shutter speed.
These long exposure times give you a better chance of capturing a meteor or meteors in the shot while still keeping all the stars as points of light.
Set your Aperture
No matter what lens you plan to use you want to allow as much light as possible to come through the lens and onto the sensor so set your camera lens to the widest aperture, expressed by the lowest f/ number, that the lens will allow. This could be f/2.0, f/2.8 or even f/3.5 or 4.0 on some lenses. If you have an F/2.8 lens use 2.8, etc. I have had excellent results with the Tokina 14-20mm f/2.0 and 11-20 f/2.8 lenses.
Set your ISO
The ISO setting controls your camera’s sensitivity to light. For shooting meteors or other astro photography set a higher ISO such as 1600, 3200 or even 6400 if you are using a kit lens that has a f/3.5 or 4 aperture.
Focus at Infinity
There isn’t enough light at night for the camera’s AF system to function. This is probably the trickiest part and usually takes a little guesswork to get the focus dialed into infinity properly. The problem with just setting the camera/lens to manual focus and then turning the focus ring to infinity is that the infinity marking on the lens assumes that they lens is at a normal room temperature. Outside at night in the winter the glass contracts as it cools and the actual focus points begin to differ from the focus scale on the lens. Start with the lens set at the infinity marking and take a photo using the shutter speed you just calculated. Now look at the picture on the camera’s screen and zoom in to 100% to see if any visible stars are sharp points of light. If they are not, turn the focus ring just a little towards the closer focus and repeat to see if the stars are in sharp focus or at least in sharper focus. This is little trail and error but you should be able to nail the focus in just a few minutes. I recommend bringing along some painter’s or gaffers tape and once you have the lens focused at infinity tape down the manual focus ring to the lens barrel so it won’t move if you hit it by accident.
Tip: Leave your camera with the battery removed and lens outside the warmth of your car, tent or house if you are luck enough to live in a dark sky area. That way the equipment will be cool down and it will be less likely to focus to shift while shooting. The same goes for after the shooting is finished. If you bring a cold lens inside the house or warm car it will fog up almost immediately. Place it in a plastic bag and seal it if you have bring it in.
Tip: Keep the batteries warm in your pocket until you are ready to start shooting to get the most use out of them in cold weather.
Light Pollution Filters
In the USA and Europe, even in dark sky areas, there will still be brownish color cast caused by light pollution on the horizon and possibly over the entire photo. A Kenko Red Enhancer No.1 filter will filter out a lot of light pollution giving a more natural color balance. This saves a lot of time in post processing and yields much better, natural color in the final image. Many photographers that do astrophotography a lot consider this filter a necessity and I recommend it highly.
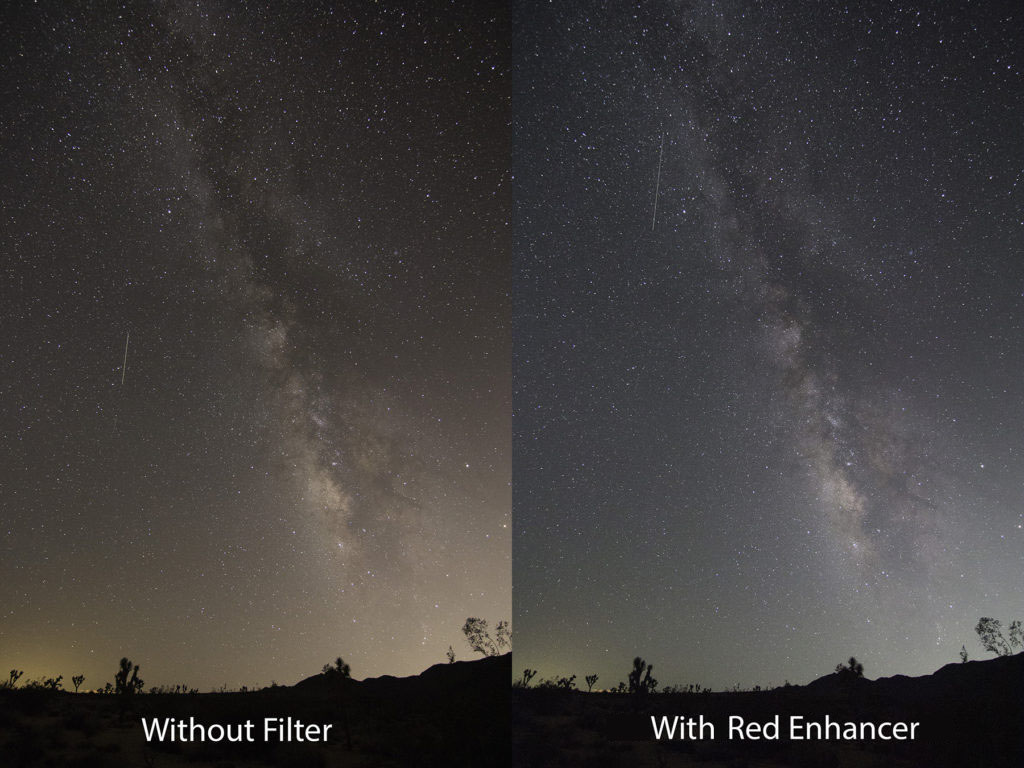
(These two photos are converted from unedited raw files straight out of the camera to show the color difference before editing for with/without the Red Enhancer/Intensifier filter.)
Here is a brief video clip that shows the effects of the Kenko Red Enhancer No.1 filters on a couple different scenes. The first 25 second of the video shows the other use of the filter, enhancing the color saturation of red and orange colors making it a great filter for autumn foliage.
(This photo was about an hour before sunrise at the trail end of a summer meteor shower. I was about to pack it up and move to another location to shoot the sunrise when this little guy showed up.)
Once you have the camera’s shutter speed, aperture, ISO and focus set the last thing to do it set the camera or the camera’s remote to do time-lapse photography. This is a setting where the camera will take photos automatically at predetermined intervals. Meteors can happen at any time during a meteor showers and each meteor only last a faction of a second so its best to set up your camera to automatically take a photo every 4,5, 6 seconds until the battery runs out. You end up with a lot of throw-aways but you will also capture the most meteors this way. Once this is all set, let it rip and then sit back and enjoy the show!
About the author
Michael Burnham is a professional photographer and photo-blogger based in Los Angles, California. He has been an avid photographer since the age of 10 and pursued a degree in photography in college, graduating with a BFA in art photography. He is currently serving clients as well as working on several personal photography projects in his area.


I attempted shooting the late summer meteor shower but had problems with dew forming on the lens. Any tips on how to prevent this?
Very helpful to a nite sky beginner. easy to follow & understand.
I also enjoyed the red filter examples…am going to buy one as my self Xmas present.
Lens warmers.