About the Author:
John is an award winning Photoshop Instructor and Professional Photographer living and working in the Greater Toronto Area and is on the faculty at Humber College.
Shooting panoramas is fun and easy to do provided you follow a few simple rules. If you are not paying attention to what you are doing, you could end up spending way too many hours in front of your computer fixing your mistakes.
Software today and in particular, Photoshop, can help you create some amazing panoramic images. The newer processing capabilities of recent versions of Photoshop really do a good job of lining up the images and if you shoot a steady series of images with good and consistent exposures, you will end up with panoramic images that you’ll be proud to display and show off to all of your friends and clients.
You can shoot for the purpose of creating panoramic images either hand held or with the assistance of a tripod. Generally using a tripod will allow you to keep your images lined up evenly, but that is not always the case. You also have to make sure your camera is level as well. If you ever plan to shoot 360 degree panoramas, you’ll also need a special panorama tripod head and a tripod leveling device.
For the purpose of this article, I will discuss shooting panoramas hand held. After all, it’s the easiest and simplest way to create them.
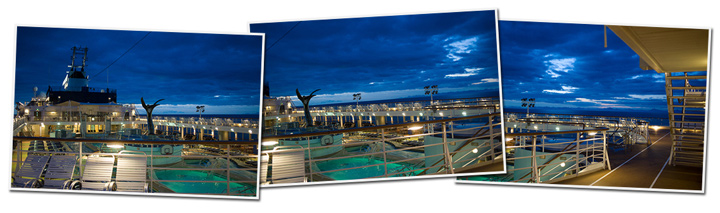
Panoramic Image of cruise ship deck at 11:00 pm at night.
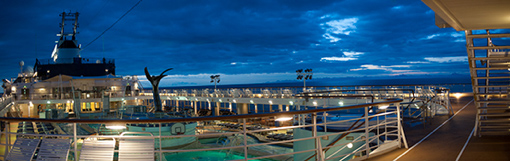
I think the first thing you have to determine is whether you are going to shoot in the portrait or landscape orientation. Subject matter and lens choice will help you out with this decision. Generally you will want to shoot vertical. That way you will end up with a final image that has some height to it but as you can see from the image above, shooting horizontal may be the right way to approach it. This image was shot on a Nikon D700 using a 35mm f2.0 lens. If I had shot this in the vertical orientation, there would have been too much sky and too much of the running track on the deck itself. For those that are interested the ISO was 800 and the exposure was 1/30 sec @ f2.8, hand held.
Shooting a scene in horizontal orientation may require 5 images, which will yield a very long image that is not very tall, but it just may work, as you will soon see in the example I plan to present. But if this scene were any wider I would need possibly 10 images to create the panorama and it would definitely be a long skinny photograph.
Shooting that same image area that I mention above using 5 landscape images will take at least 10 to 15 images in the portrait orientation. This just means that the computer will have to work much harder to merge everything together. I have created some amazing 8-inch high by 40-inch wide panoramic images using the vertical orientation method.
Rules for shooting panoramas include but are not limited to the following:
Shoot in Manual exposure mode – this way your scene does not have one shade of blue sky on the left and a completely different brightness value for that same sky on the right.
Meter the scene and take an average of the light and dark areas. (If you have a hand held light meter and if it’s convenient to use, please use it).
Now that you have determined the appropriate exposure, manually focus your lens and do not re-focus in between shots. You do not want some images to be burry and other crisp and sharp.
Stand still, keep your camera steady at the same height and practice panning from right to left and then from left to right. Think of it as a pivoting motion from one spot and the closer your camera is to the centre of your rotation the more accurate the end result will be.
NOTE: If you want to see why this is important, try this after you have captured using the above technique. If you also try the following, you will really see how messed up things can get. In a sequence of say, five images, take the first one as you would normally and then pan to your right (or left) for the next shot but before you click the shutter, extend your arms all the way out and then take the picture. Now pan to your right (or left) again and before you take the next picture, bring you arms back in to a more normal position. Repeat this extending and contracting of your arms until you have all five images captured. This should be interesting to see.
Make sure you have about a 25% overlap from one image to the next. The software needs many common elements to line up from each frame.
The next step is to process these images on your computer using any software you want. I believe the majority of readers will be using either Adobe Lightroom or Adobe Camera Raw and Bridge to begin with and move on over to Photoshop to do the actual photomerge.

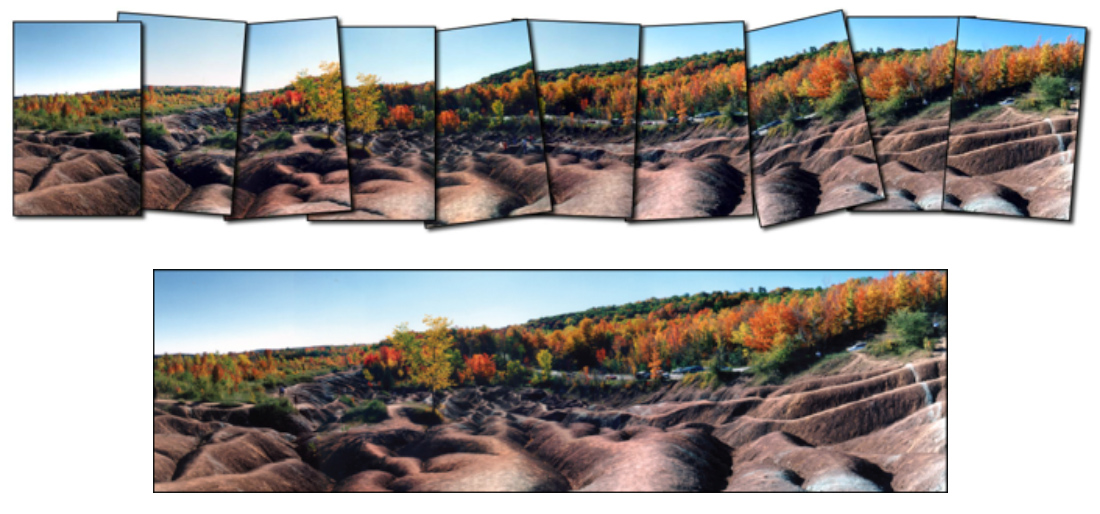
I shot these up in Tobermory at the tip of the Bruce Peninsula a few summers ago. This was not planned, I was just walking around where the boats come in and saw this scene and thought it might lend itself to a Photoshop Photomerge.
So these are all shot hand held – no tripod.
After importing these images I chose the ACR/Bridge route to generate my panorama image. Once I selected the five images in Adobe Bridge, I accessed the Tools Menu and from there, chose Photoshop and finally Photomerge.
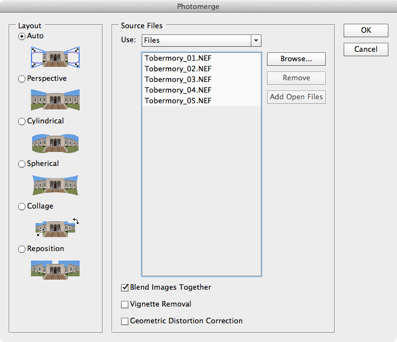
This is the Photomerge dialog box with the five selected images listed in the Source Files section. Using Adobe Bridge or Lightroom to invoke the Photomerge dialog allows us to use our 16-bit RAW files, which is pretty cool in itself.
This is going to give me high quality files to edit after all is done. When you think about it, it is quite amazing that we can get Photoshop to do this Photomerge thing straight from RAW files.
I think I could have speeded up things a bit by reorganizing the files in their proper order. If you notice, I shot the images from right to left but Photoshop creates the panorama from left to right.
There are basically two sections to this dialog box; Layout and Source Files. The layout section allows you to choose how you want the images stitched together. For our purposes, the Auto option would be best as long as the images were captured properly. If you find that your end result did not blend and merge well, you may want to choose the Reposition option, which allows you to line things up manually.
After I have verified that all of the necessary images have been selected and that the Auto Layout option has been chosen, the only other item I want to check off here is the Blend Images Together check box. The other two check box choices do not offer any benefit to my images. The Vignette option would be used if my images had vignetting in them, which they don’t. The Geometric Distortion would help I was shooting with a really wide angle lens.

Wow, look at what Photoshop created for us. Absolutely amazing!!
This is what our Layer’s Panel looks like. Photoshop has placed each individual image on its own Layer and created a Layer Mask (the black & white icon to the right of each Layer thumbnail) for each to assist in the blending process. The white part in the Layer Mask represents the portion of the image that is being revealed to us from each Layer. Notice that they are all different. Check out the middle Layer, number 3, and notice how little of that particular image is actually being used. If I had a different amount of overlap when taking the images, then the appearance of each Layer Mask would be different.
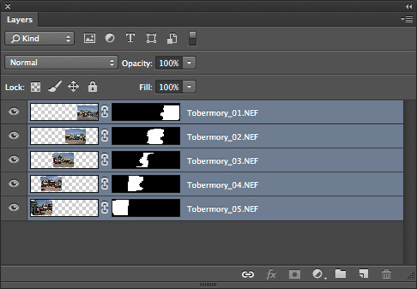
Since Photoshop’s Photomerge feature did such a good job of blending the individual images, there really isn’t much need to do any editing to the final result except to crop out the transparent areas. If I had used my panoramic head, leveler and tripod, there probably would not be as much to crop out and I would end up with more image area but this looks really great as it is.

One last thing I want to discuss here is the actual size of this panoramic image. To find out how wide and how tall this image is, in Photoshop go Image > Image Size. The resulting dialog box should look like this.
Notice that both the width and height are locked together and the Resolution is set to 72 pixels per inch. We are also viewing the width and height as a percentage right now, but we will change that shortly.
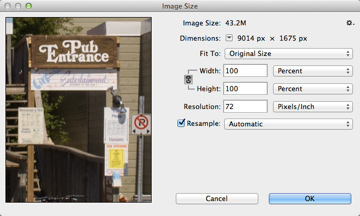
Changing the width and height to display in inches shows us that our image is a whopping 125 (over ten feet) inches wide and almost 2 feet in height. That’s nice but we can’t print this out and expect to get any decent quality at this resolution of 72 pixels per inch. In order to get this to print out nicely we will need to change the pixels per inch from 72 to 300.
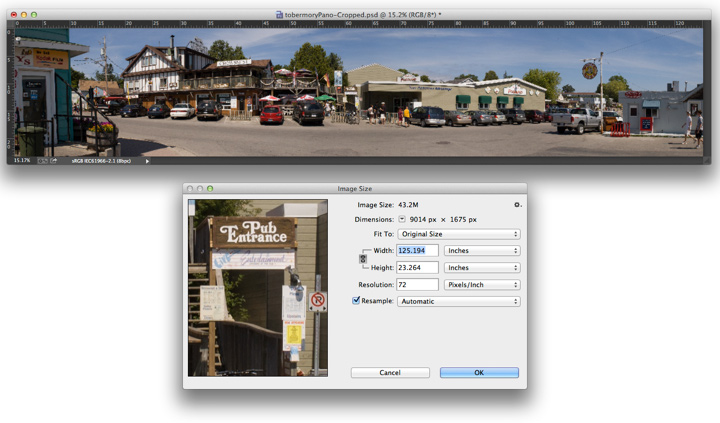
In order to change the resolution of our image but not add or take away any of the pixels, we need to uncheck the Resample check box. Doing this groups all three variables, width, height and resolution together so changing one affects the others. Now that I have set the printing resolution to 300 pixels per inch, the width and height have fallen into something we can more readily relate to; a 30 inch by 5.5 inch print.

One last thing I would like to mention is creating panoramas or photo-merged images does not have to be restricted to horizontal images. Try shooting panoramic images vertically such as tall buildings or totem poles.
You can even try shooting in what I like to call clusters. What do I mean by clusters? Think of it this way. If you find yourself in a tight environment that you wish to photograph and when you frame the scene using a wide angle lens, in order to get it all in, the important stuff that you first envisioned ends up being so small that the original image you saw in your mind’s eye is gone. Well, what if you were to switch lenses and put on say a 50mm lens, and then shot that scene in smaller pieces, overlapping areas until you have it all covered. Try it out. I think you’ll be amazed and impressed by what you can do if you just think outside that box we seem to be stuck in so often.
In future articles I will expand on shooting 360 degree panoramas that you see on Real Estate web sites, Hotel web sites and tourist destinations all over the world. I also plan to have an article that will walk you through the editing process of panorama images that were not photographed with the correct exposure and the needed to have each layer adjusted and balanced to complete the master piece.
 In 2005, John was the first ever recipient of the Dean Collins Photoshop Educator Scholarship Award presented by Scott Kelby, President of the National Association of Photoshop Professionals (NAPP).
Web sites: www.thephotoshopchannel.com & www.firstframephotography.ca
All Photos by John Warren