
Photoshop Professor Notes series
Introduction
Sharpening our images using the Overlay Blending Mode in combination with the High Pass filter has been around for quite a while now and some of you may even use it at this point but I am going to explain why it works so well. I am also going to incorporate a touch of Unsharp Masking to this technique which I got from Bruce Fraser who wrote an entire book on the subject of sharpening. There are many approaches to sharpening our images and I am discussing this approach because, if I am not mistaken, it is the same approach that Adobe has taken or incorporated in their Lightroom application although I believe that in Lightroom it is used with a scaling algorithm based on output size whereas in this example, which will be performed in Photoshop, is based on a typical 8×10 glossy print.
Sharpening using the High Pass Overlay method
Before we get in to sharpening our images for output purposes (printing), I need to clarify a few things about sharpening. According to the Adobe philosophy of sharpening, there are three separate stages of sharpening, two of which are necessary and the third is completely optional; Raw sharpening which counters the anti-alias filter inside our cameras, creative sharpening which is optional and output sharpening which counters dot gain or ink spreading in printing.
The idea of sharpening our images is to create the visual appearance of a sharper image by increasing the contrast at edges in our image. To do this we need to make the lights lighter and the darks darker at these edges without changing the middle tones. The other thing we need to do is only increase this contrast to the luminance or brightness portion of the image and not the colour. Increasing the contrast in colour, increases saturation and we do not want to do this as it will change the appearance of our image. We only want to sharpen the tones in the image, not the colour information. Thank goodness Photoshop has a way to separate the colour information from the back and white information in an image.
Also, we can never sharpen an image in post production that was taken out of focus to begin with – not possible with what is commercially available to us today. Photoshop does however have a Shake Reduction Sharpening filter but only kind of works if there was camera movement on a sharply focused subject.
- Step 1. Start by duplicating the Background layer in our image.
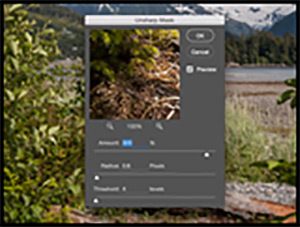
- Step 2. Go Filter > Sharpen > Unsharp Mask and use the following values;
- Amount = 320%, Radius = 0.6 pixels & Threshold = 4 levels and click OK
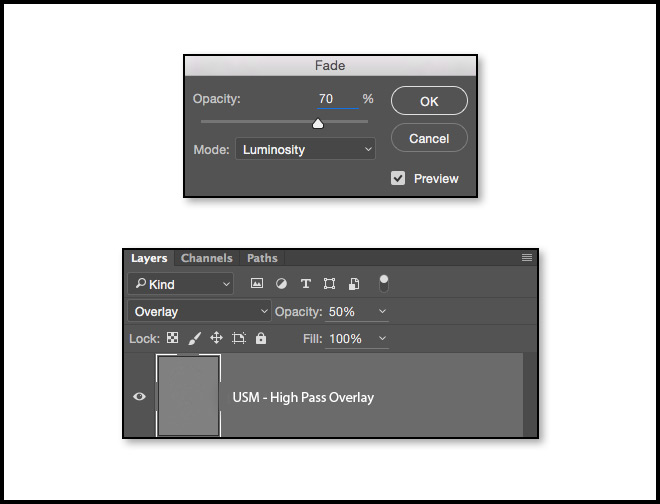
- Step 3. Go Edit > Fade Unsharp Mask … and use the following values;
- Amount = 70% & Mode = Luminance and click OK.
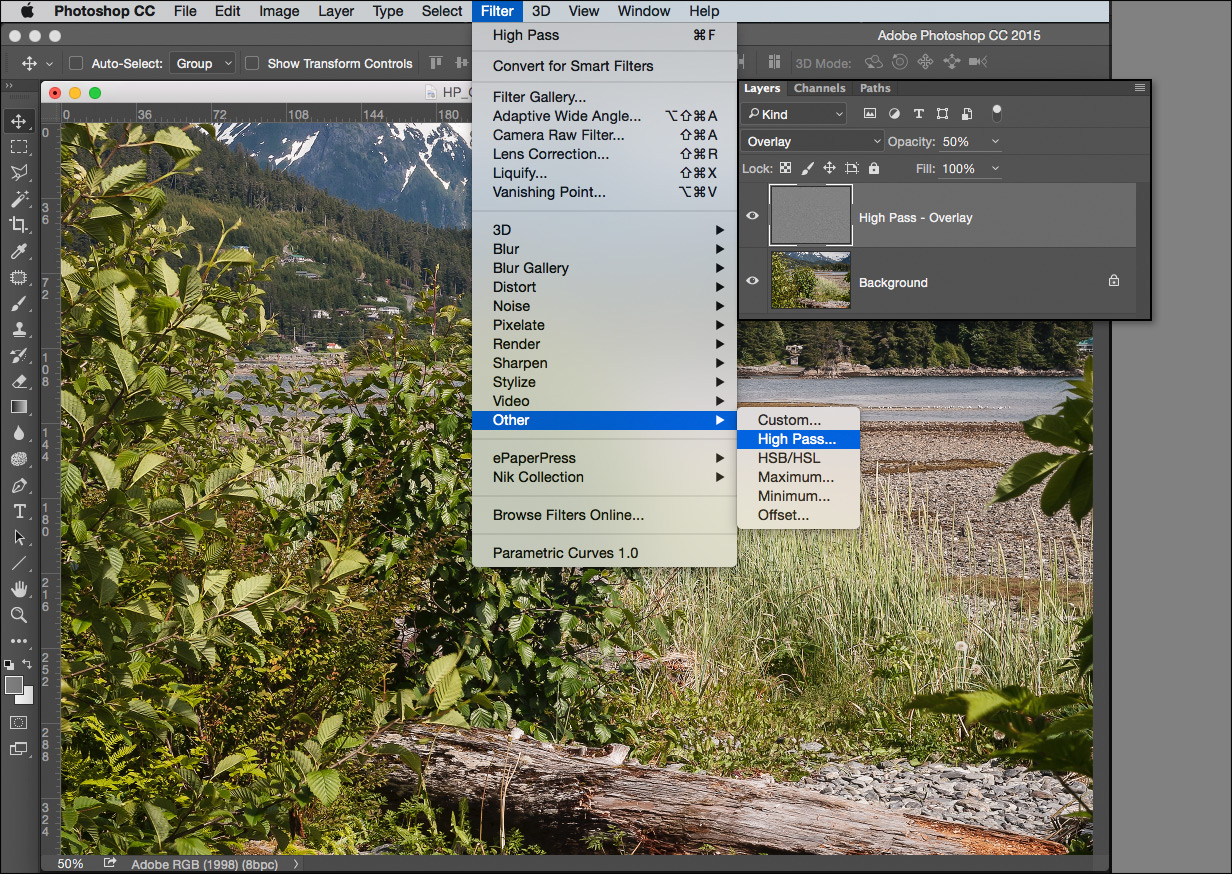
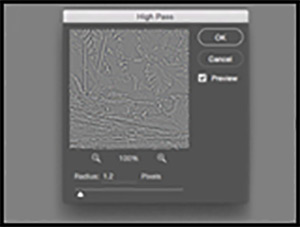
- Step 4. Go Filter > Other > High Pass and set the Radius to 1.2 pixels and click OK.
- Step 5. Change this layer’s Blending Mode to Overlay
- Step 6. Reduce this layer’s opacity to 50%.
Please remember that the above values are for 8×10 inch images and possibly 11×14’s that have a resolution of 300 pixels per inch. If you are printing smaller such as 5×7’s or 4×6 inch prints then you may have to reduce things a bit and if you are enlarging more then increase somewhat. I would start by decreasing and increasing the opacity of the Overlay layer myself.
At this point you will have a multi-layered image file; if you save it as is, it will become a multi-layered Photoshop file (psd) but if you are planning on printing this image at a photo lab, remember to convert the colour profile to sRGB by going Edit > Convert to Profile and choosing sRGB and then do a File > Save As … and choose JPEG. Choosing JPEG will automatically flatten the layers during the save process but still maintain the layers in the original PSD file.
If you are printing to an ink jet printer connected to your computer through Photoshop then I would leave the colour space to Adobe RGB (1998) and just print the Photoshop file.
About the Author:
John Warren is an award winning Photoshop Instructor and Professional Photographer living and working in the Greater Toronto Area and is on the faculty at Humber College.


Lab Color Space in Photoshop allows you to work on Color or tones separately. Unfortunately not many people know about how to use it in editing images. I use it all the time. The results are very controllable. I need to make some on-line tutorials.