
This is a topic I am asked about quite often not only in the classroom but out in the field, especially by those who are relatively new to photography with little computer experience.
This does not have to be complicated (and it can be) but it is more in the lines of overwhelming and daunting to say the least.
For those of you who are well organized and think in a linear fashion, must be wondering what all the fuzz is about. Believe it or not, there are those out there that are not as rigidly structured as others and their files tend to be scattered. I know first hand. I used to be one of them until I realized that if I don’t get a handle on this now, I may never. That was well over a decade ago and am I glad I took the time to figure something out.
The system I use today is one that has evolved over the years and I will be the first to admit that I did not come up with this method all on my own. It is a combination of many others systems and it may very well evolve a few more times. One thing to keep in mind is to make sure that whatever system or method you decide on using is that it is adaptable and expandable for the future. That last bit sounds worse than it really is. By the time most people decide to get organized, they have thousands upon thousands of image files located in several places on their computer, USB devices, external hard drives and even have their images saved on their SD and CF cards. I know some people that never format their SD cards but rather keep them as a back up copy. (The SD and CF card manufacturers must love these people.) I know they have their reasons but I don’t get it.
The task of organizing all of the image files can be overwhelming at first but if you approach and tackle it one small bit at a time (no pun intended), before you know it, the job is done.
The first thing I believe you should do is create a master folder where all of you images will live from now on. I have named mine “Images” for the main reason that there was no folder on my computer named that. I placed this new folder at the same level on the hard drive as my “Documents” folder, my “Pictures” folder and so on. I do not use the folder named “Pictures” because a lot of imaging software use this folder as the default folder to place stuff in.
Before you go and start gathering all of your images to place inside this new folder I think it would be wise to come up with a game plan as to how you are going to name things and what kind of folder structure you are going to have in place.
What I mean is; “how are you going to start to organize things”? By event? By date? I think by date would be a good way to start because it’s easy to do. In your folder, set the method of displaying the contents to list view and then select the “Date” column. I would also click this “date” column tab so that it displays the earliest date at the top of the list. This way you know how far back your images go.
Next I would create folders by year. Inside each individual year folder, place folders representing each month. This is easier than it sounds because you only have to create the 12 folders once and then copy and paste them into each year.
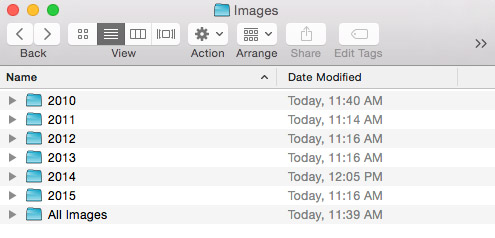
I would also create one last folder and name it something like “All Images”.
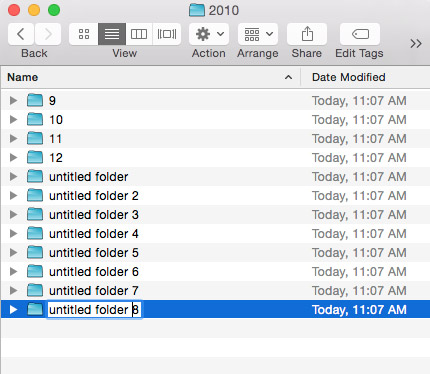
Here I am creating the monthly folders. It’s really simple -‐ just create all of them at once and then renaming them is as easy as deleting the text before the number.
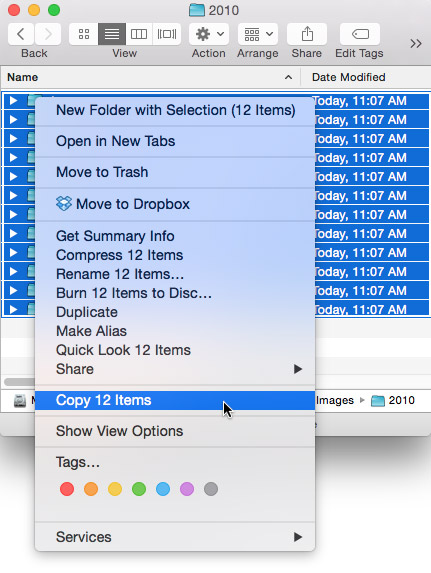
Here I am selecting all of the monthly folders I just created in my 2010 folder and I am doing a right-‐click which brings up a contextual menu and I am choosing “Copy 12 Items”.
Next I will go back to my “Images” folder and right-‐click on the 2011 folder and choose “Paste 12 Items”. I will repeat this with the 2012, 2013, 2014 and the 2015 folders.
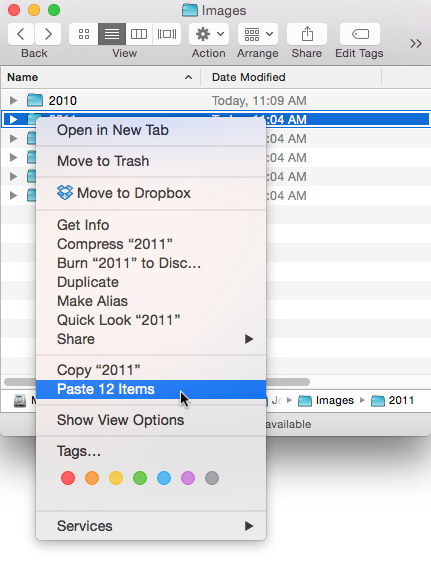
Here I am pasting the 12 monthly folders into each year’s folder.
Now, if you have folders full of images named after their specific event or just randomly thrown inside various other folders for no other reason than … just because, then your first task is to gather all of these loose image files and folders (full of images) regardless of how they are named and place them inside this newly created “All Images” folder.
Have both the “All Images” and “Images” folder windows open. In the “All Images” folder window, make sure the “Date” column is set to display items from the earliest at the top to most recent at the bottom of the list.
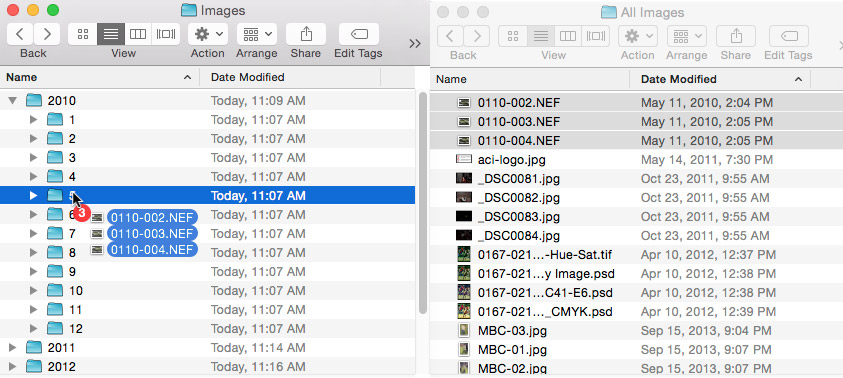
In this case, in the “All Images” folder, I have 3 images dated May 2010 at the top. Now go to the “Images” folder and click on the disclosure triangle beside the folder for the year 2010. Now it’s just a matter of going back to the “All Images” folder and selecting these 3 images and dragging them over to the “05” folder.
Repeat this process until all of your images are in their respective folders. This may be a daunting task as first but if you work on this a few minutes each day, before you know it, the job is done.
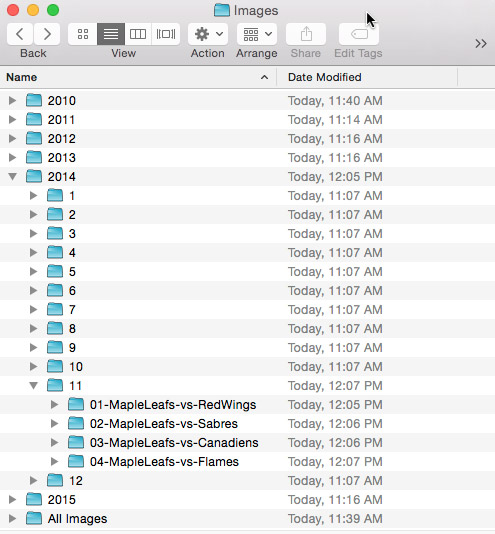
Now, if you shoot little Timmy’s hockey games and he plays once a week, you’ll have four separate games in any given month. In this case you should think of naming these folders sequentially. For example in the month of November of 2014 there would be four folders starting with “01-‐text-‐descriptor”, “02-‐text-‐descriptor”, “03-‐text-‐descriptor” and “04-‐text-‐ descriptor”.
At least this part of the organizing is done. We still need to address the fact that the image names are a freaking mess still. Some are named based on what the camera named them, others have descriptive names and others have a numerical sequence naming convention.

In order to take care of the naming of your files I think it would be best if we did this sort of thing in image browsing software such as Adobe Bridge, Lightroom, Aperture, iPhoto, Capture One or whatever you have chosen to use.
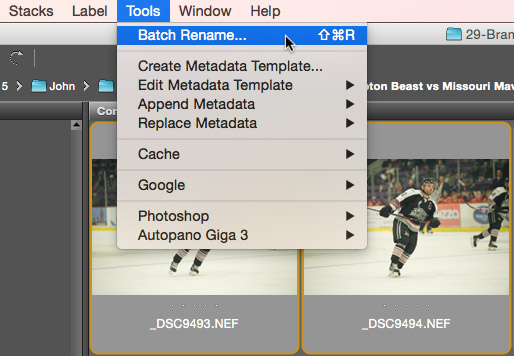
Here I will use Adobe Bridge but it would be a similar process in other software. Select all of the images in the folder that you want to rename. generally a Command + A (Mac) or a Control + A (Win) will do it for you.
Then go to the Tools Menu and choose the first option, Batch Rename ….
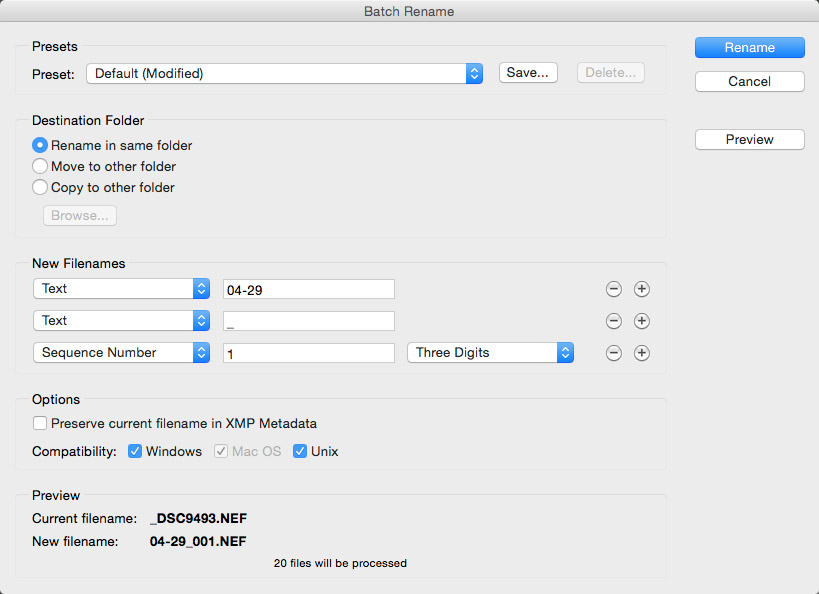
The resulting dialog box can be somewhat intimidating so I will try to keep things simple.
There are five sections in this dialog box starting with Presets. For now just leave it on “Default”.
Next we have Destination Folder.
I always choose “Rename in same folder”.
Next we have New Filenames.
This is the tricky part because everybody does this a little different and I am no exception. Some people want to include the date in the file name and others want to include a text descriptor and so on. In this case I am going to have just a few numbers as my file name. Well, two groups of numbers in this case. The first group are the month and day of the month followed by an underscore and then a three digit sequence. I do not need to include the year in my file name because that has been used in the folder up a level or two. I do not need to add a text descriptor to the file name because that is in the folder name up one level as well. Since I like to keep my file names short and sweet, I am using here just the month and the day and then the underscore followed by the three digit sequence number. In this example; “04-29_001.NEF”.
If you look at the file structure, you’ll see what I mean. I don’t want to repeat the text “Brampton Beast vs Missouri Mavericks” in every file name. I don’t even want to include the year in my file names because it’s redundant at this point. If I need to find a file that was shot in say … 2014 or 2015, I just look under that year. If I do a search for Brampton Beast, all of those folders with Brampton Beast as part of the text descriptor will result. From there I choose the year I am looking for and then the particular event or game. This may make sense to you or it may not – it all depends on how your brain is wired. If it really matters to you then include the year as part of the file name.
It does not matter to me what naming convention you use, just as long as it makes sense to you. Don’t forget you can always change your system later on but for now you might want to keep it simple.
Whatever you do, please keep the same name all through the life of the image. There is no point in leaving the names as they come out of the camera and then after some editing of the image rename it to something completely different like “baby jane in yellow hat” and send that small jpeg version off to baby jane’s grandparents only to have the grandparents come back to you 2 years later and ask for a much larger version. In this case you would have to find the original Raw file and prepare it for a large print. Sounds easy enough except what file are you searching for? “baby jane in yellow hat.jpg” – No. That’s the file name of the small jpg. You have to try and remember when and where that photo was taken and then you’d have to search through all of ….. I think you are getting my meaning.
Now, including the unique words such a baby jane and yellow hat is a great idea but not in the file name. Those are better served as Keywords and we’ll discuss that and descriptions in the next instalment of “Organizing Your Image Files”.
Final Notes:
I believe this to be a very simple but detailed file structure that most people can understand work with right away. You may not agree completely with the structure presented here and I do not claim that this is the best and only solution to organizing your image files but, it is one method that will help you become more structured and organized. A lot of people pick and choose bits and pieces of what I have presented here and make up their own system that makes sense to the way they are wired.
One last note, get rid of any duplicate files unless they are part of your backup strategy. One thing that clogs up most people’s computer hard drives are unnecessary duplicate files which reside in different folders on the same drive.
Find some time and locate these unnecessary duplicate files and throw them into the trash. This will free up lots of space on your hard drive(s) which will allow room for new images.

About the Author:
John Warren is an award winning Photoshop Instructor and Professional Photographer living and working in the Greater Toronto Area and is on the faculty at Humber College.